v3.23.1

Getting Started Devices Gateways Integrations Reference
Get The Things Stack

Integrations

    Overview
  • Adding Applications
  • Adding Integrations
  • Cloud Integrations
    • akenza
    • AllThingsTalk Maker
    • AnyViz
    • AWS IoT
    • Azure IoT Central
    • Azure IoT Hub
    • Blockbax
    • Cayenne
    • Cloud Studio
    • Daizy
    • Datacake
    • deZem
    • Homey
    • InfluxDB Cloud 2.0
    • IoT in a Box
    • Kaa
    • Losant IoT Platform
    • MClimate
    • my IoT open Tech
    • Qubitro
    • TagoIO
    • Telemetry2U
    • Tellsens
    • thethings.iO
    • Thinger.io
    • ThingsBoard
    • ThingSpeak
    • TTN Mapper
    • Ubidots
    • UIB
    • Widgelix
    • Withthegrid
  • MQTT Server
  • Pub/Sub
  • LoRa Cloud
  • Node-RED
  • IFTTT
  • Payload Formatters
  • Storage Integration
  • Webhooks

Widgelix

Widgelix is a flexible IoT service, which supports zero-code and low-code features, helps to connect any device and build custom applications for device management and data visualization.

Prerequisites

  1. A user account on Widgelix.

Setup Widgelix

Create a Data Converter

Note:
Skip this section if you are already decoding data on The Things Stack using payload formatters.

Navigate to Data Converters on the left hand menu, then click Create Data Converter. Give a Name to your converter, then edit the default JavaScript converter code or create a new one.

Optionally, you may provide a test payload and check the converter. The resulting output of your converter should be a flat JSON object.

Create Data Converter

Create Device Type

Device types allow to join same devices in a single group, manage simultaneously and assign Rules, Widget Sets, Data Converters and Data Flows.

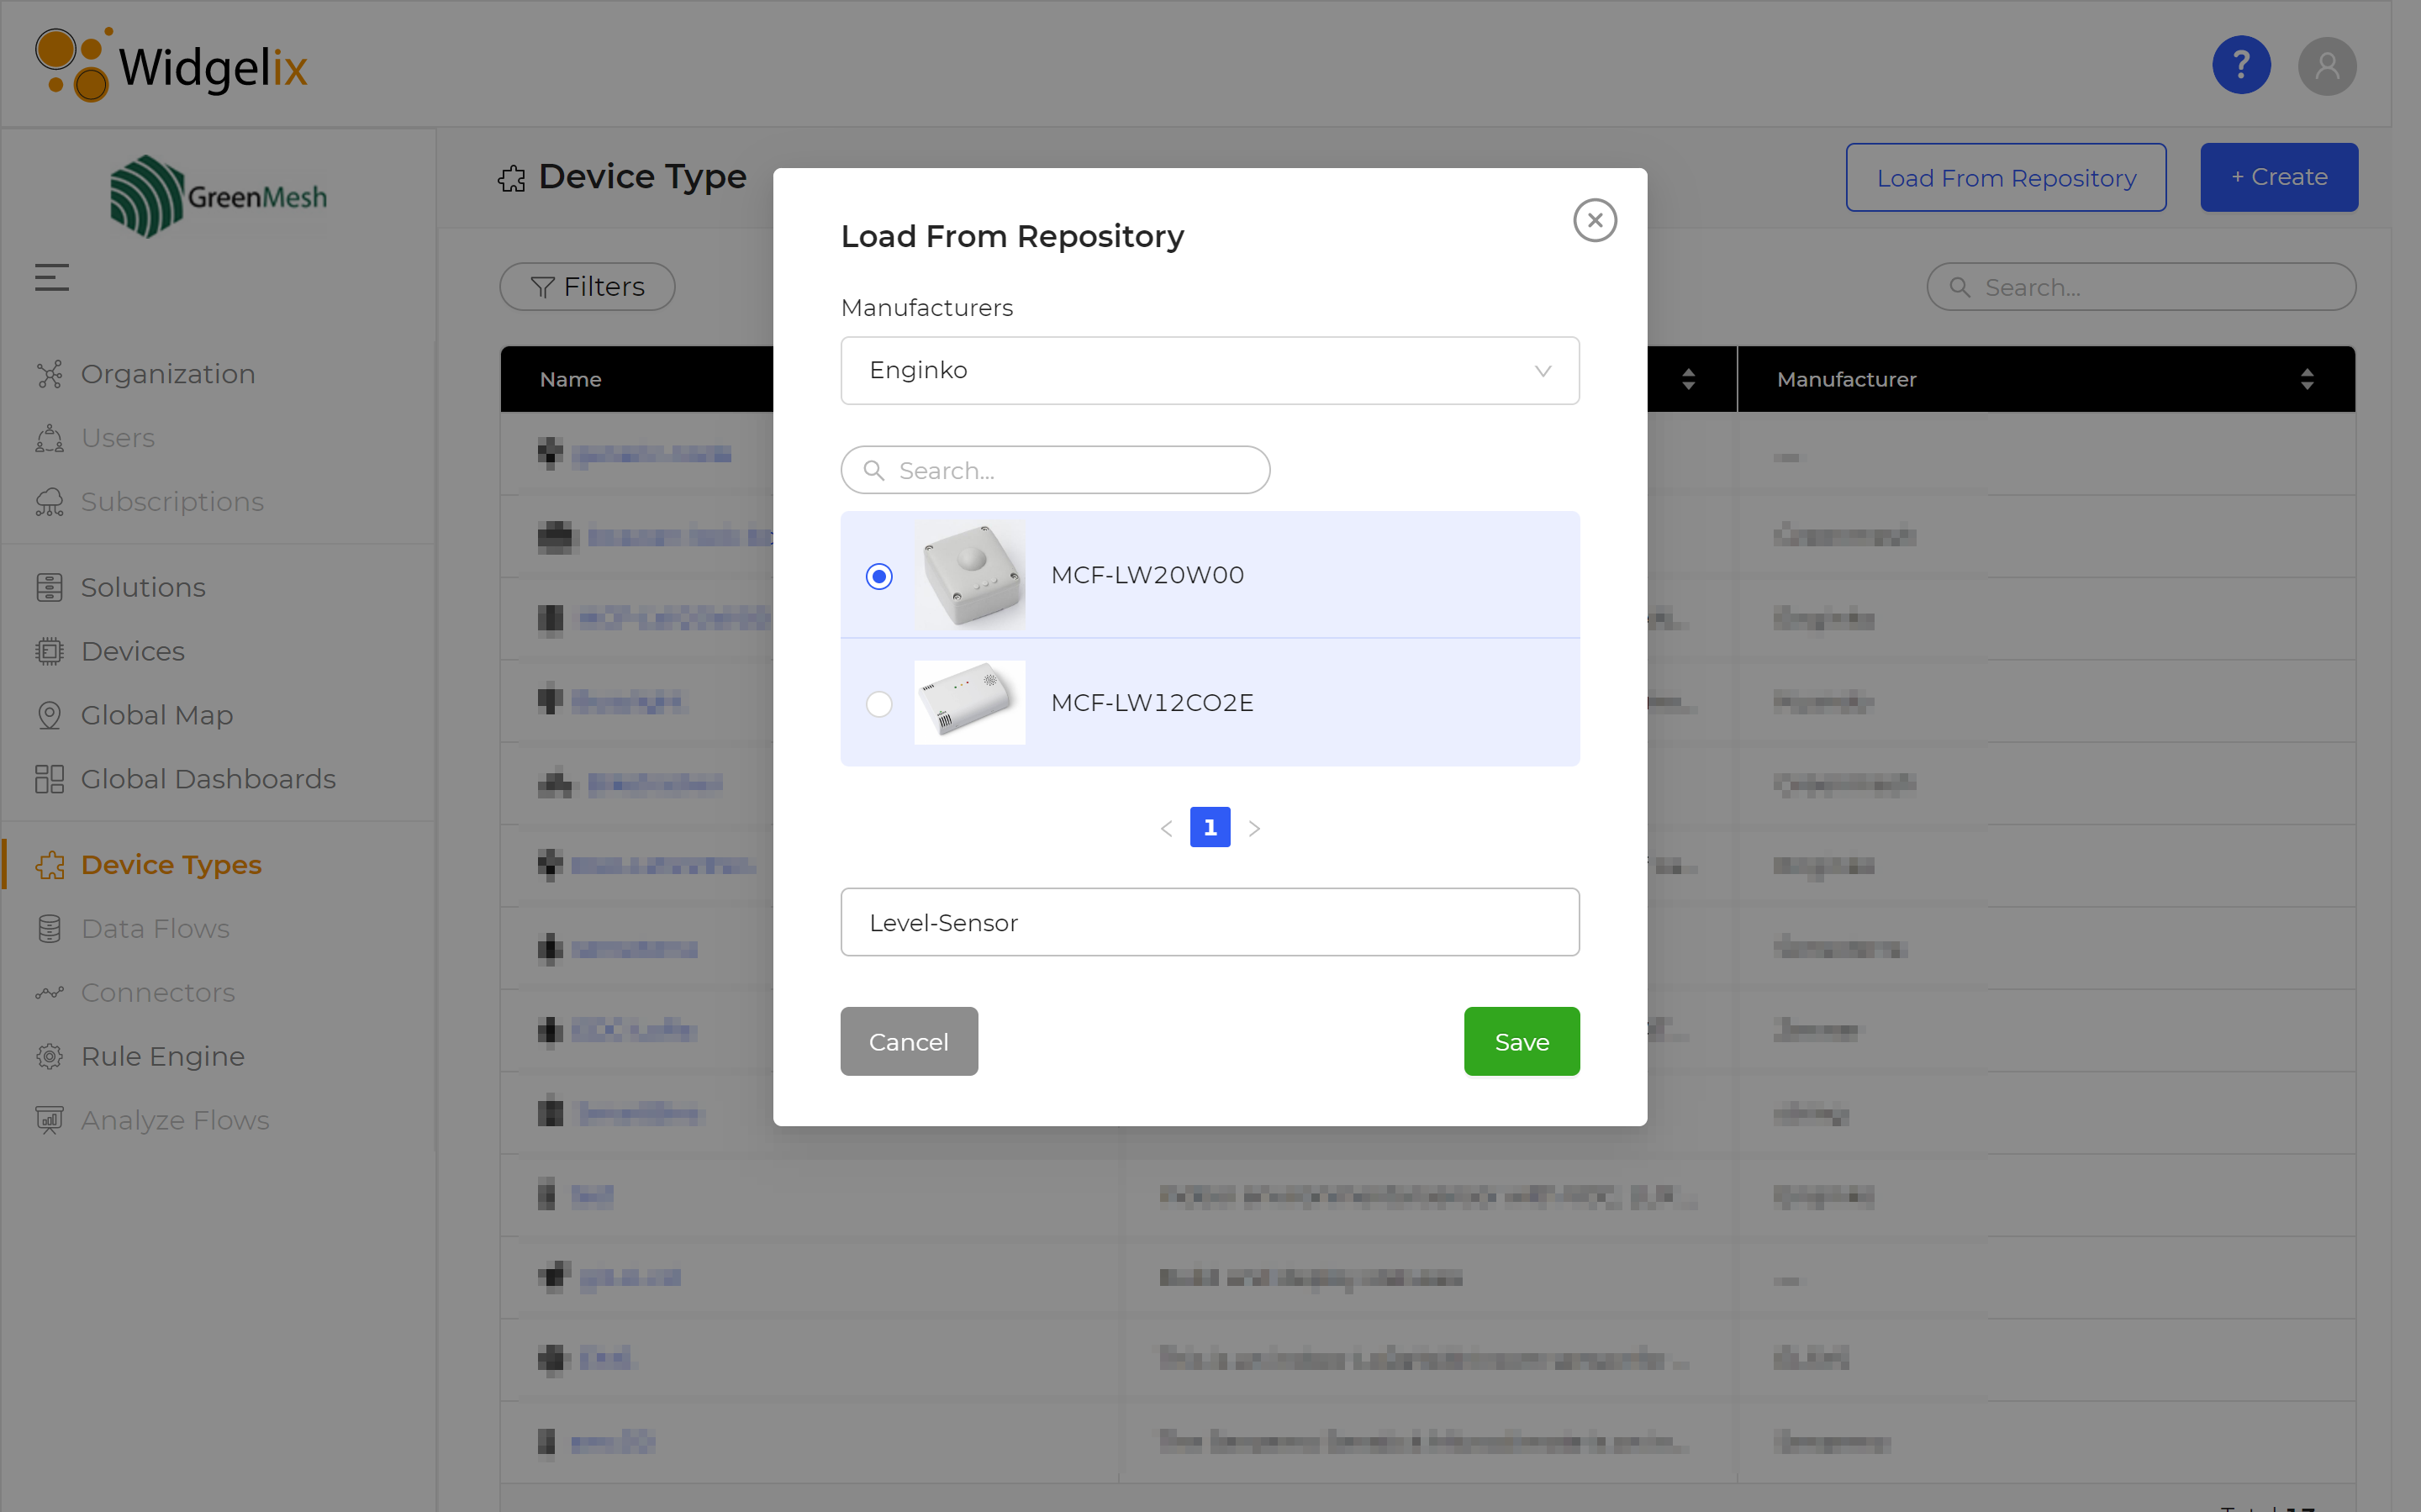
Navigate to Device Types on the left hand menu, then click Create Device Type button.

Give a Name to your device type, and fill the Description and Manufacturer fields (optional).

If you previously created a data converter, you can assign it under Uplink Data Converter. In the Data Fields input, you need to provide all required keys from your resulting flat JSON object.

Create Device Type

Add Device

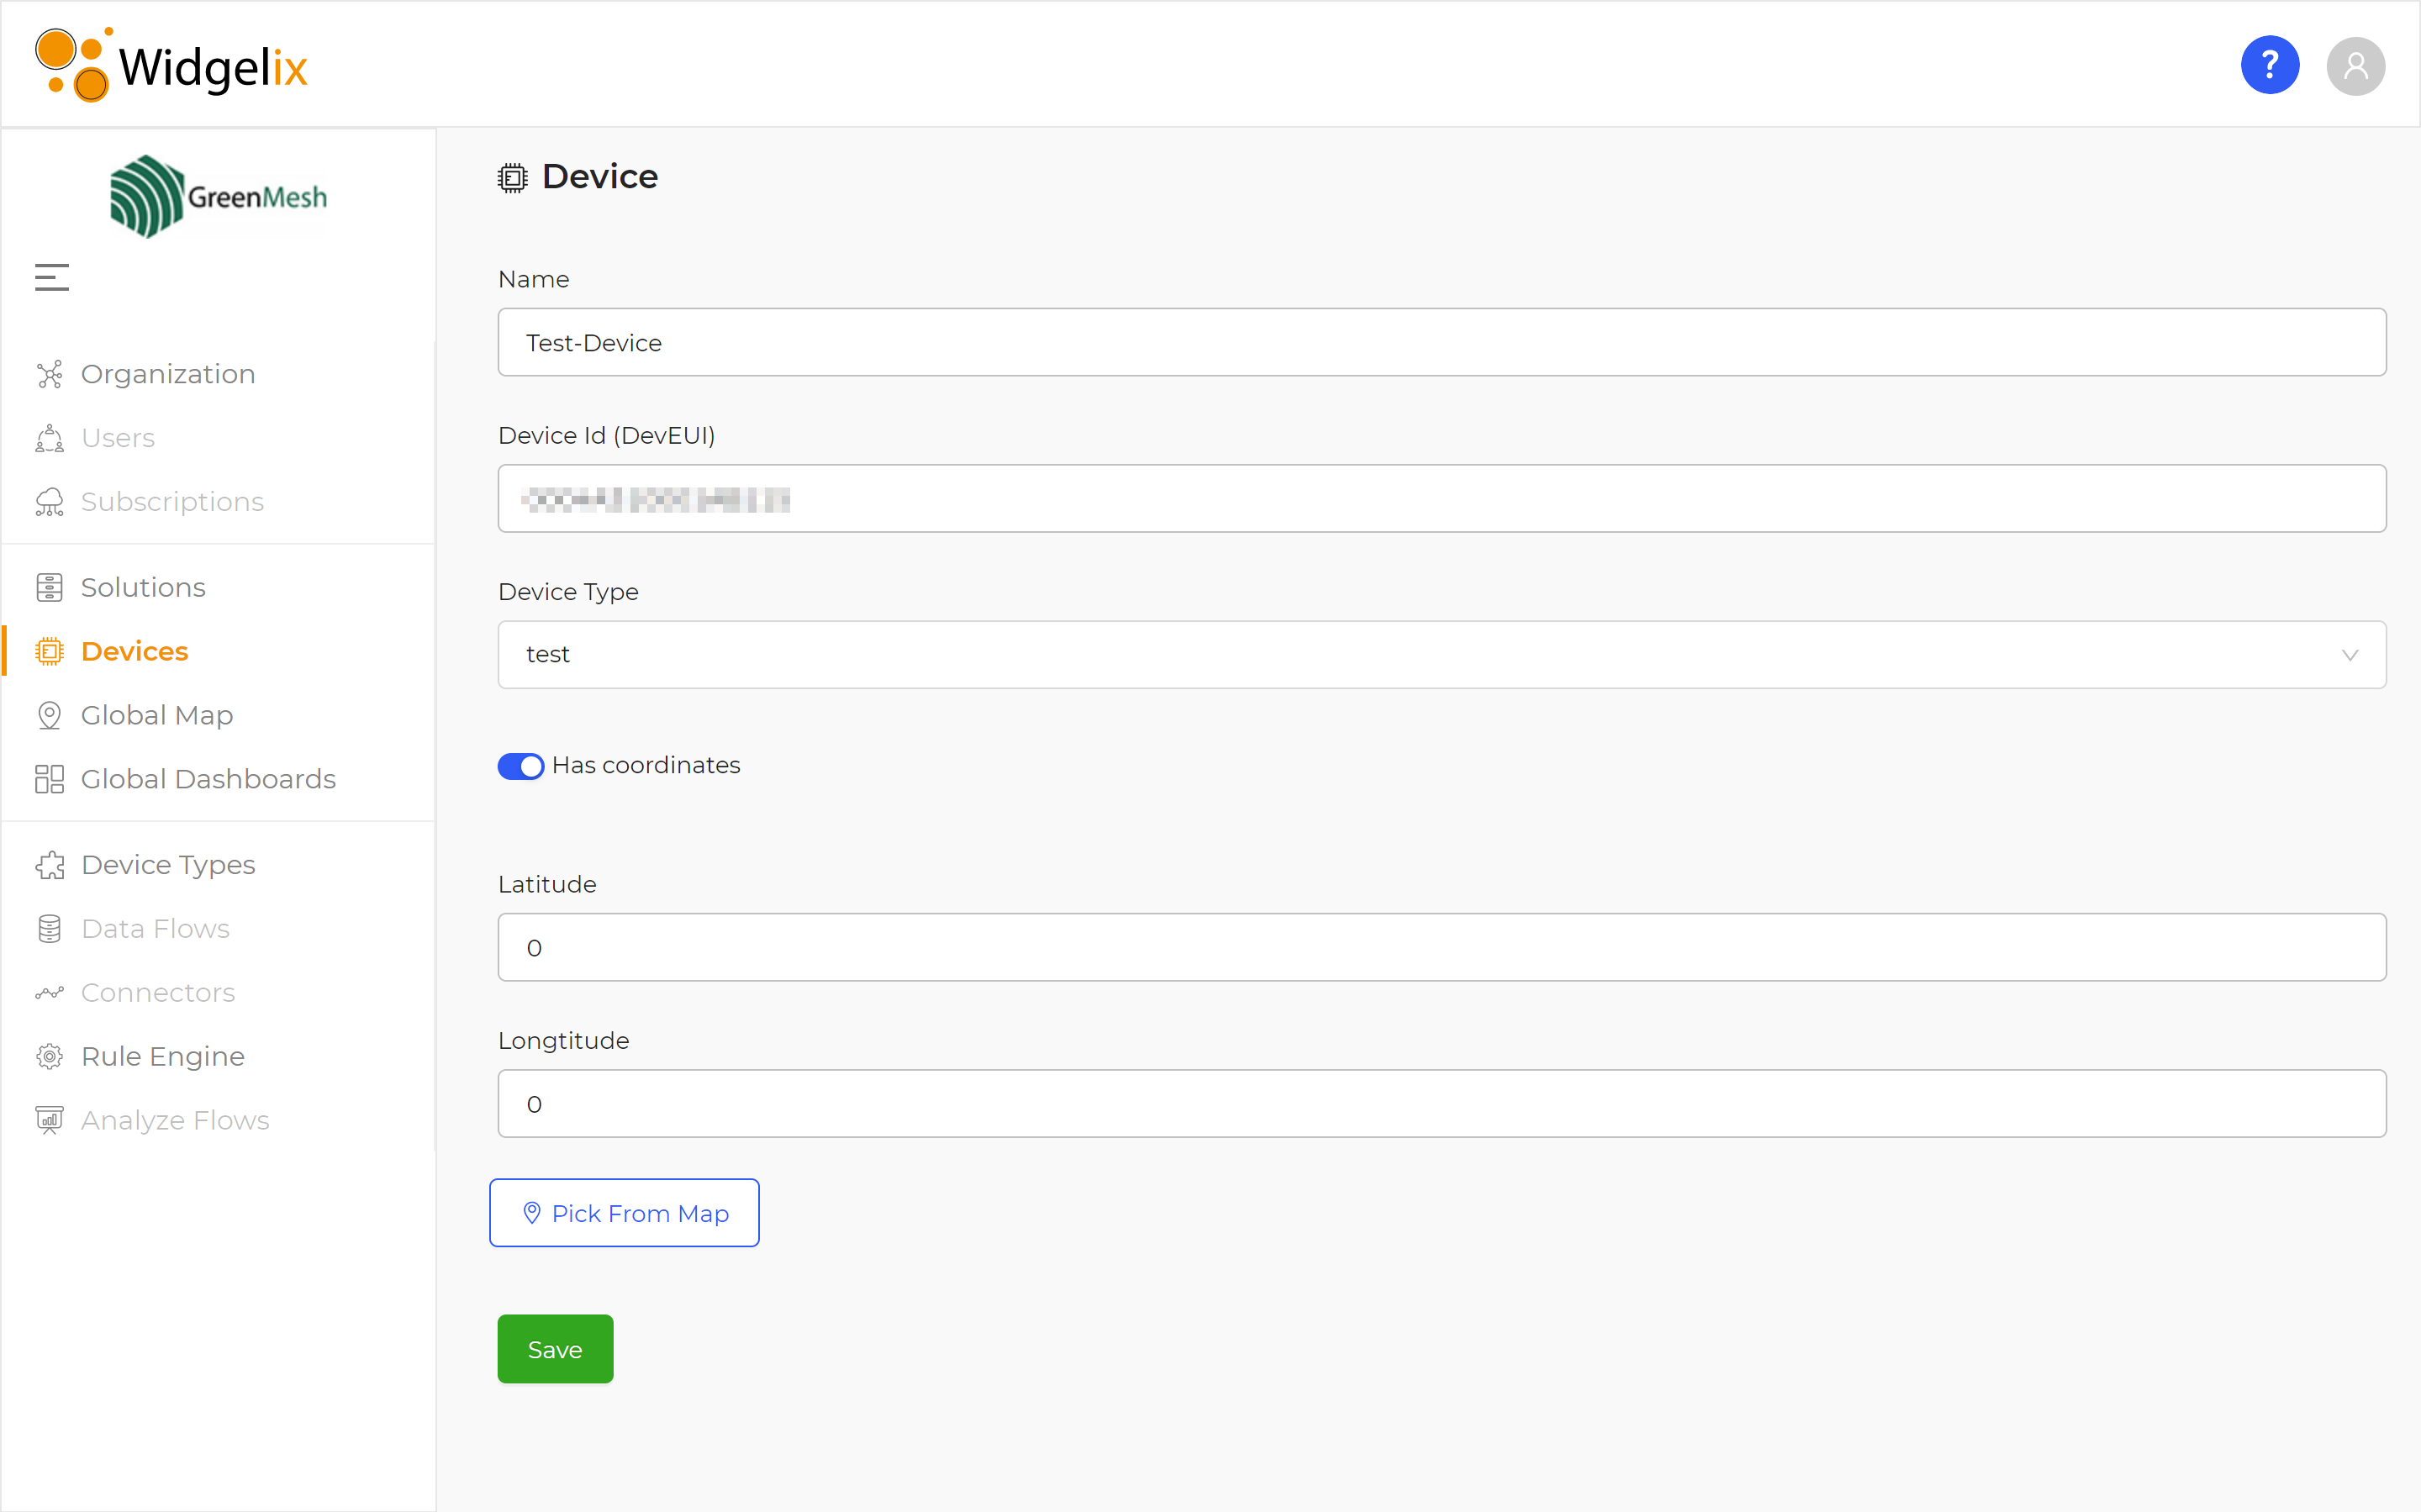
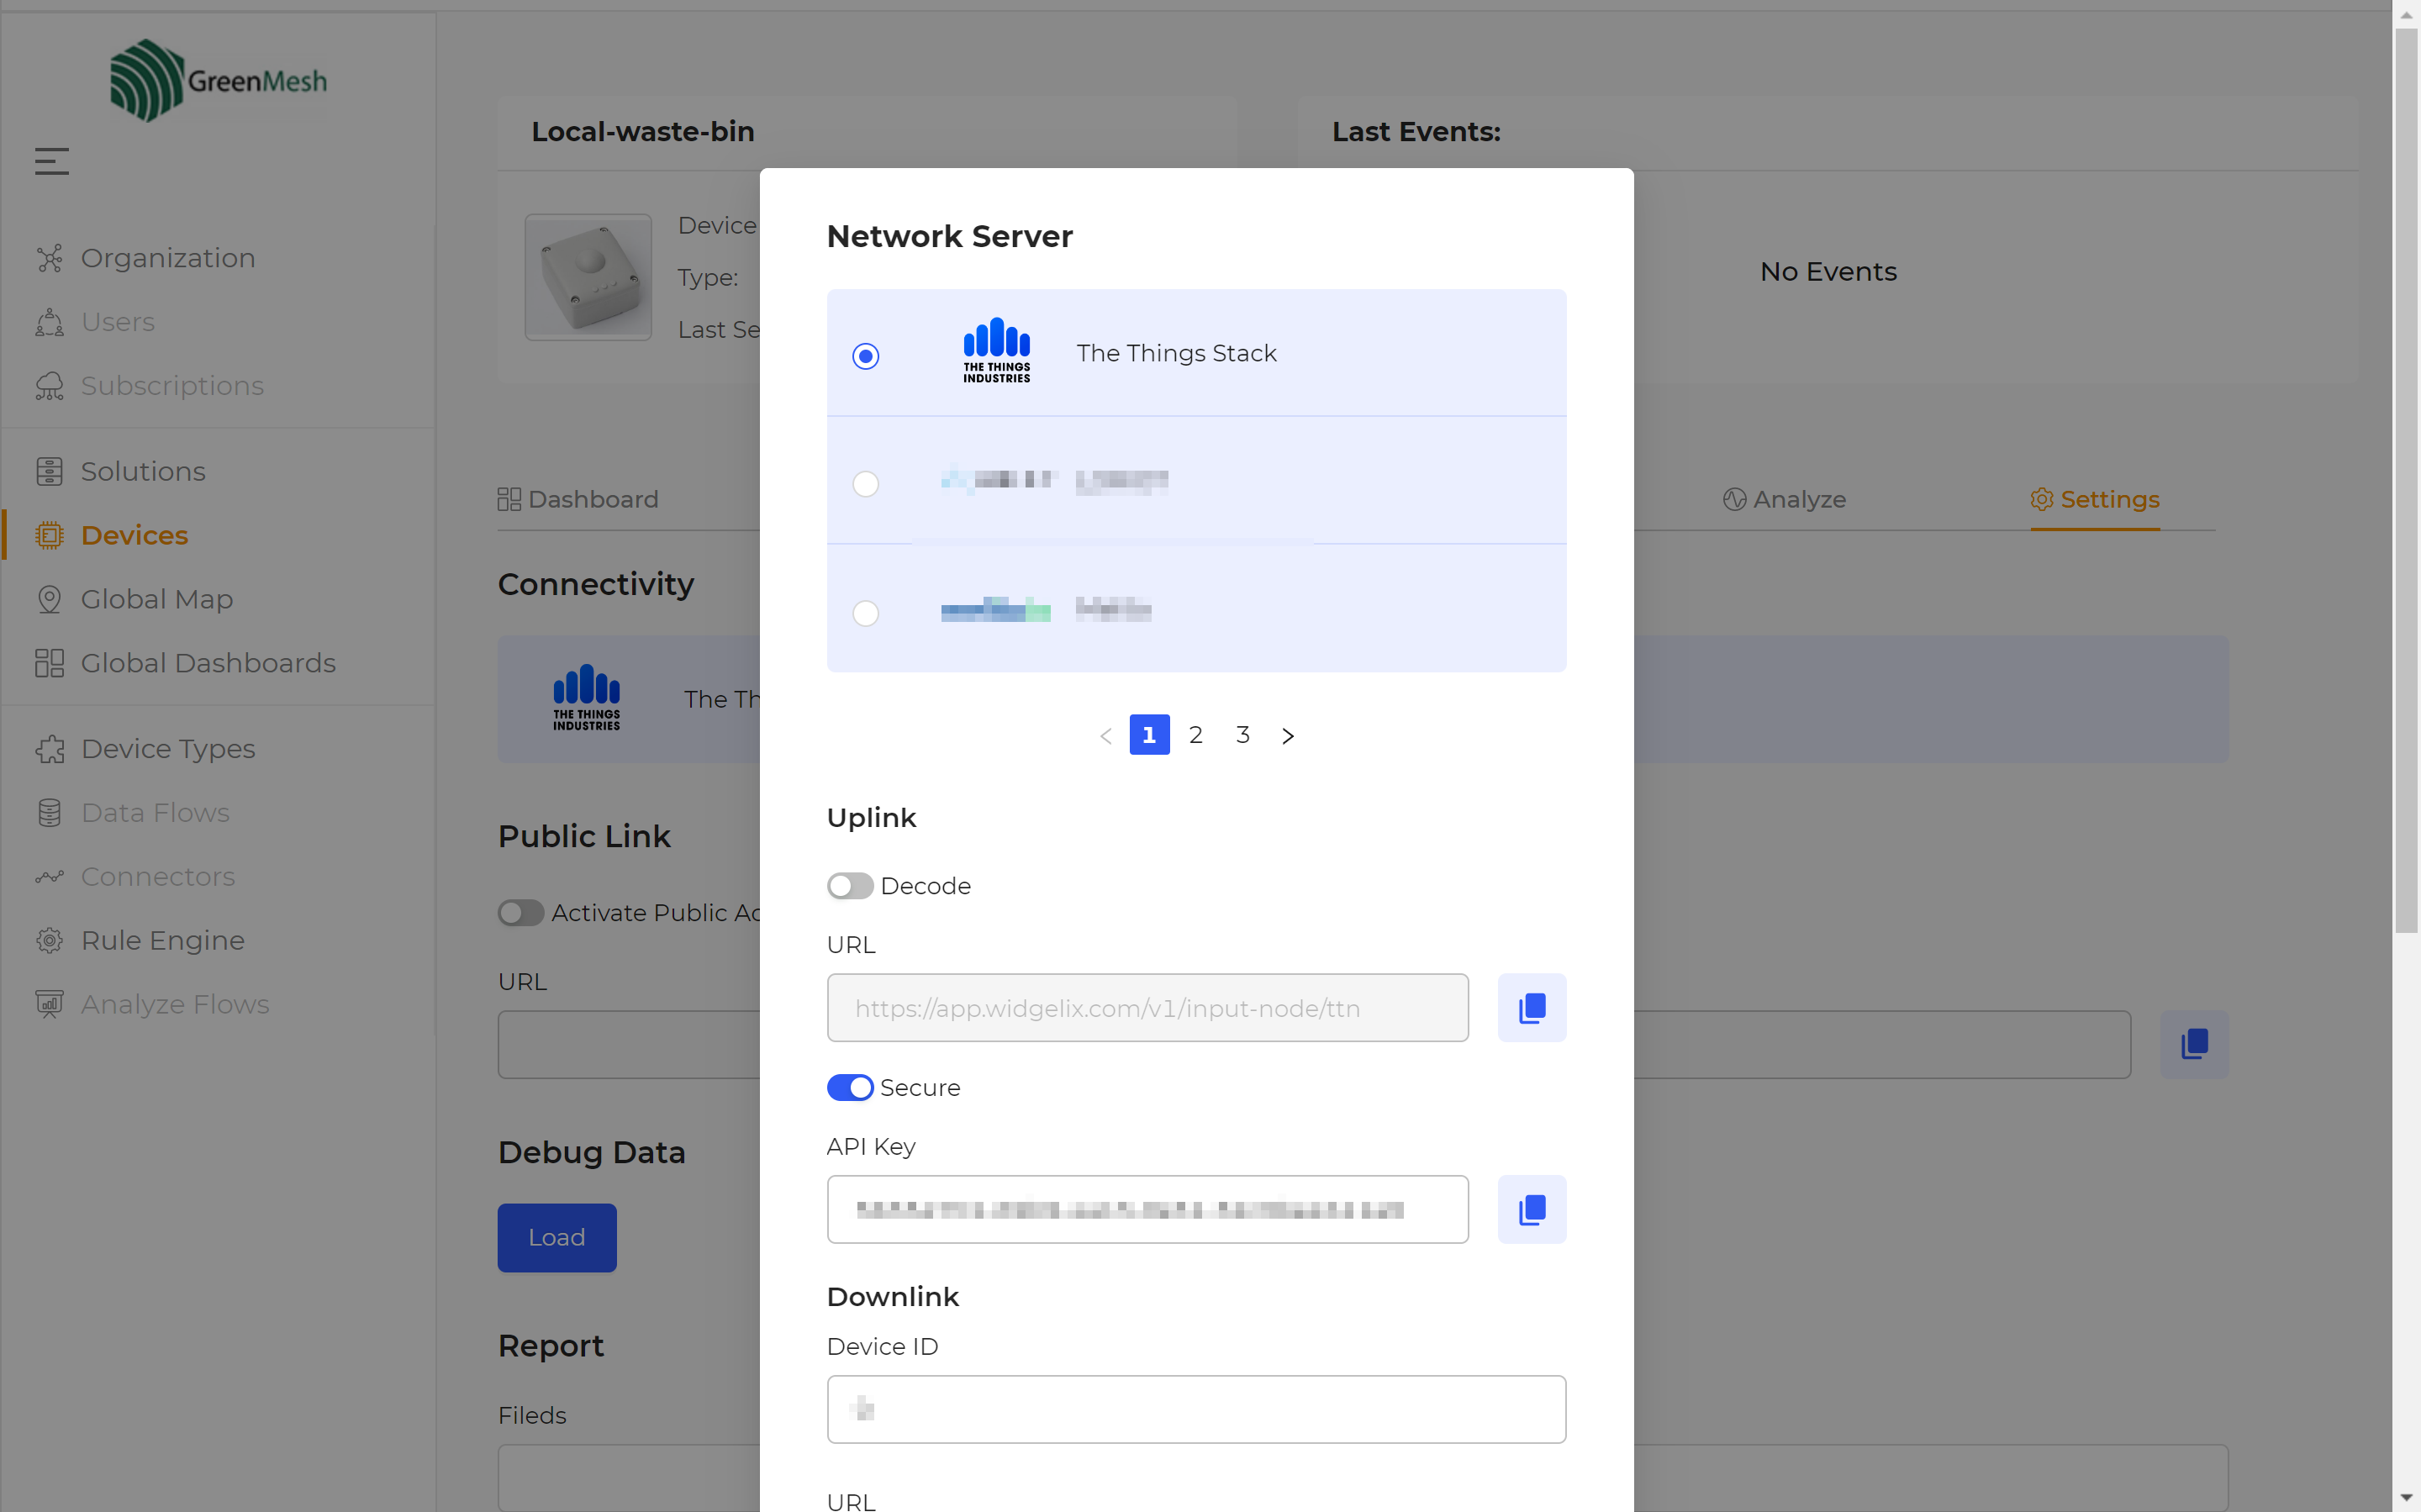
Navigate to Devices on the left hand menu, then click the Create Device button.

Give a Name to your device and provide its DevEUI. Assign the previously created Device Type.

Create Device

Create Data Flow

Navigate to Data Flows on the left hand menu, then click the Create New Data Flow button.

Give a Name to your data flow, select LoRaWAN (TTN) connectivity and assign the previously created Device Type.

Create Data Flow

The new Data Flow will appear in the table of data flows. Click on your data flow and copy the Webhook path and the API key - you will need these values to set up The Things Stack Webhook integration.

Create Data Flow

Configure The Things Stack

Now you are ready to instantiate the Widgelix Webhook template. This will allow you to forward data from your The Things Stack device to Widgelix.

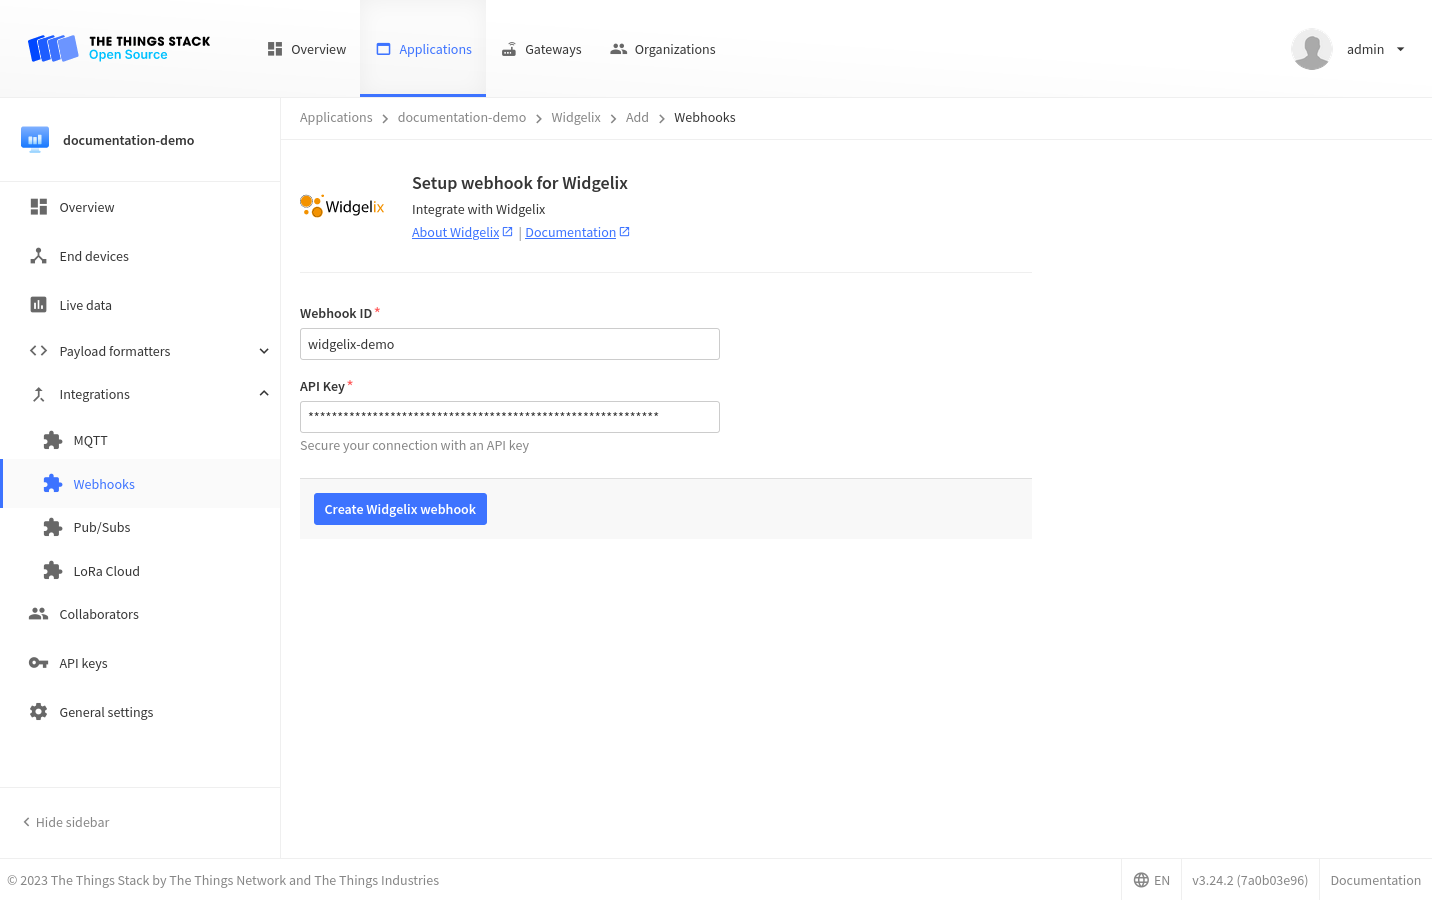
On The Things Stack, navigate to Integrations → Webhooks and choose Widgelix Webhook template.

Give a Webhook ID to your integration. Fill the Webhook path and the API token with values you previously copied from Widgelix.

Widgelix integration on TTS

Congrats, Widgelix is now ready to accept your device’s uplinks! Navigate back to Devices on Widgelix, click on your device and you will be able to observe all the incoming data from your device.

← UIB Withthegrid →

On this page

  • Prerequisites
  • Setup Widgelix
  • Configure The Things Stack

The Things Stack

Getting Started

Devices

Gateways

Integrations

Reference

Contributing

GitHub

Forum

About Us

The Things Network

The Things Industries

About this page

Last changed by Nejra Selimović on 04 Feb 2022.
doc: Widgelix documentation added (#762)

Edit on Github