An Application in The Things Stack is a collection of end devices.
Users have the freedom to select which devices are part of an application. Each application has an Application Identifier (application id) which is unique within a tenant. Follow the instructions in the guide to create an Application.
Adding Applications using the Console
In addition to the written instructions below, a video with instructions for adding an application is available on The Things Industries youtube channel.
Show video
Go to Applications in the top menu, and click + Add Application to reach the application registration page. Fill the application ID. The other fields are optional.
Click Create Application to create the application.
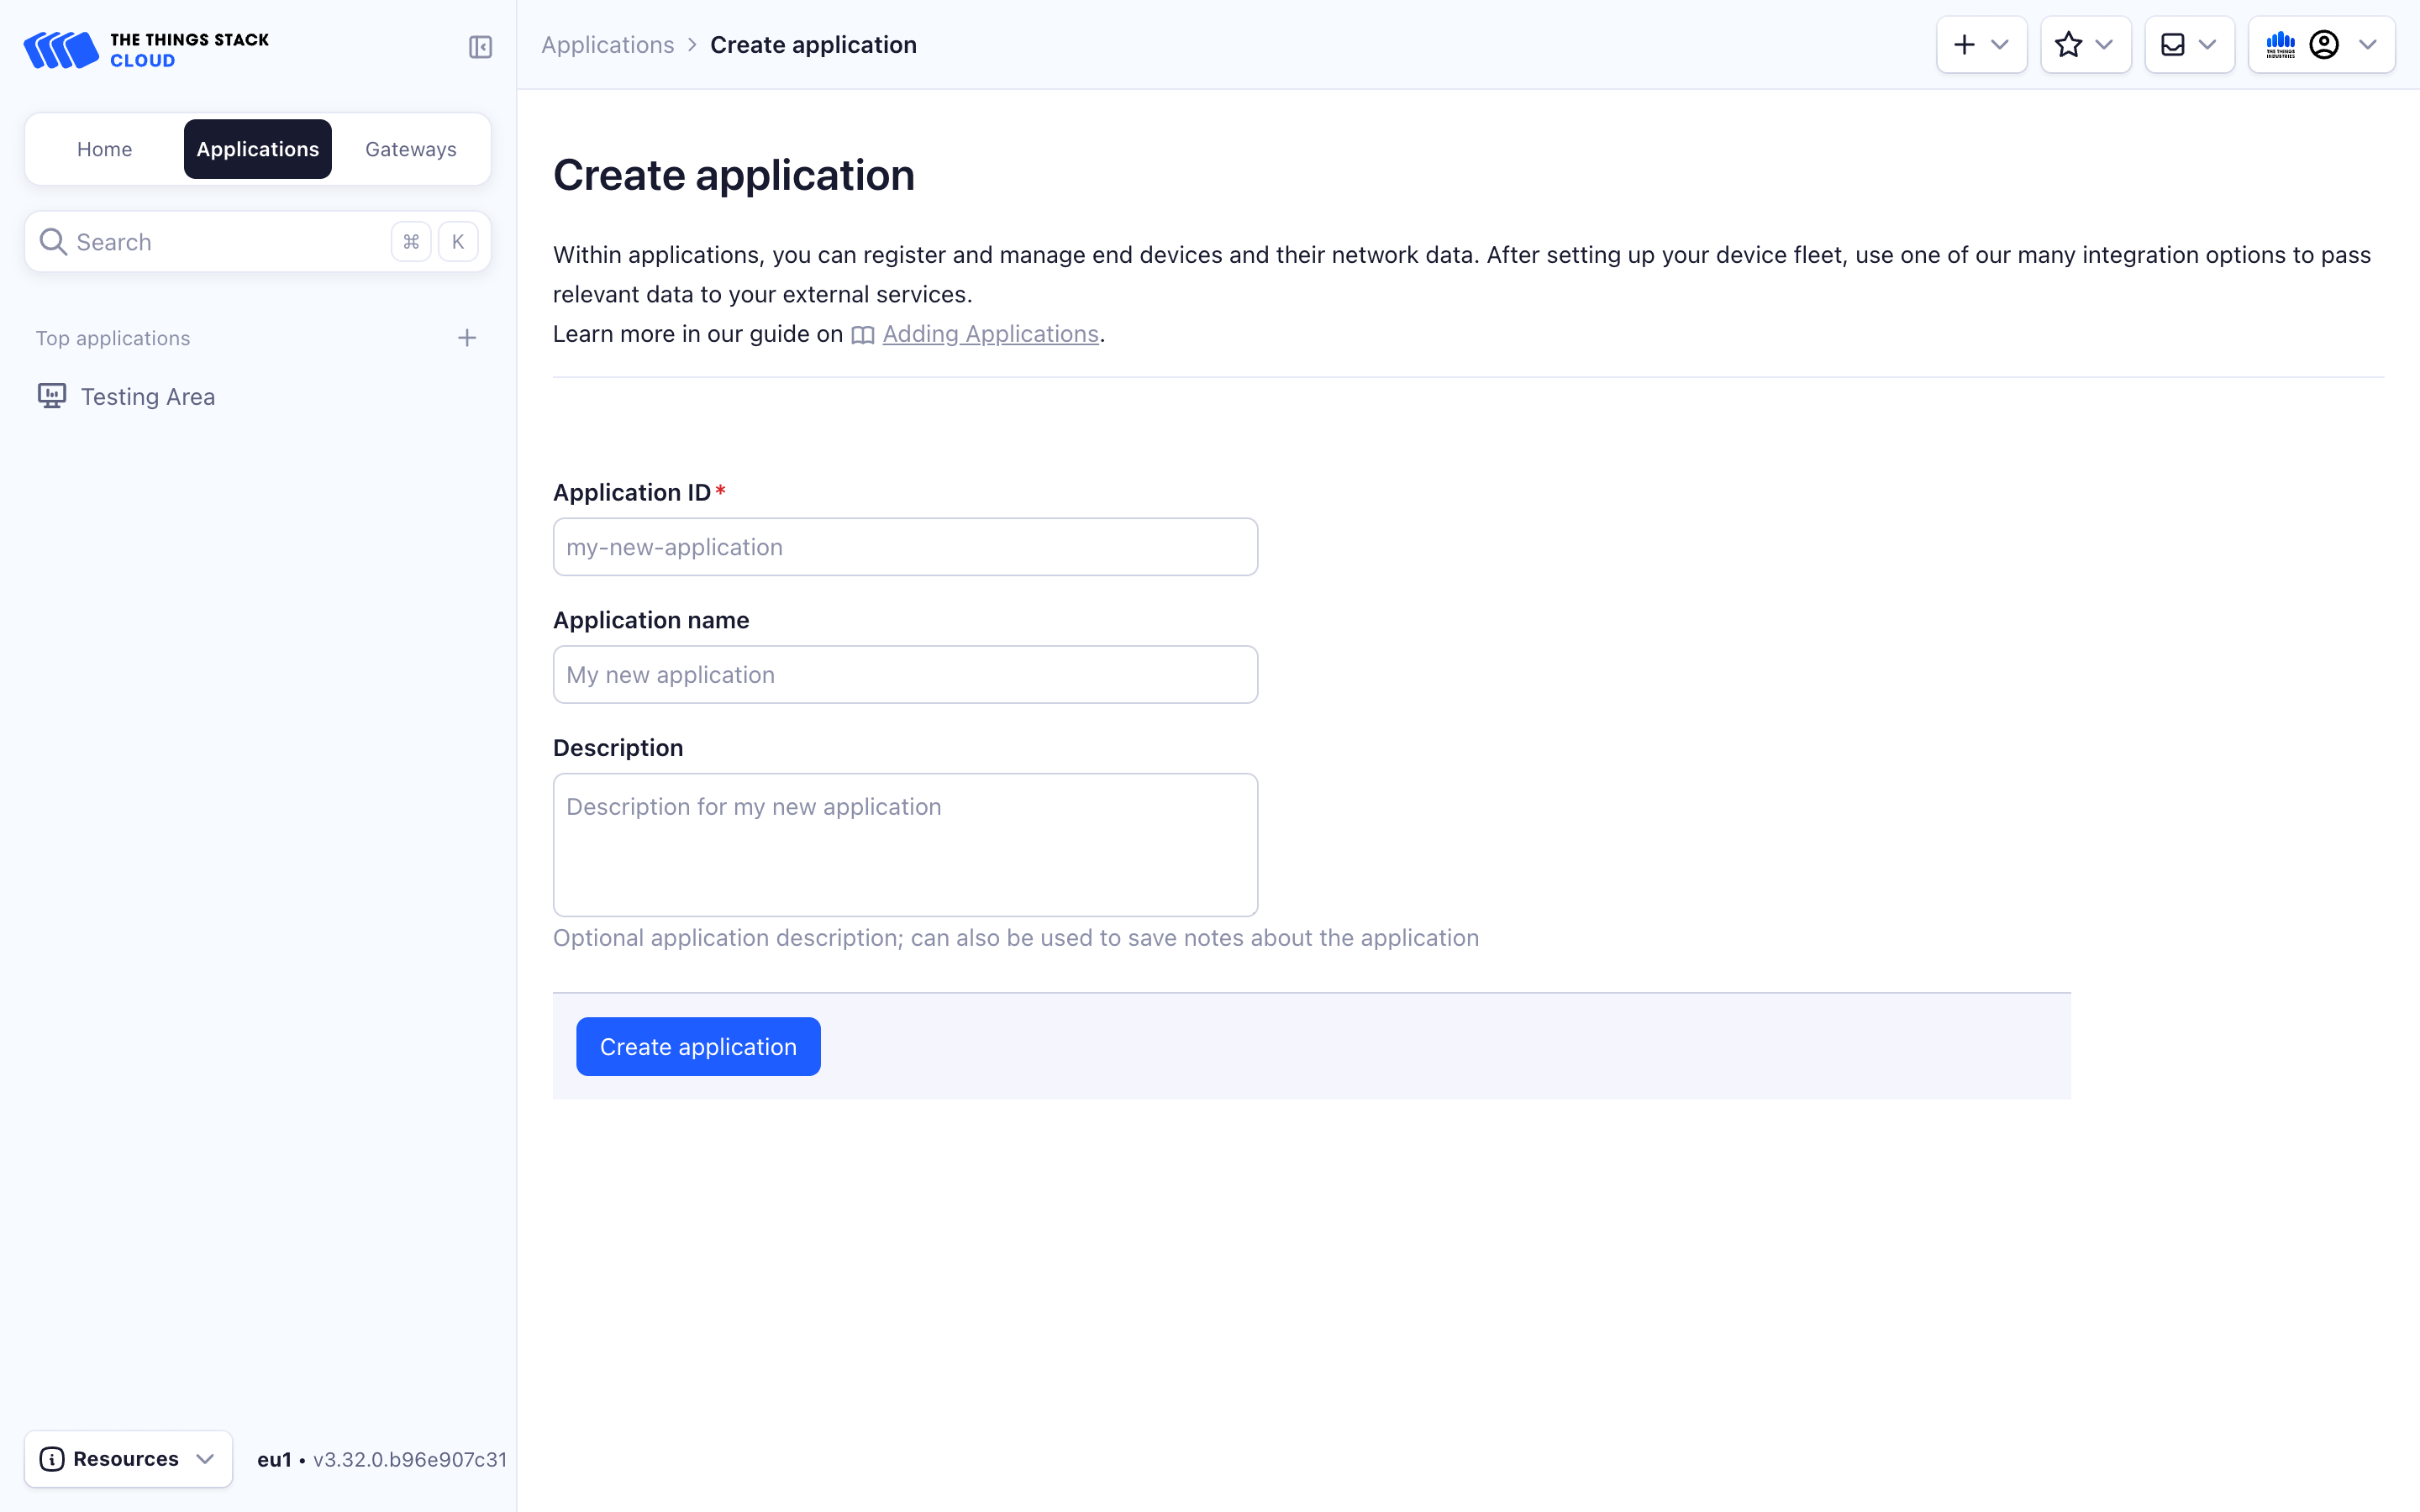
Your application will be created and you will be redirected to the application overview page of your newly created application.

Adding Applications using the CLI
Create the first application:
APP_ID="app1"
USER_ID="admin"
ttn-lw-cli applications create $APP_ID --user-id $USER_ID
This creates an application app1 with the admin user as collaborator. Make sure to modify user parameters according to your setup.
Adding Applications using the HTTP (REST) API
Details
| Item | Value |
|---|---|
| Endpoint | /users/{collaborator.user_ids.user_id}/applications |
| Request type | POST |
Example
To create an application my-test-app on thethings.example.com, first create a JSON file named req.json in the same folder with the following example contents.
{
  "application": {
    "ids": {
      "application_id": "my-test-app"
    },
    "name": "My Test Application",
    "description": "Application for my test devices",
    "network_server_address": "thethings.example.com",
    "application_server_address": "thethings.example.com",
    "join_server_address": "thethings.example.com"
  }
}
The request using cURL is as follows.
 curl -X POST -H "Content-Type: application/json" -H "Authorization: Bearer $API_KEY" \
-d @./req.json \
 https://thethings.example.com/api/v3/users/testuser/applications
{"ids":{"application_id":"my-test-app"},"created_at":"2024-01-10T09:13:34.817772Z","updated_at":"2024-01-10T09:13:34.817773Z","name":"My Test Application","description":"Application for my test devices","administrative_contact":{"user_ids":{"user_id":"testuser"}},"technical_contact":{"user_ids":{"user_id":"testuser"}},"network_server_address":"thethings.example.com","application_server_address":"thethings.example.com","join_server_address":"thethings.example.com"}
Next, see HTTP Webhooks for receiving uplink and sending downlink traffic. Also, use the built-in Storage Integration to persist your data. Then you can checkout Other Integrations.
End devices are also created within applications. See Adding Devices for more information.
Create Application API Key
Some applications require an API Key to write downlink traffic, read uplink traffic, manage integrations, etc. In this section we explain how to create an application API key on some basic examples, but this procedure is identical for any other right as well.
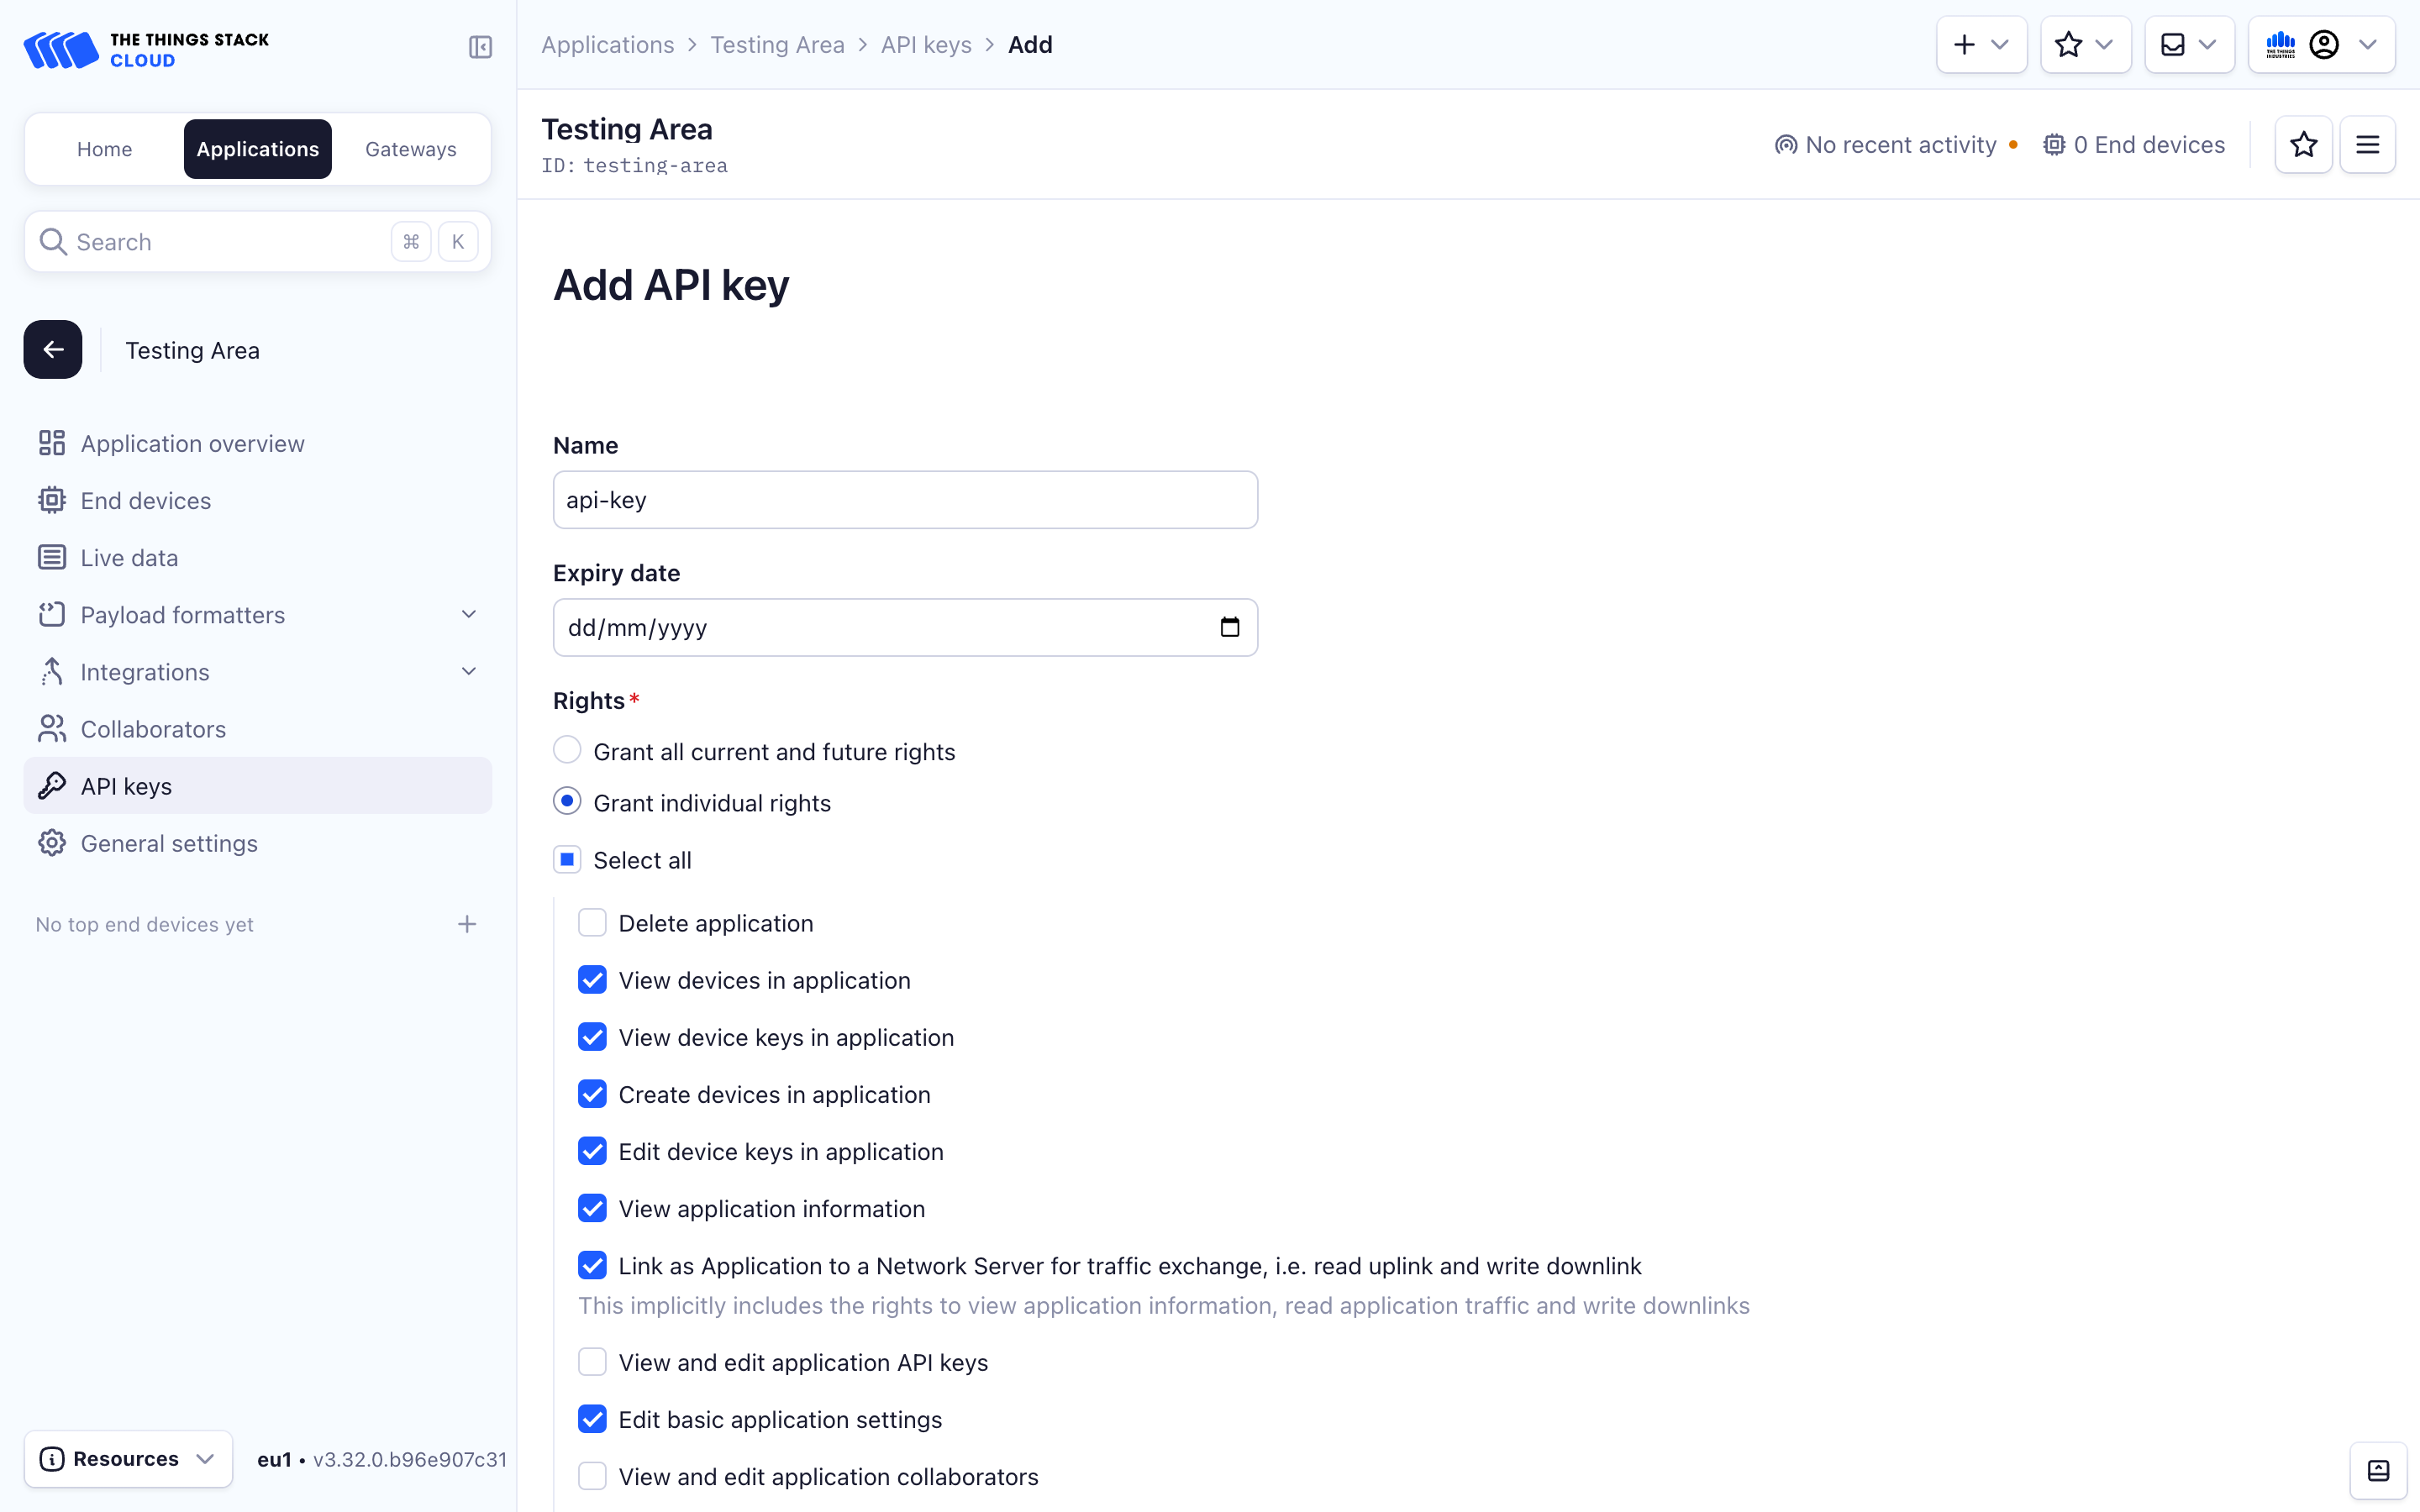
To create an API key for your application, navigate to API Keys on the left hand menu of your application’s settings and select Add API Key.
Enter a Name for your key, set the Expiry date, select rights that you want to grant and then press Create API Key.
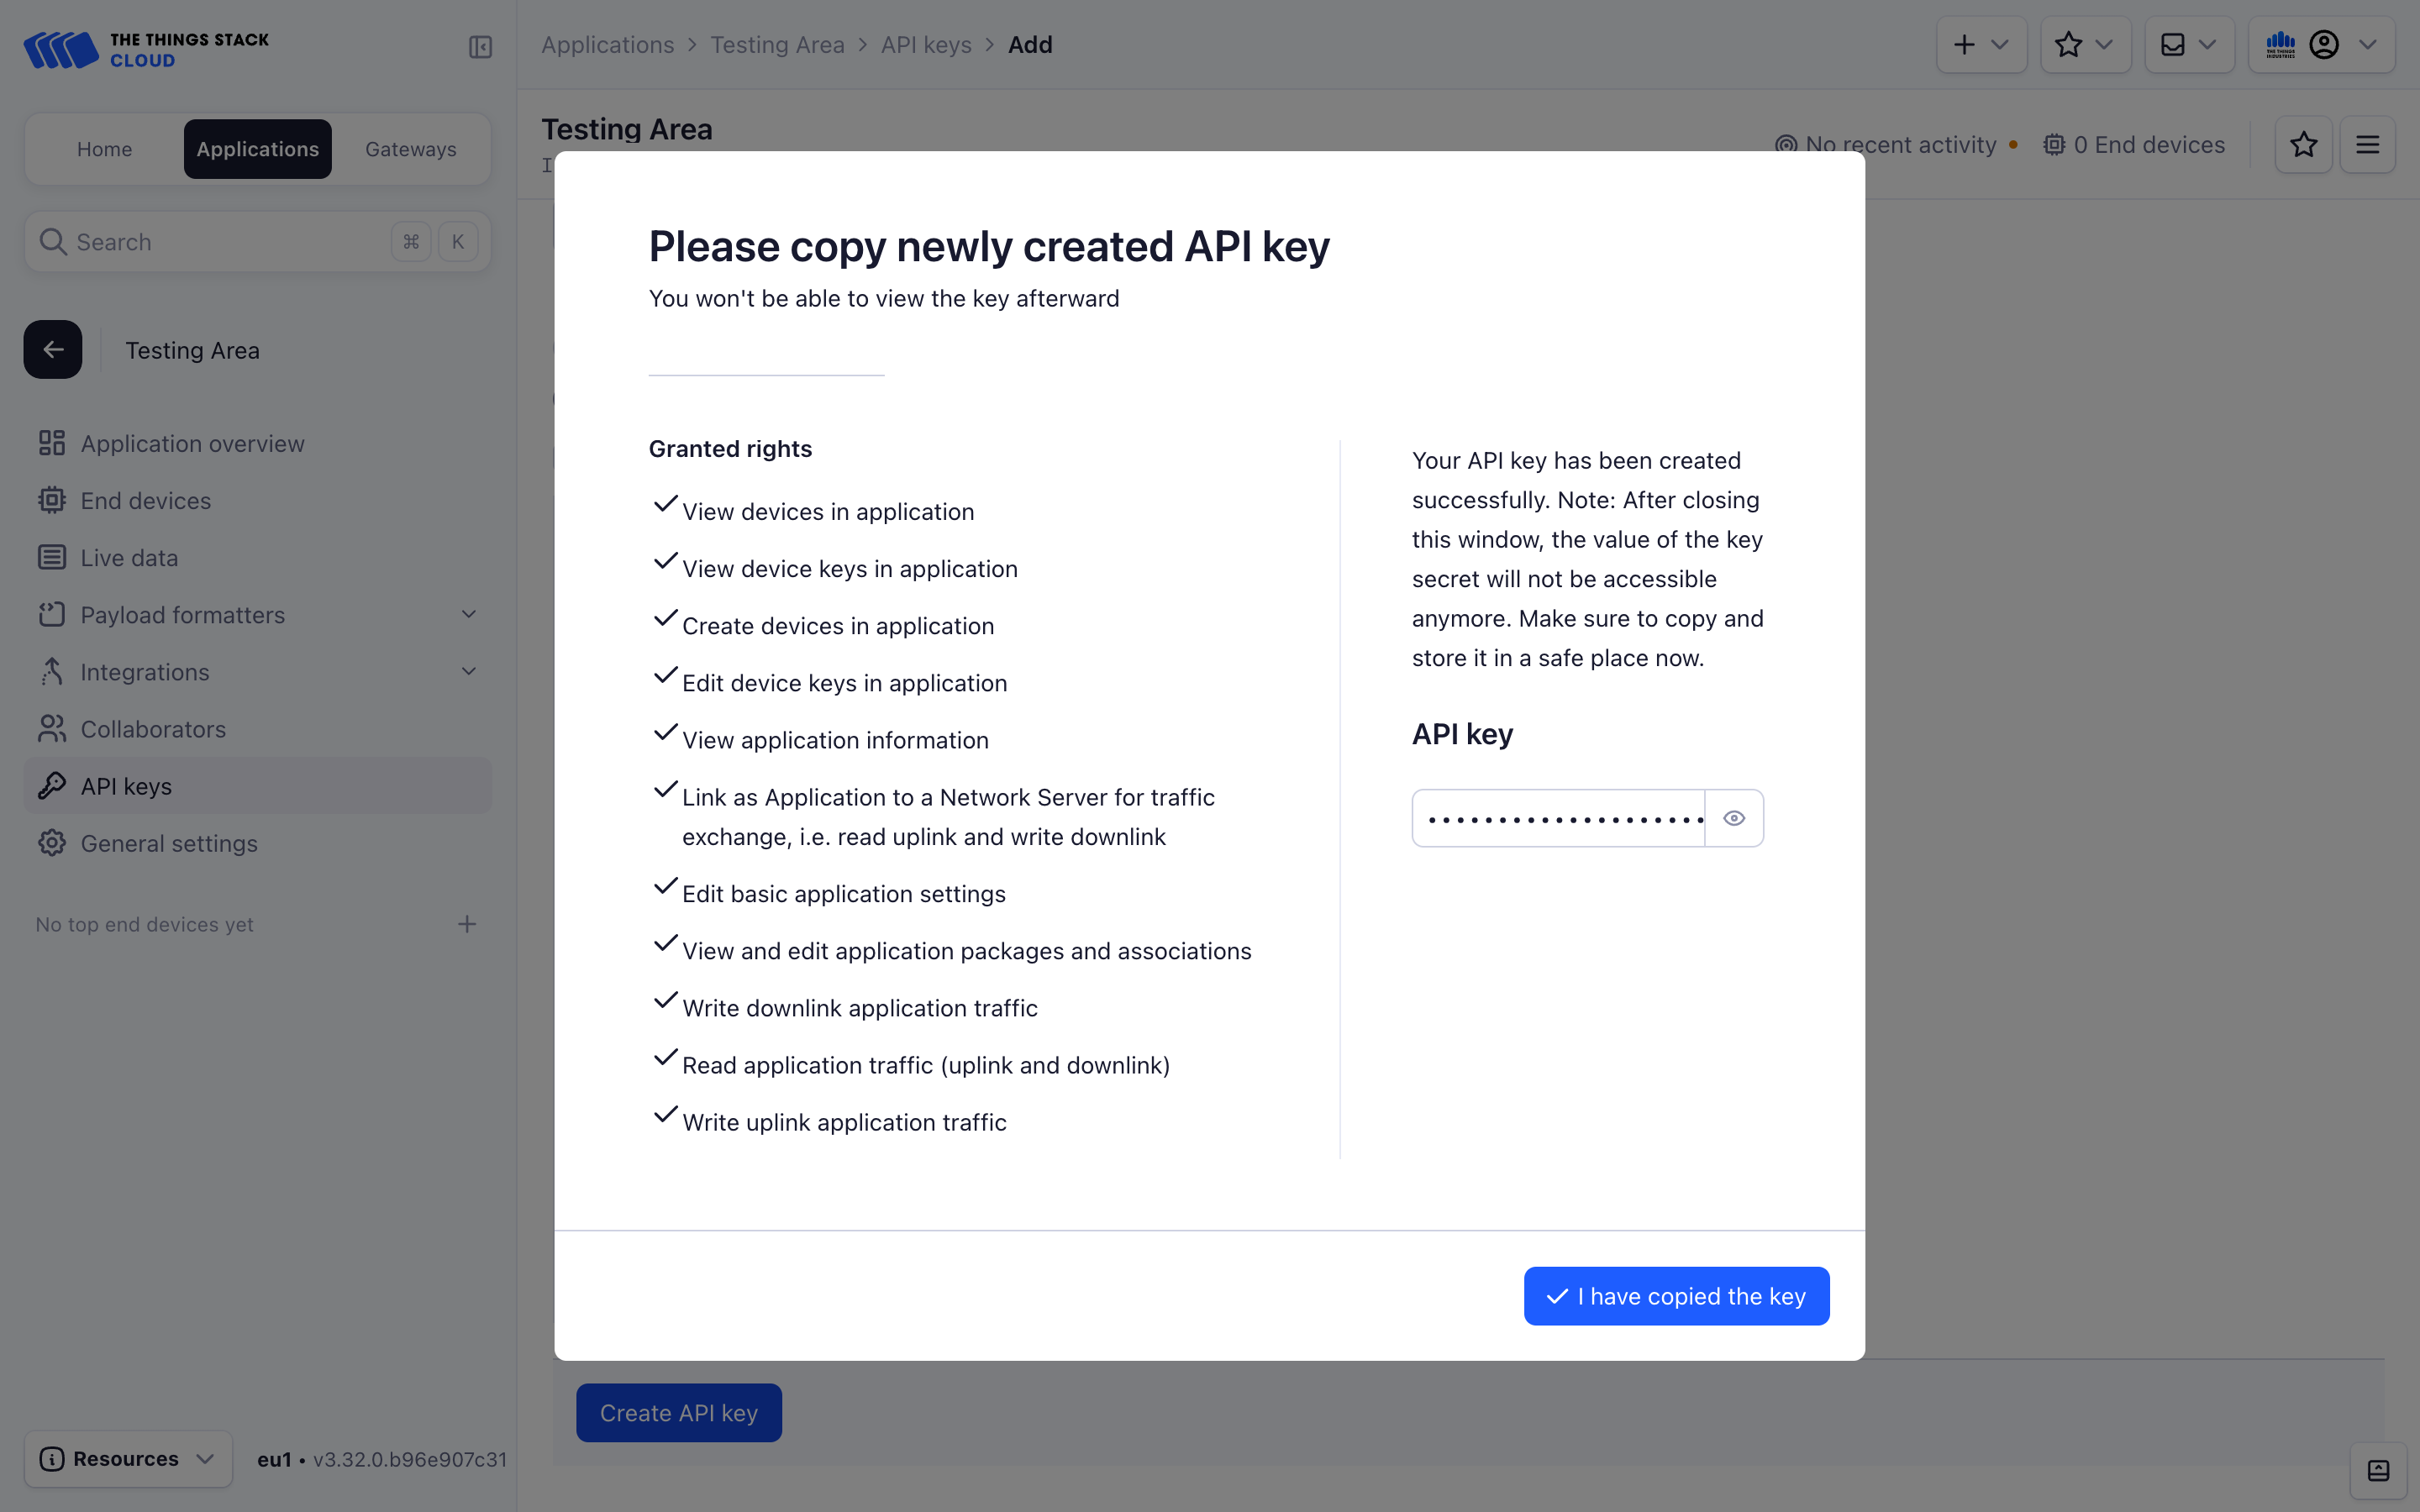
You will see a screen that shows your newly created API Key. You now can copy it in your clipboard by pressing the copy button. After saving the key in a safe place, press I have copied the key. You will not be able to see this key again in the future, and if you lose it, you can create a new one by following this same procedure.
To create an API key for your application with a Delete application right:
API_KEY_NAME="API key for deleting my application"
ttn-lw-cli applications api-keys create \
  --name $API_KEY_NAME \
  --application-id $APP_ID \
  --right-application-delete
The CLI will return an API key such as NNSXS.RLA7AGGMD5ZHBH.... This API key has only delete rights and can therefore only be used for deleting this application. Make sure to copy the key and save it in a safe place. You will not be able to see this key again in the future, and if you lose it, you can create a new one by following this same procedure.
See the CLI Reference for details on managing application API keys using the CLI.
Details
| Item | Value |
|---|---|
| Endpoint | /api/v3/gateways/{gateway_ids.gateway_id}/api-keys |
| Request type | POST |
Example
To create an API Key for the application my-test-app on thethings.example.com, first create a JSON file named req.json in the same folder with the following example contents.
{
  "expires_at": "2024-11-07T20:33:48.000Z",
  "name": "Test API Key",
  "rights": ["RIGHT_APPLICATION_DELETE"]
}
The request using cURL is as follows.
curl -X POST -H "Content-Type: application/json" -H "Authorization: Bearer $API_KEY" \
-d @./req.json \
 https://thethings.example.com/api/v3/applications/my-test-app/api-keys
{"id":"H4K2ZTXEIBZERY7R55KYMO6Y2W75UQXXKEZSAOY","key":"NNSXS.H4K2ZTXEIBZERY7R55KYMO6Y2W75UQXXKEZSAOY.6SIKPRUFYNVPEI6ACIYOEL2BY4NU3EGDXAQZ4XFPFKMDPQRNCUZA","name":"Test API Key","rights":["RIGHT_APPLICATION_DELETE"],"created_at":"2024-01-10T09:16:54.435864Z","updated_at":"2024-01-10T09:16:54.435864Z","expires_at":"2024-11-07T20:33:48Z"}
Payload Encryption and Decryption
LoRaWAN® frames are encrypted and decrypted on the application layer using the AppSKey by default.
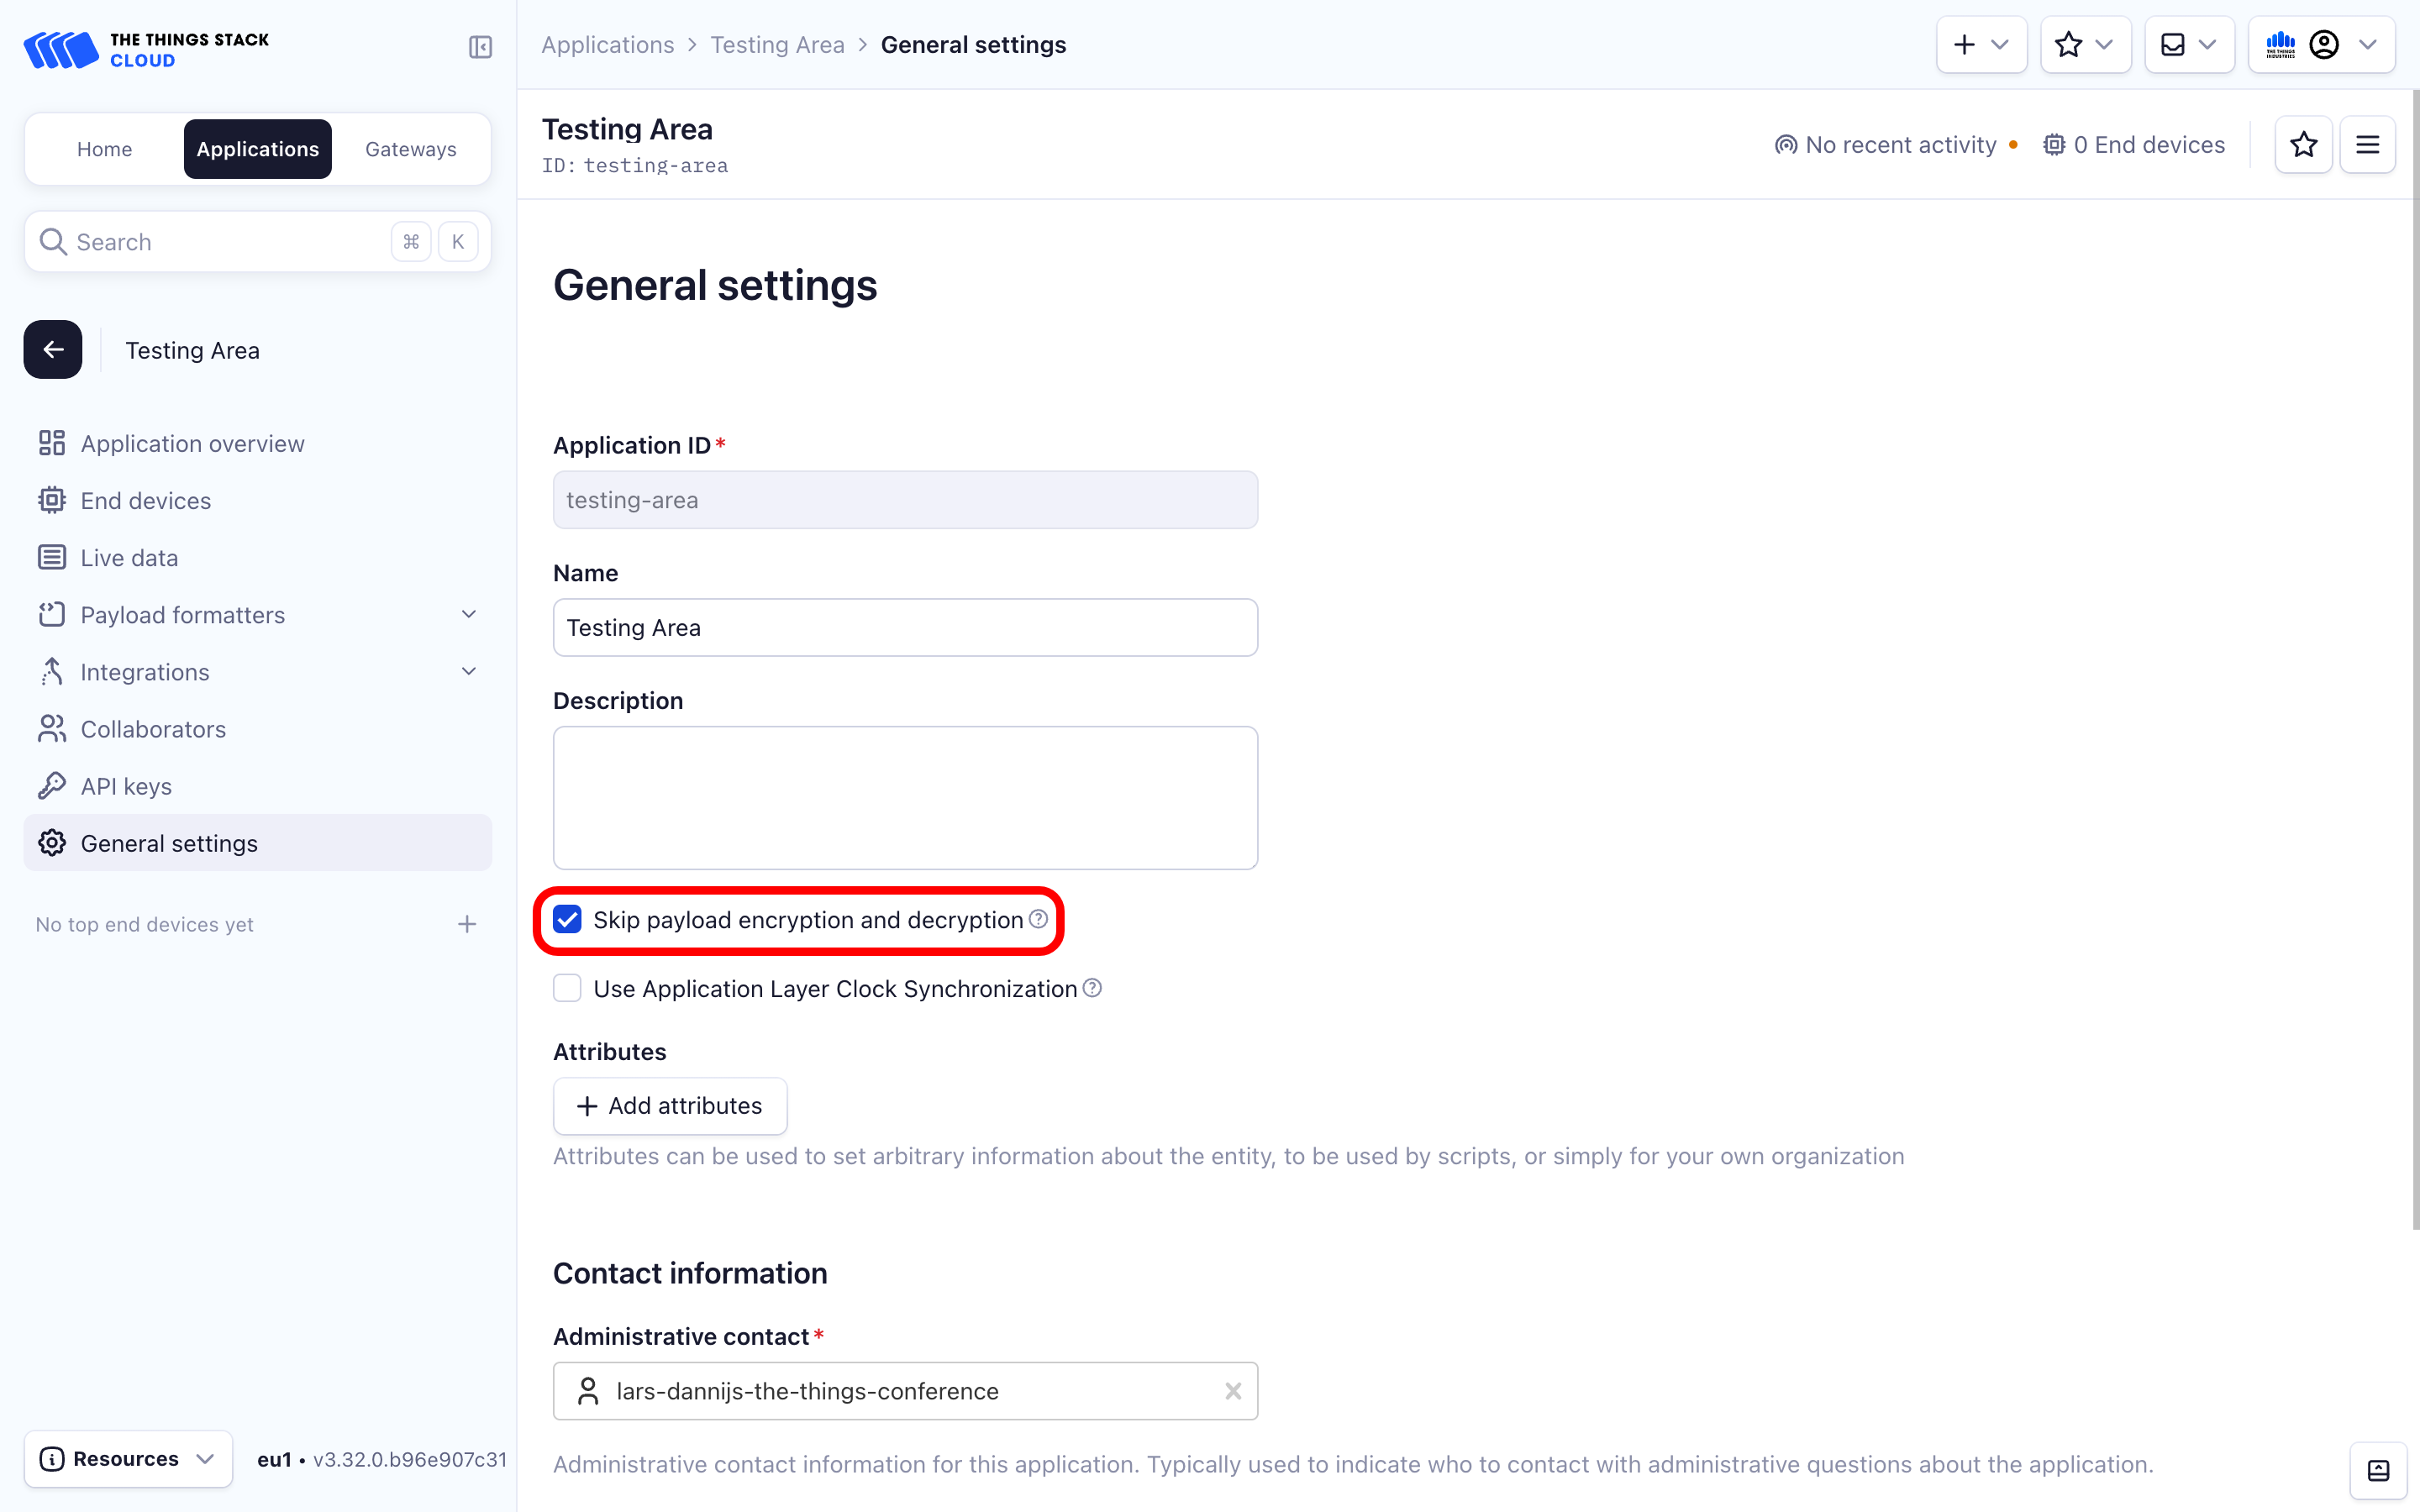
Once the application is created, you can update your application settings to skip uplink payload decryption and downlink payload encryption. This will cause the Application Server to forward messages to integrations without any processing, for example it will neglect payload formatters, meaning the integrations will be responsible for decrypting uplink messages in order to understand them. Also, scheduling downlinks from The Things Stack will be restricted, as it is expected for downlinks in that case to be scheduled from integrations.
To configure this setting, navigate to your applications’s General settings tab in the Console and check the Enabled box under Skip payload encryption and decryption section.
Note:
The Skip payload encryption and decryption setting requires that the Application Server cannot access the AppSKey and can be used exclusively with external join servers (such as The Things Join Server with a custom KEK or the Semtech Join Server) that encrypt the AppSKey with their own KEK. Using this setting with a cluster local Join Server will not have any effect, because the Application Sever automatically unwraps keys so this setting gets overridden.