This section will help you get started with using The Things Uno on The Things Stack.
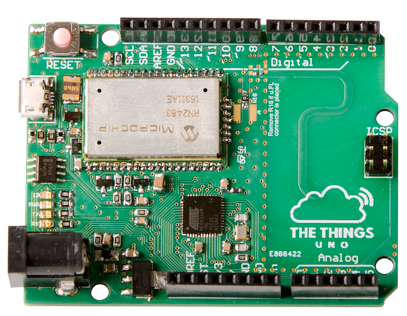
The Things Uno is based on the Arduino Leonardo (not the Arduino Uno) with an added Microchip LoRaWAN® module (RN2483 or RN2903).
The Things Uno is fully compatible with the Arduino software also known as the Arduino Integrated Development Environment (IDE) and the existing Arduino shields.
The Things Uno lets you easily get started with LoRaWAN application development using the Arduino IDE. First, choose the correct Things Uno board to suit the recommended frequency plan of your country/region. It is currently available for EU868 and US915 frequency bands.
Setting up Arduino IDE
The Arduino IDE allows you to write code using the Arduino programming language (C/C++), compile (verify), and upload it to the Things Uno board. It supports Windows, Mac OS, Linux, and Chrome OS.
Download the latest release of the Arduino Software (IDE), install it on your operating system and run it.
In the Arduino IDE, select Sketch → Include Library → Manage Libraries… or Tools → Manage Libraries… from the menu bar.
In the Library Manager window, search for TheThingsNetwork Arduino library and install it from the search results. When the installation finishes, select the Close button.

Connecting Things Uno to your Computer
To begin, connect your Things Uno to the computer using a micro-USB cable.
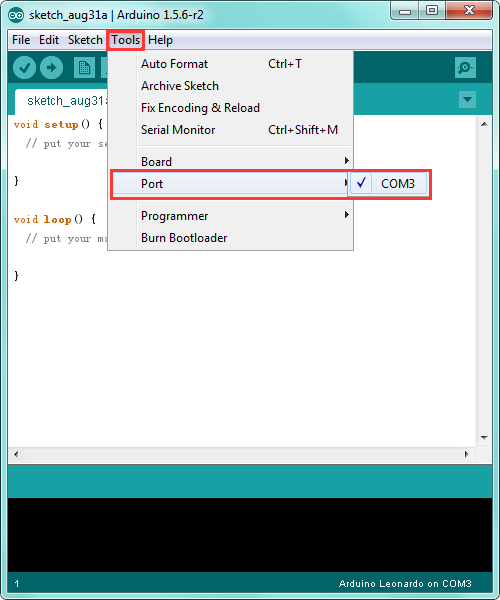
In the Arduino IDE, select Tools → Board → Arduino Leonardo from the menu bar. This will tell your Arduino IDE to upload sketches to your Things Uno board.

Select Tools → Port → Serial port (the serial port associated with your Things Uno) from the menu bar.
Creating an Application
The Things Uno (or any end device) first needs to be registered with an application to communicate with The Things Stack. To create a new application, follow the instructions on the Adding Applications page.
Writing your First Sketch to Get the DevEUI and AppEUI
In this section, you will learn how to write and upload your first sketch to The Things Uno. This sketch prints DevEUI, AppEUI, and some useful information that you will need to register your Things Uno with The Things Stack.
In the Arduino IDE, select File → New from the menu bar. A new window will open with the default Arduino sketch.
void setup() {
  // put your setup code here, to run once:

}

void loop() {
  // put your main code here, to run repeatedly:

}
Select Sketch → Include Library → The Things Network from the menu bar. The following code will add to the top of the sketch.
#include <TheThingsNetwork.h>
This will import The Things Network Arduino library to your sketch and provide you with some useful functions to work with LoRaWAN.
Type the following lines to create two serial port objects for Serial and Serial1.
#define loraSerial Serial1
#define debugSerial Serial
The Serial object allows communication between The Things Uno and your computer. Also, the Serial1 object allows communication between The Things Uno and the Microchip LoRa module.
Type the following line to define the frequency plan of your Things Uno. Replace REPLACE_ME with TTN_FP_EU868 or TTN_FP_US915 depending on the frequency plan of your Things Uno and your country/region.
// Replace REPLACE_ME with TTN_FP_EU868 or TTN_FP_US915
#define freqPlan REPLACE_ME
Note:
The Things Uno supports only EU868 and US915 frequency plans.Type the following line after the freqPlan.
TheThingsNetwork ttn(loraSerial, debugSerial, freqPlan);
This will create a TheThingsNetwork object named ttn with loraSerial, debugSerial, and freqPlan as inputs.
Type the following lines inside the setup() function.
debugSerial.begin(9600);
loraSerial.begin(57600);
This will call the begin() function for each serial port object to set the baud rate for serial data transmission. Use 9600 and 57600 bits per second for debugSerial and loraSerial respectively.
Type the following lines just after the loraSerial.begin(57600);.
while (!debugSerial) {
    ;
}
This will tell your code not to jump to the next line until the Serial Monitor is ready.
Type the following code snippet just after the while loop.
debugSerial.println("-- STATUS");
ttn.showStatus();
The showStatus() function retrieves some useful device-specific information from the Microchip LoRa module and prints them on the Serial Monitor.
After editing your sketch, save it as TheThingsUnoTest by selecting File → Save As from the menu bar.
Once completed your Arduino sketch should look something like this:
TheThingsUnoTest.ino
#include <TheThingsNetwork.h>

#define loraSerial Serial1
#define debugSerial Serial

// Replace REPLACE_ME with TTN_FP_EU868 or TTN_FP_US915
#define freqPlan TTN_FP_EU868

TheThingsNetwork ttn(loraSerial, debugSerial, freqPlan);

void setup()
{
  loraSerial.begin(57600);
  debugSerial.begin(9600);

    while (!debugSerial) {
    ;
    }

  debugSerial.println("-- STATUS");
  ttn.showStatus();

}

void loop()
{
}
Make sure that your Things Uno board is connected to your computer and select the Upload button in the toolbar. The IDE verifies your sketch again and uploads it to your Things Uno. During this process, the TX/RX LEDs on your Things Uno board should blink, indicating the information is traveling between the Things Uno and your computer.
Once uploaded, your sketch will immediately start to run but you cannot see any output unless you open the Arduino Serial Monitor. The Arduino Serial Monitor is a tool that can be used to print information passing through the serial port.
In the Arduino IDE, select Tools → Serial Monitor from the menu bar. Once open the Serial Monitor prints something similar to the following output.
-- STATUS
EUI: 0004A30B001B7AD2
Battery: 3223
AppEUI: 70B3D57EF000001C
DevEUI: 0004A30B001B7AD2
Band: 868
Data Rate: 5
RX Delay 1: 1000
RX Delay 2: 2000
Total airtime: 0.00 s
Copy the Serial Monitor output to a text editor (E.g. Notepad) because you will need the AppEUI and DevEUI when you register your Things Node with The Things Stack.
Registering The Things Uno with The Things Stack
It’s time to register your Things Uno with The Things Stack.
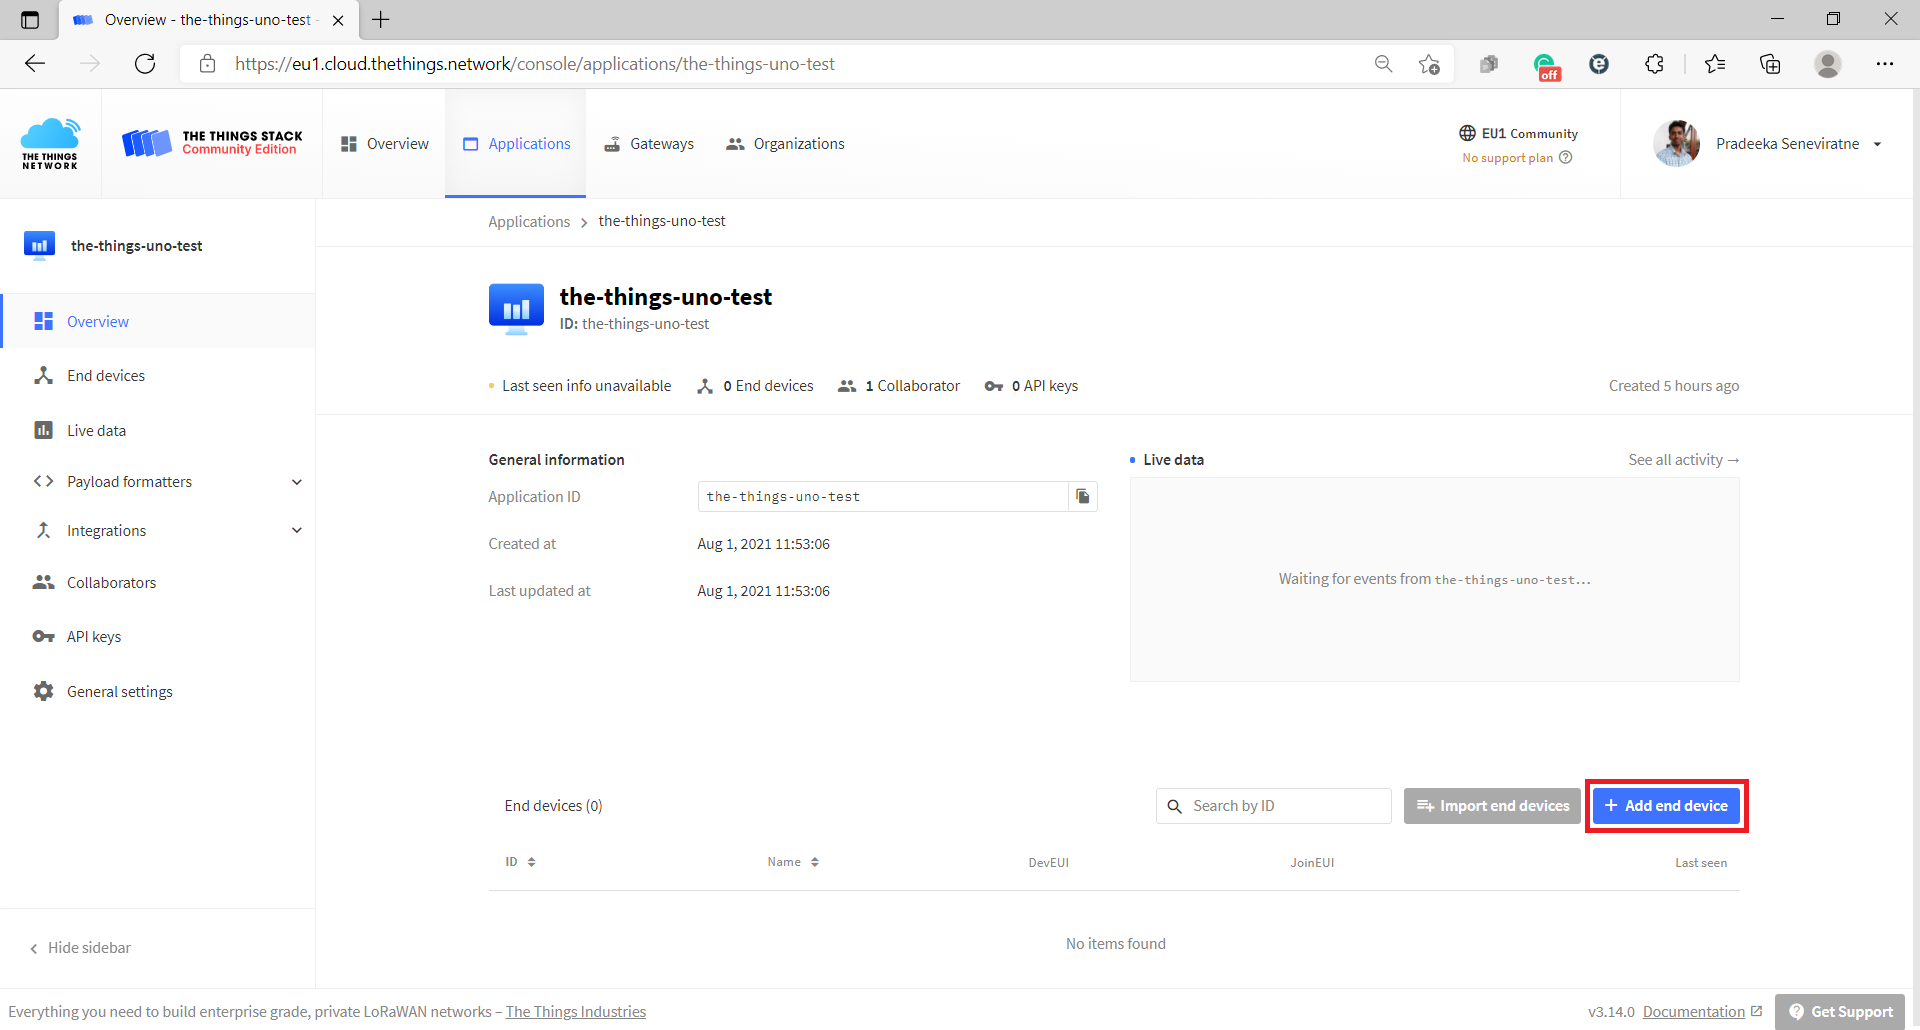
On the Applications page, select your application to go to its overview page.
Select + Add end device in the bottom-right of the page.
The Things Stack provides two options to register your end device.
- From the LoRaWAN Device Repository
- Manually
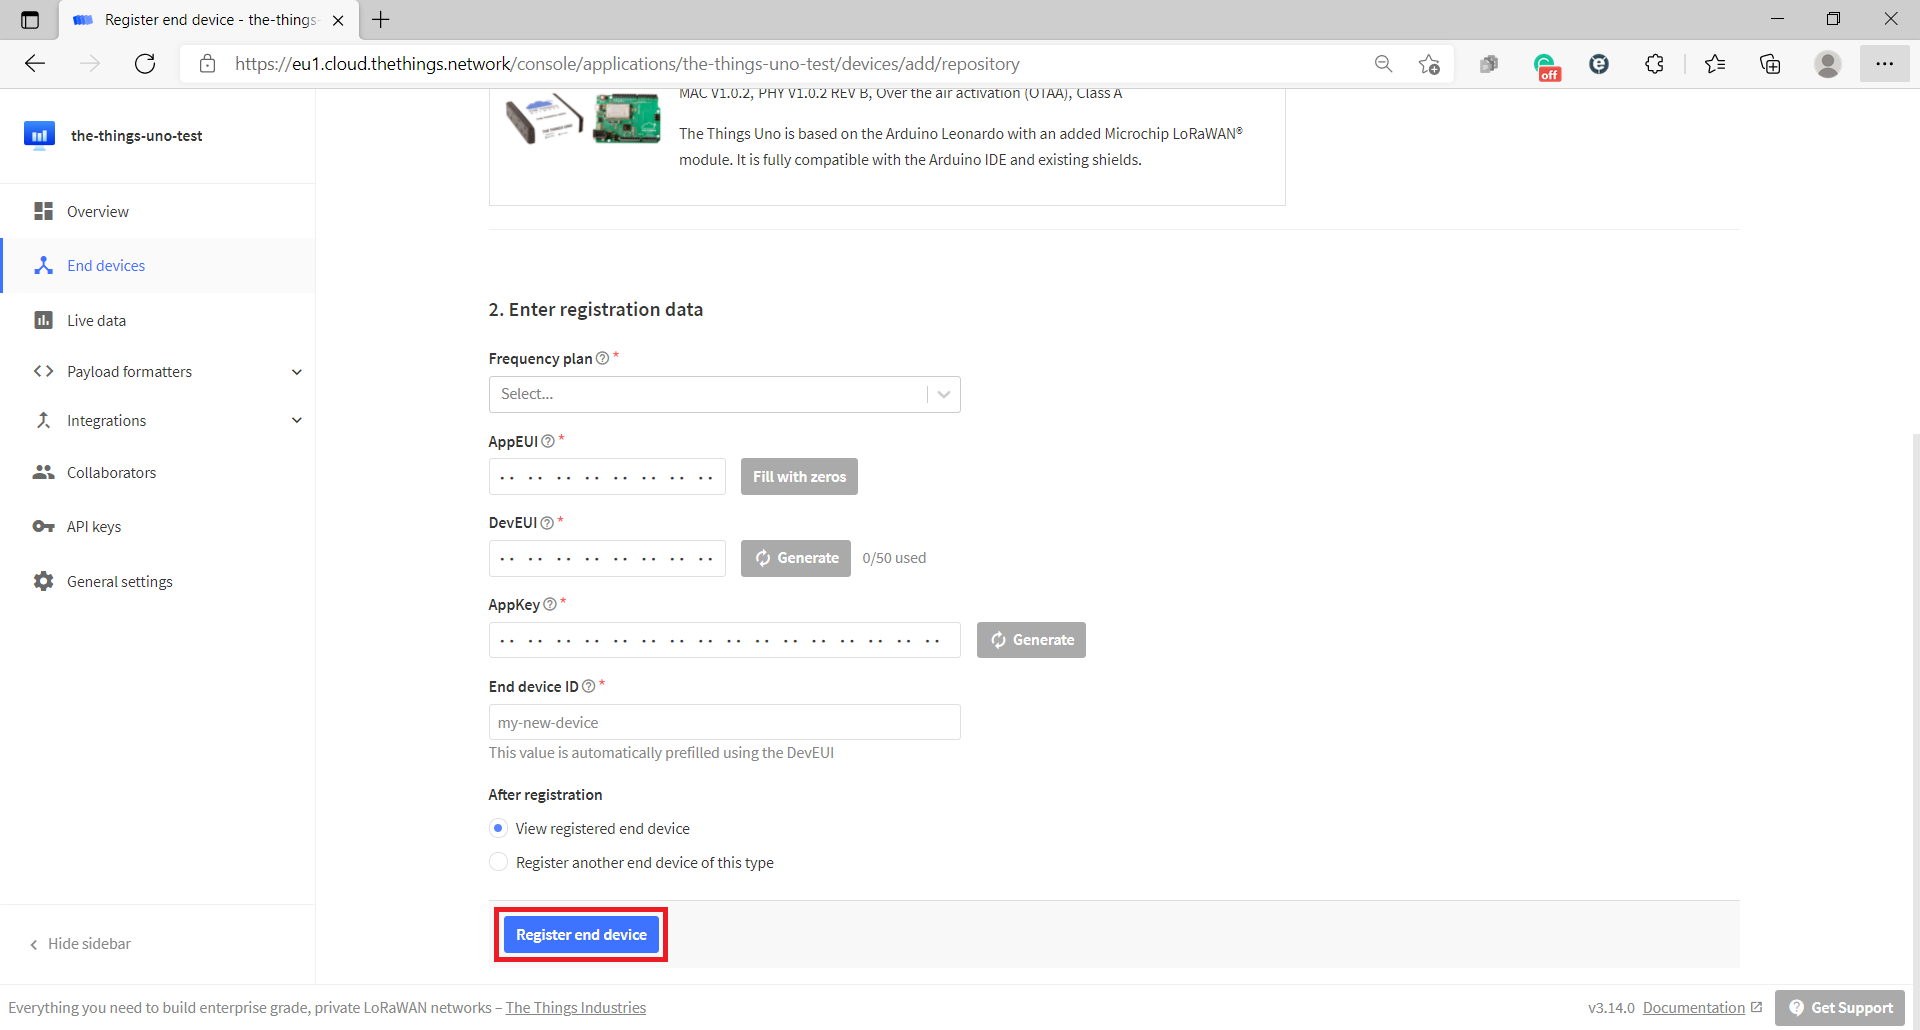
Each registering option provides both OTAA and ABP activation methods. However, in this quickstart, we only look at the first option, From the LoRaWAN Device Repository which is the easiest way to register your Things Uno with The Things Stack.
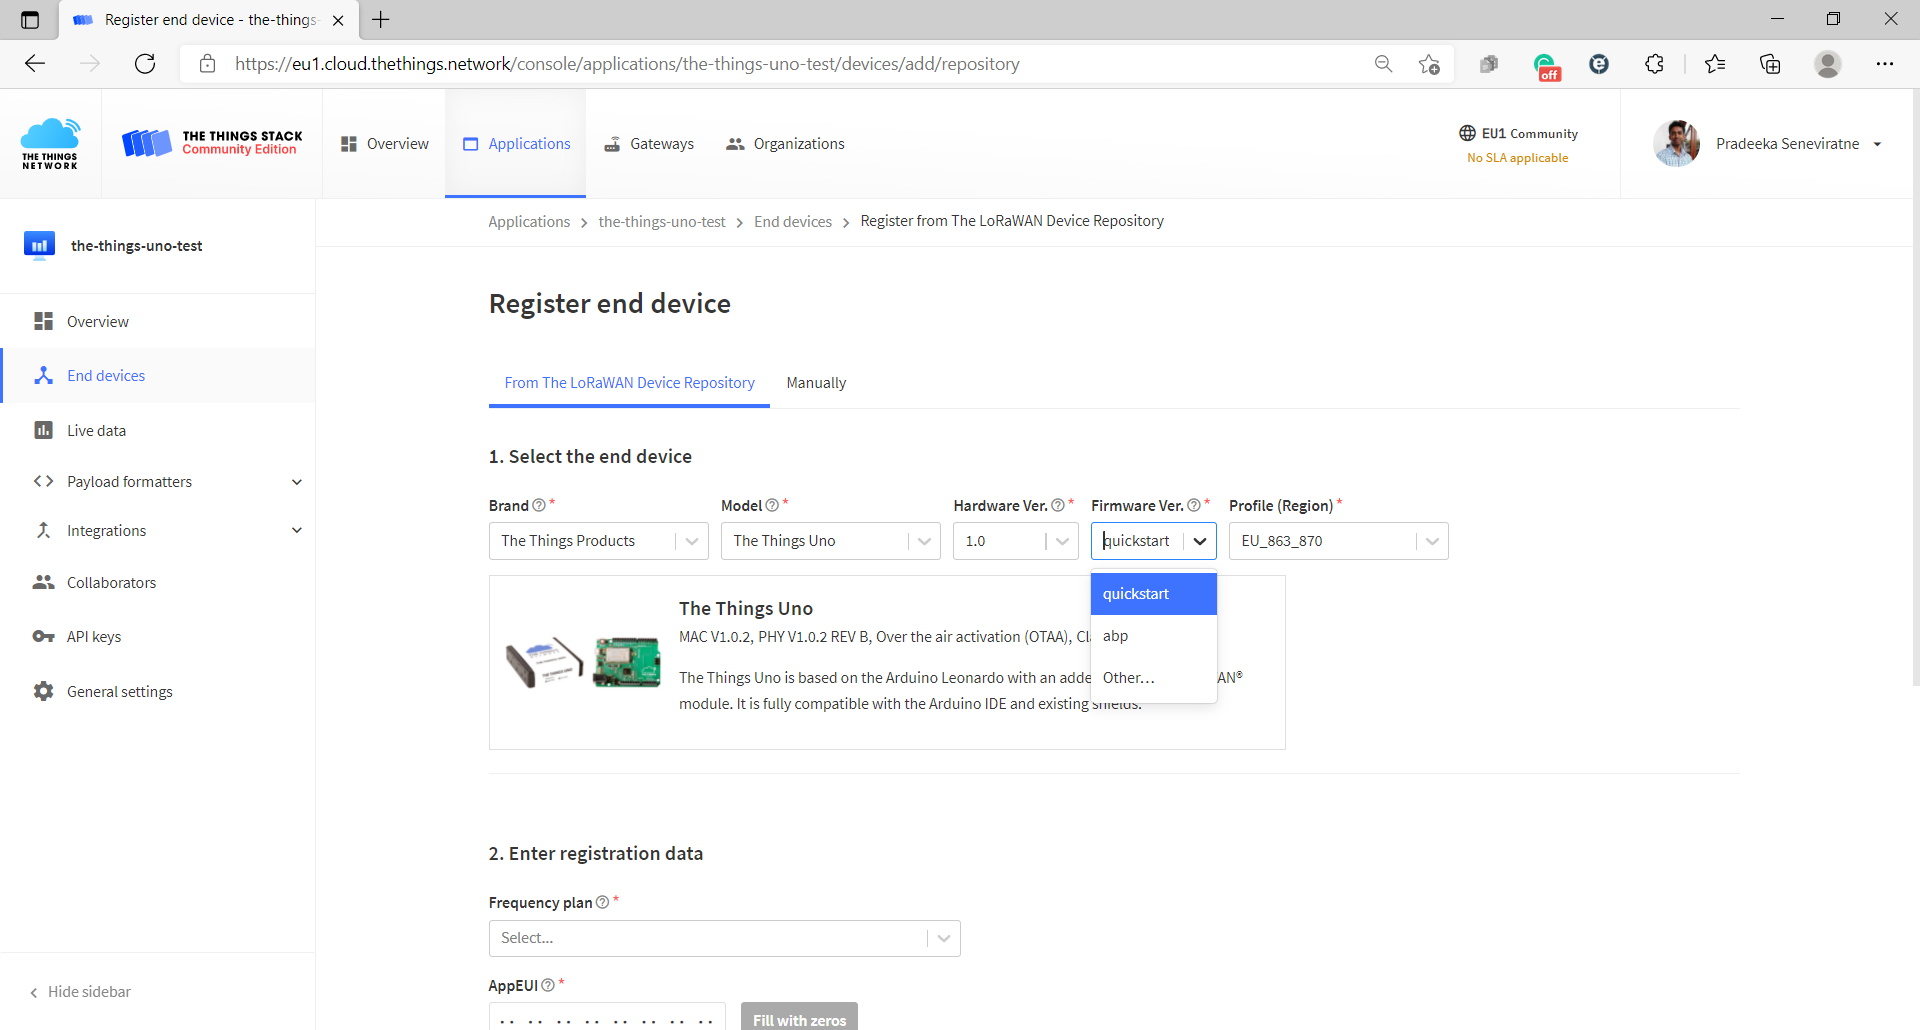
On the Register end device page, select the From the LoRaWAN Device Repository tab, if not already selected by default.
Under Select the end device, select the following mandatory fields.
- Brand -
The Things Products - Model –
The Things Uno - Hardware Ver. –
1.0 - Firmware Ver. –
quickstartorabp. We recommend you to usequickstartas it supports OTAA. - Profile (Region) – Choose
EU_863_870orUS_902_928to match with your board.
Under the Enter registration data, select/fill the following mandatory fields.
If you have selected quickstart from the Firmware Ver. in the previous step:
- Frequency plan – Select
Europe 863-870 MHz (SF9 for RX2 - recommended)for EU_863_870 orUnited States 902-928 MHz, FSB2 (used by TTN)for US_902_928. - AppEUI – Copy the AppEUI from the output printed by the TheThingsUnoTest sketch.
- DevEUI – Copy the DevEUI from the output printed by the TheThingsUnoTest sketch.
- AppKey – Select Generate button to generate an AppKey.
- End device ID – Give your device a unique human-readable identifier.
Select the Register end device button.
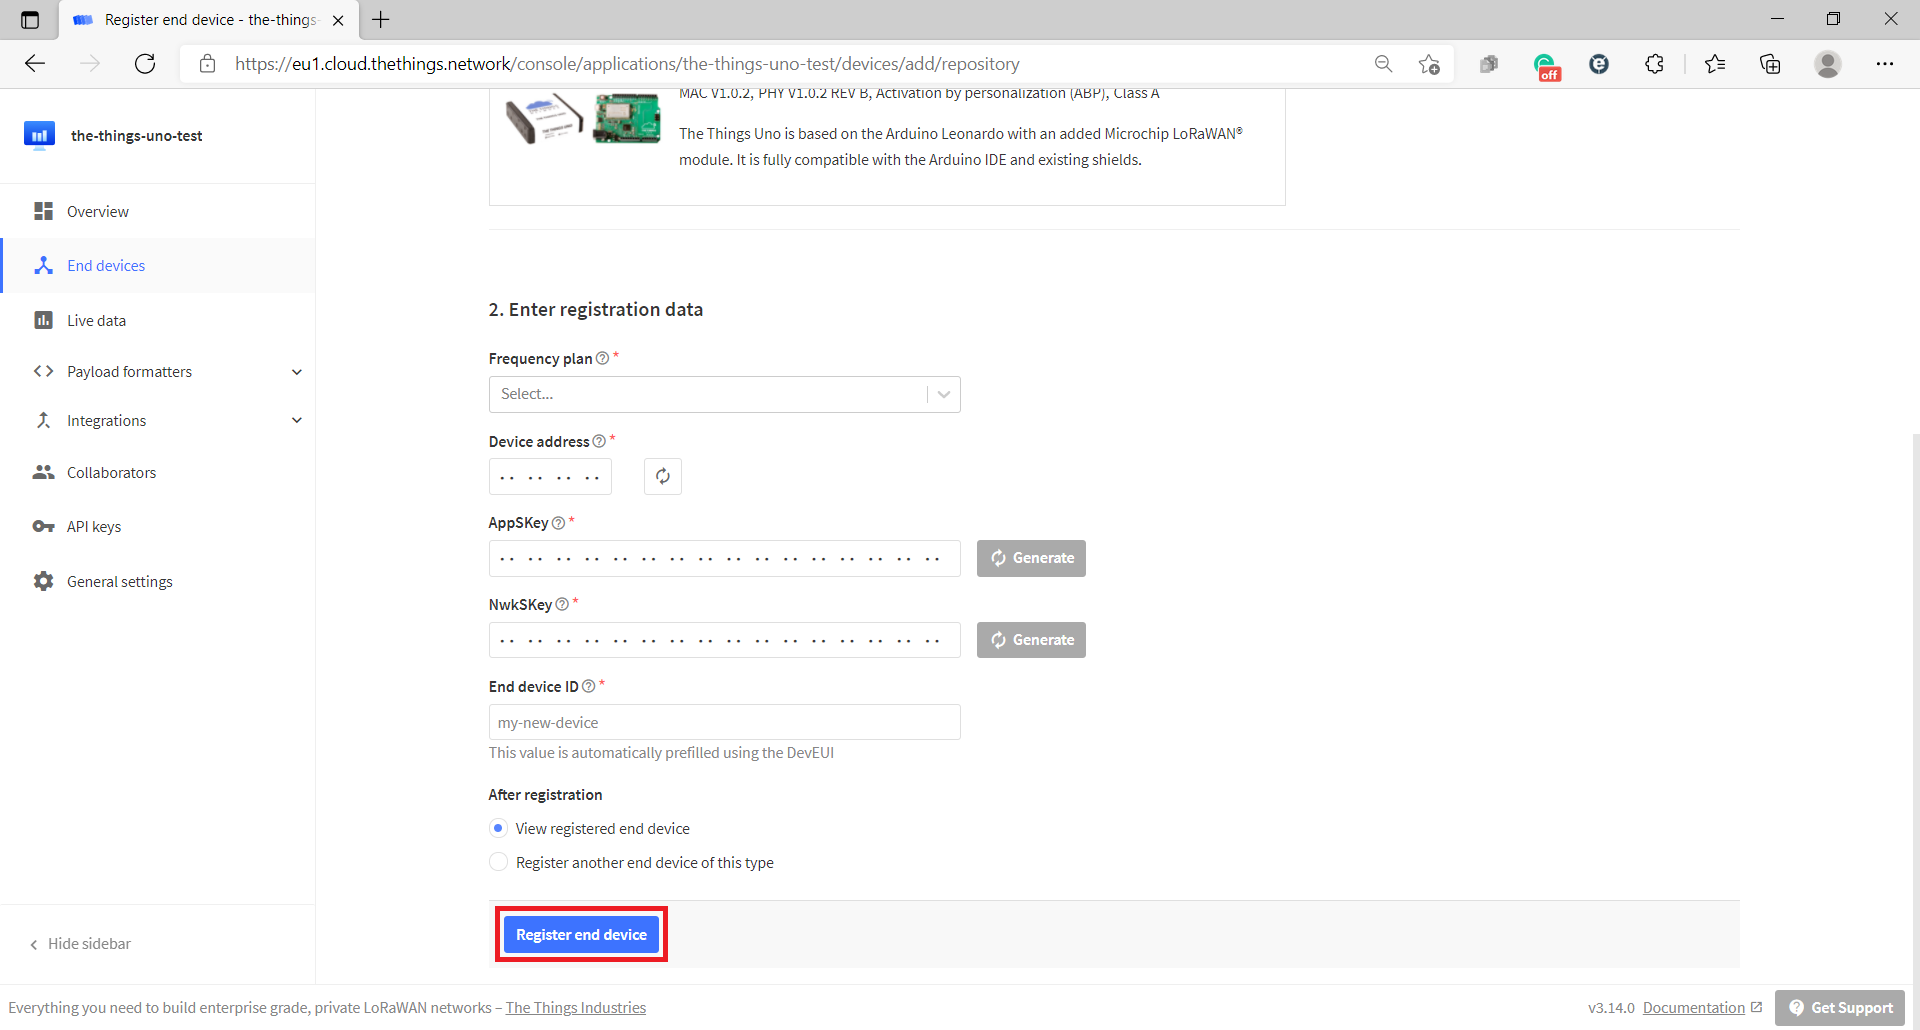
If you have selected abp from the Firmware Ver. in the previous step:
- Frequency plan – Select
Europe 863-870 MHz (SF9 for RX2 - recommended)for EU_863_870 orUnited States 902-928 MHz, FSB2 (used by TTN)for US_902_928. - Device address - Select Generate button.
- AppSKey– Select Generate button.
- NwkSKey– Select Generate button.
- End device ID – Give your device a unique human-readable identifier.
Select the Register end device button.
Once registered, you will be redirected to the overview page of the newly registered device, where you can find the generated AppKey which we’ll need next.
Activating the Things Uno - OTAA
In this section, you will learn how to use the Over the air activation (OTAA) method to activate your Things Uno with The Things Stack. To do so you had to register your Things Uno with The Things Stack using From the LoRaWAN Device Repository with the quickstart firmware version.
Open the TheThingsUnoTest sketch with your Arduino IDE if not already open.
Type the following code after the #include <TheThingsNetwork.h>.
// Set your AppEUI and AppKey
const char *appEui = "0000000000000000";
const char *appKey = "00000000000000000000000000000000";
Replace the appEUI with the AppEUI you have copied from the previous sketch’s output.
Replace the appKey with the AppKey you have generated with the From the LoRaWAN device repository option.
Type the following code in the setup() function just after the loraSerial.begin(57600).
debugSerial.println("-- JOIN");
ttn.join(appEui, appKey);
Upload the sketch to your Things Uno and then open the Serial Monitor. You should see something like this.
-- STATUS
EUI: 0004A30B001B7AD2
Battery: 3223
AppEUI: 70B3D57EF000001C
DevEUI: 0004A30B001B7AD2
DevAddr: 260127C6
Data Rate: 5
RX Delay 1: 1000
RX Delay 2: 2000
Total airtime: 0.00 s
-- JOIN
Version is RN2483 1.0.1 Dec 15 2015 09:38:09, model is RN2483
...
Sending: mac set appeui with 8 bytes
Sending: mac set deveui 0004A30B001B7AD2
Sending: mac set appkey with 16 bytes
Sending: mac join otaa
Join accepted. Status: 00000401
DevAddr: 26012E93
Meanwhile, you should see something like this in the Live data section on your application overview page.
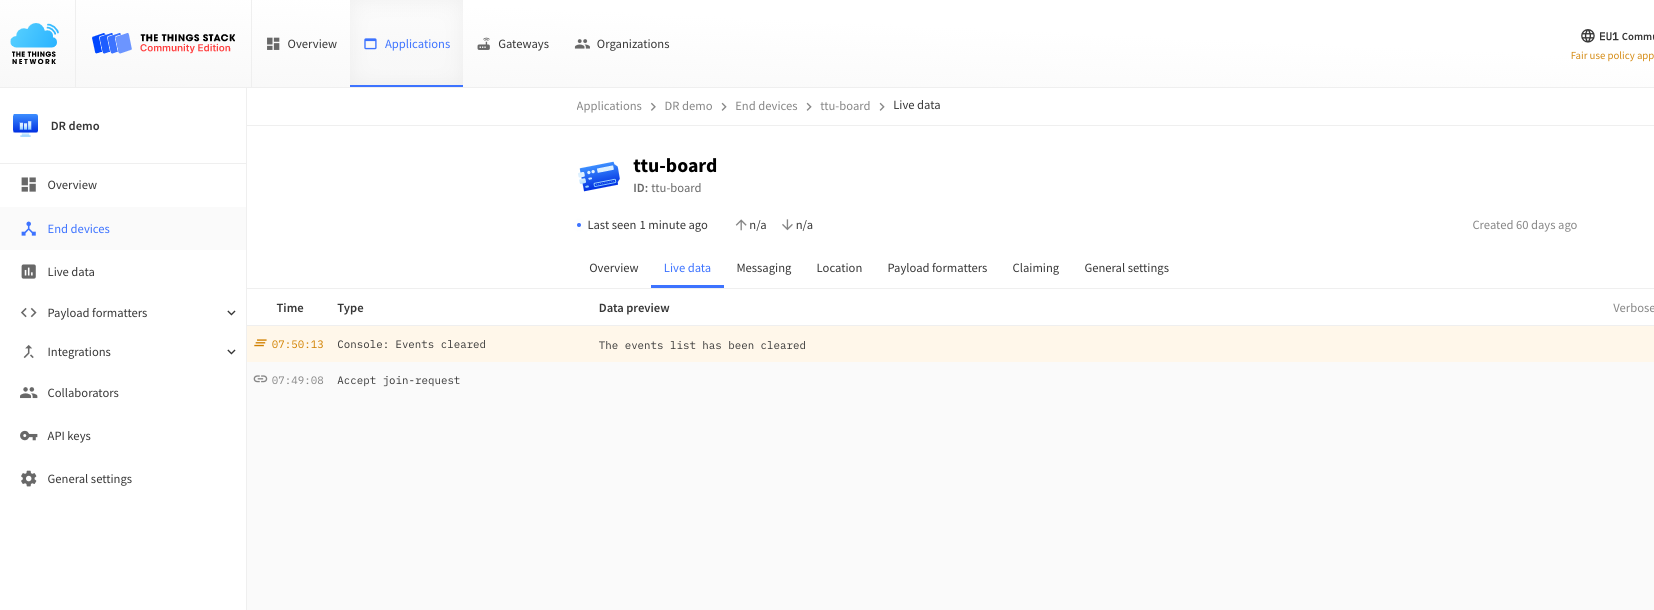
Your device is now activated and ready to send/receive messages to/from The Things Stack!.
Sending Messages
With The Things Stack, you can send small packets of data under certain limitations. The following example will explain to you how to send the status of the Things Uno’s built-in LED (pin 13) as a simple message.
In the Arduino IDE, go back to your TheThingsUnoTest sketch and replace the loop() function with the following lines:
debugSerial.println("-- LOOP");

// Prepare array of 1 byte to indicate LED status
byte data[1];
data[0] = (digitalRead(LED_BUILTIN) == HIGH) ? 1 : 0;

// Send it off
ttn.sendBytes(data, sizeof(data));

delay(10000);
- The
byte data[1]creates an empty bytes array of size 1. - The
digitalRead()function reads the status of the built-in LED (pin 13) and stores 1 in the bytes array if the LED is ON (pin 13 is HIGH) or stores 0 if the LED is OFF (pin 13 is LOW). - The
sendBytes()function accepts the data to be sent and the size of data. - The
delay(10000)makes 10 seconds delay between each message
After editing, upload the sketch to your Things Uno. Then in the Arduino IDE, open the Serial Monitor. You should see something like this:
-- LOOP
Sending: mac tx uncnf 1 with 1 bytes
Successful transmission
The above output indicates that the data has been sent from your Things Uno side to The Things Stack.
Decoding the received messages
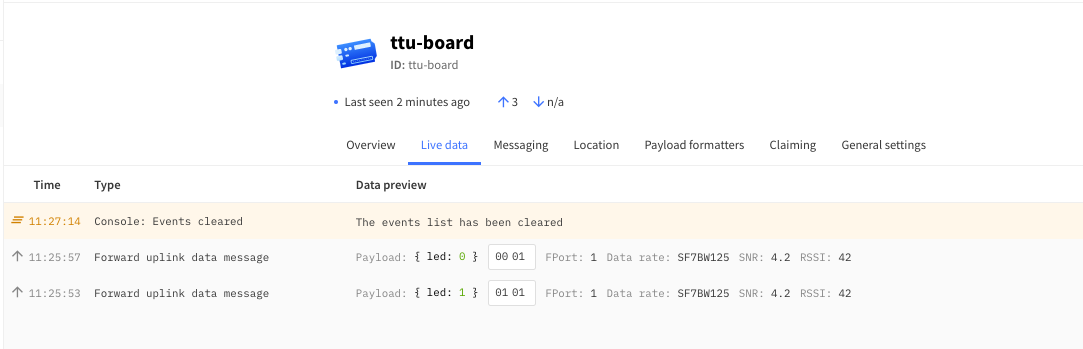
Now let’s confirm whether the data has been received to The Things Stack. On the Applications page, select the Live data tab. You should now see the messages come in. What you see on the Live data tab are the raw payloads in hex-formatted, space-separated bytes.
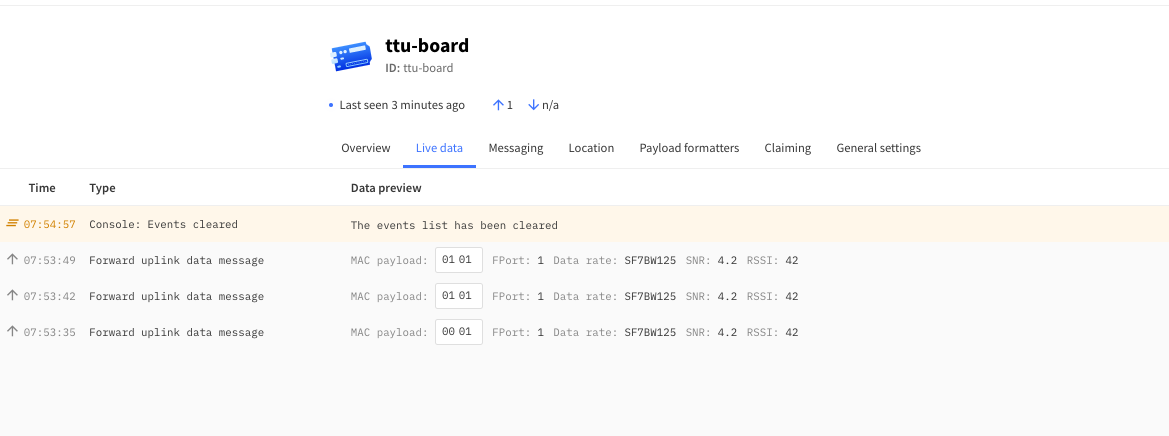
These payloads are difficult to understand so let’s decode them into meaningful fields.
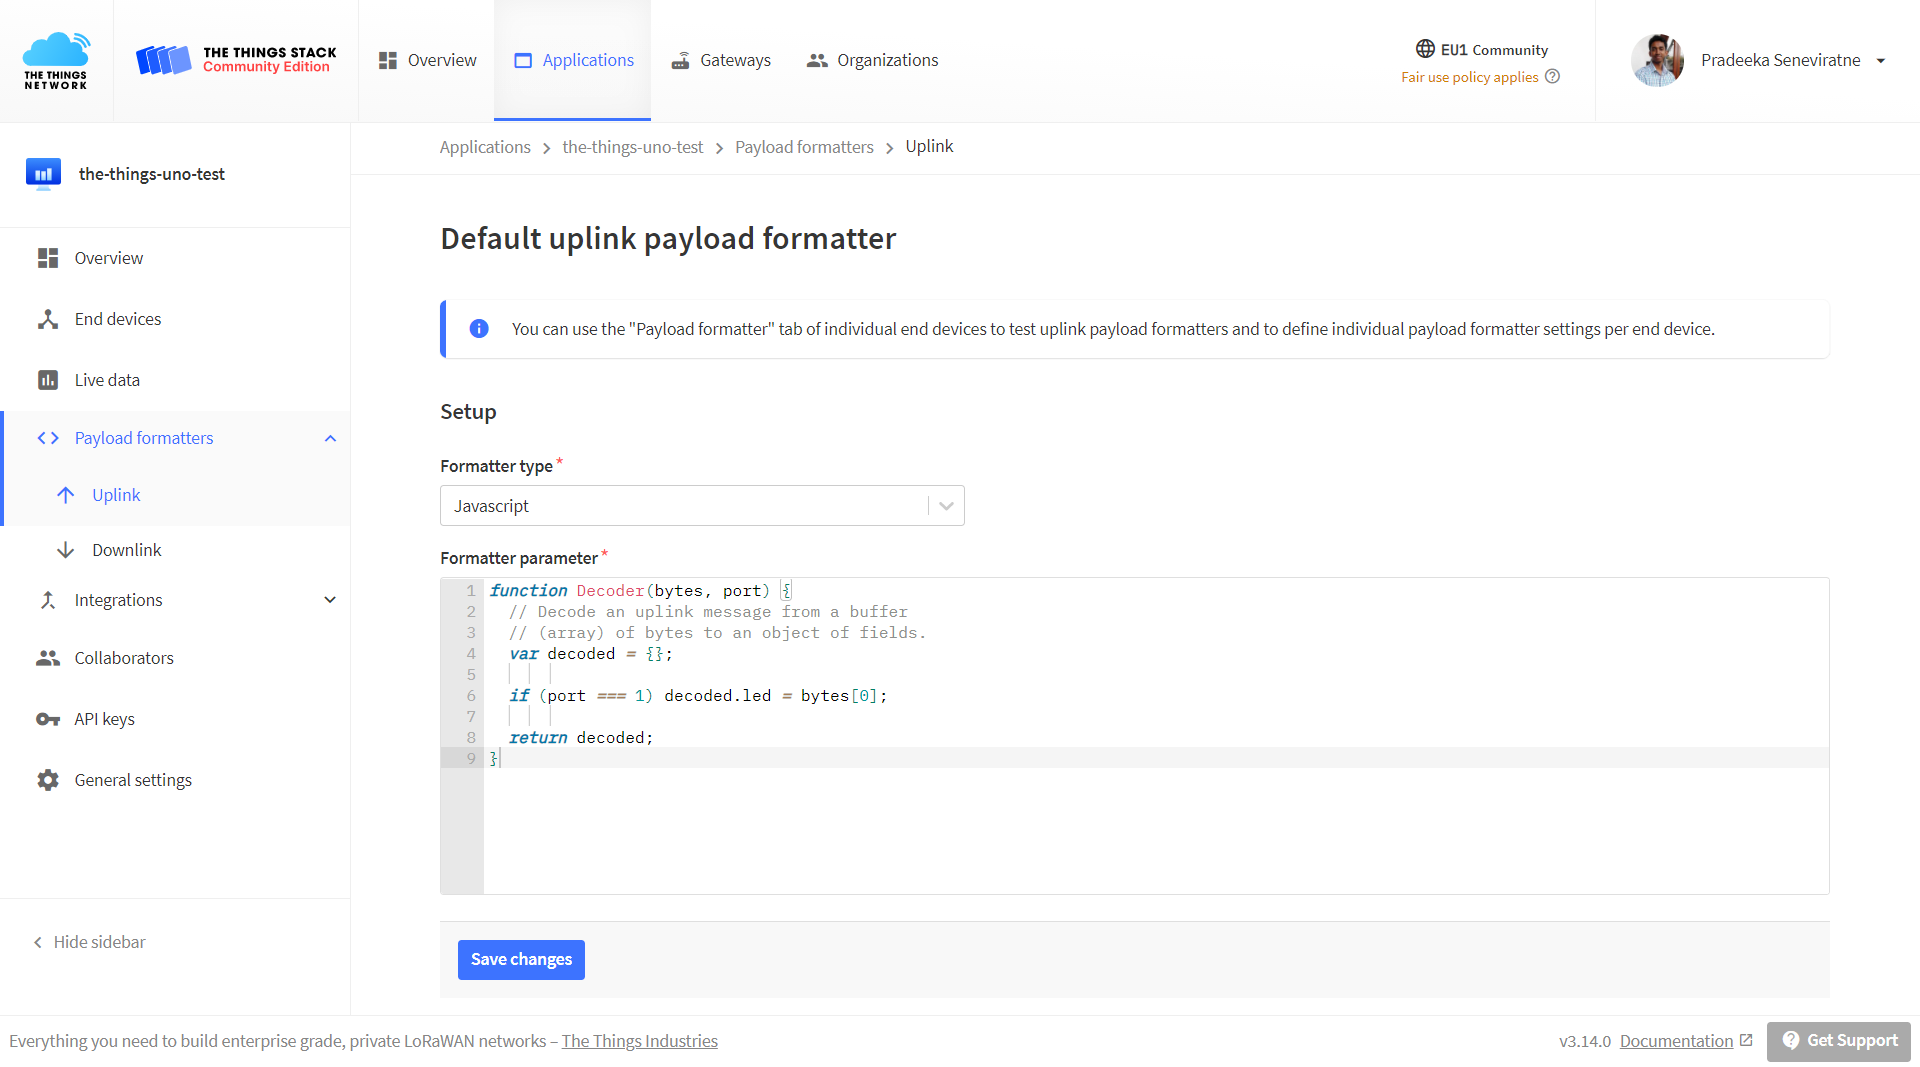
On the Applications page, select the Payload formatter tab and then select Uplink.
Under Setup, from the Formatter type drop-down list select Javascript.
Copy and paste the following JavaScript code in the Formatter parameter box.
function Decoder(bytes, port) {
  // Decode an uplink message from a buffer
  // (array) of bytes to an object of fields.
  var decoded = {};

  if (port === 1) decoded.led = bytes[0];

  return decoded;
}
Select the Save changes button.
Now go back again to the Live data tab. The new messages should now show their decoded payload.
You have now completed the quickstart and are able to activate the Things Uno, send messages to an application, and decode them from the server side to get meaningful data. Go build something!