This section contains instructions for adding Gateways in The Things Stack.
Some gateways, like The Things Indoor Gateway Pro and The Things Indoor Gateway, have an onboarding guide. Look for your gateway in the left hand menu for specific instructions.
If your The Things Stack deployment is connected to Packet Broker, you can take advantage of coverage from The Things Network without adding any gateways of your own. See the community sourced TTN Mapper to find out if you have nearby gateways.
Adding Gateways using the Console
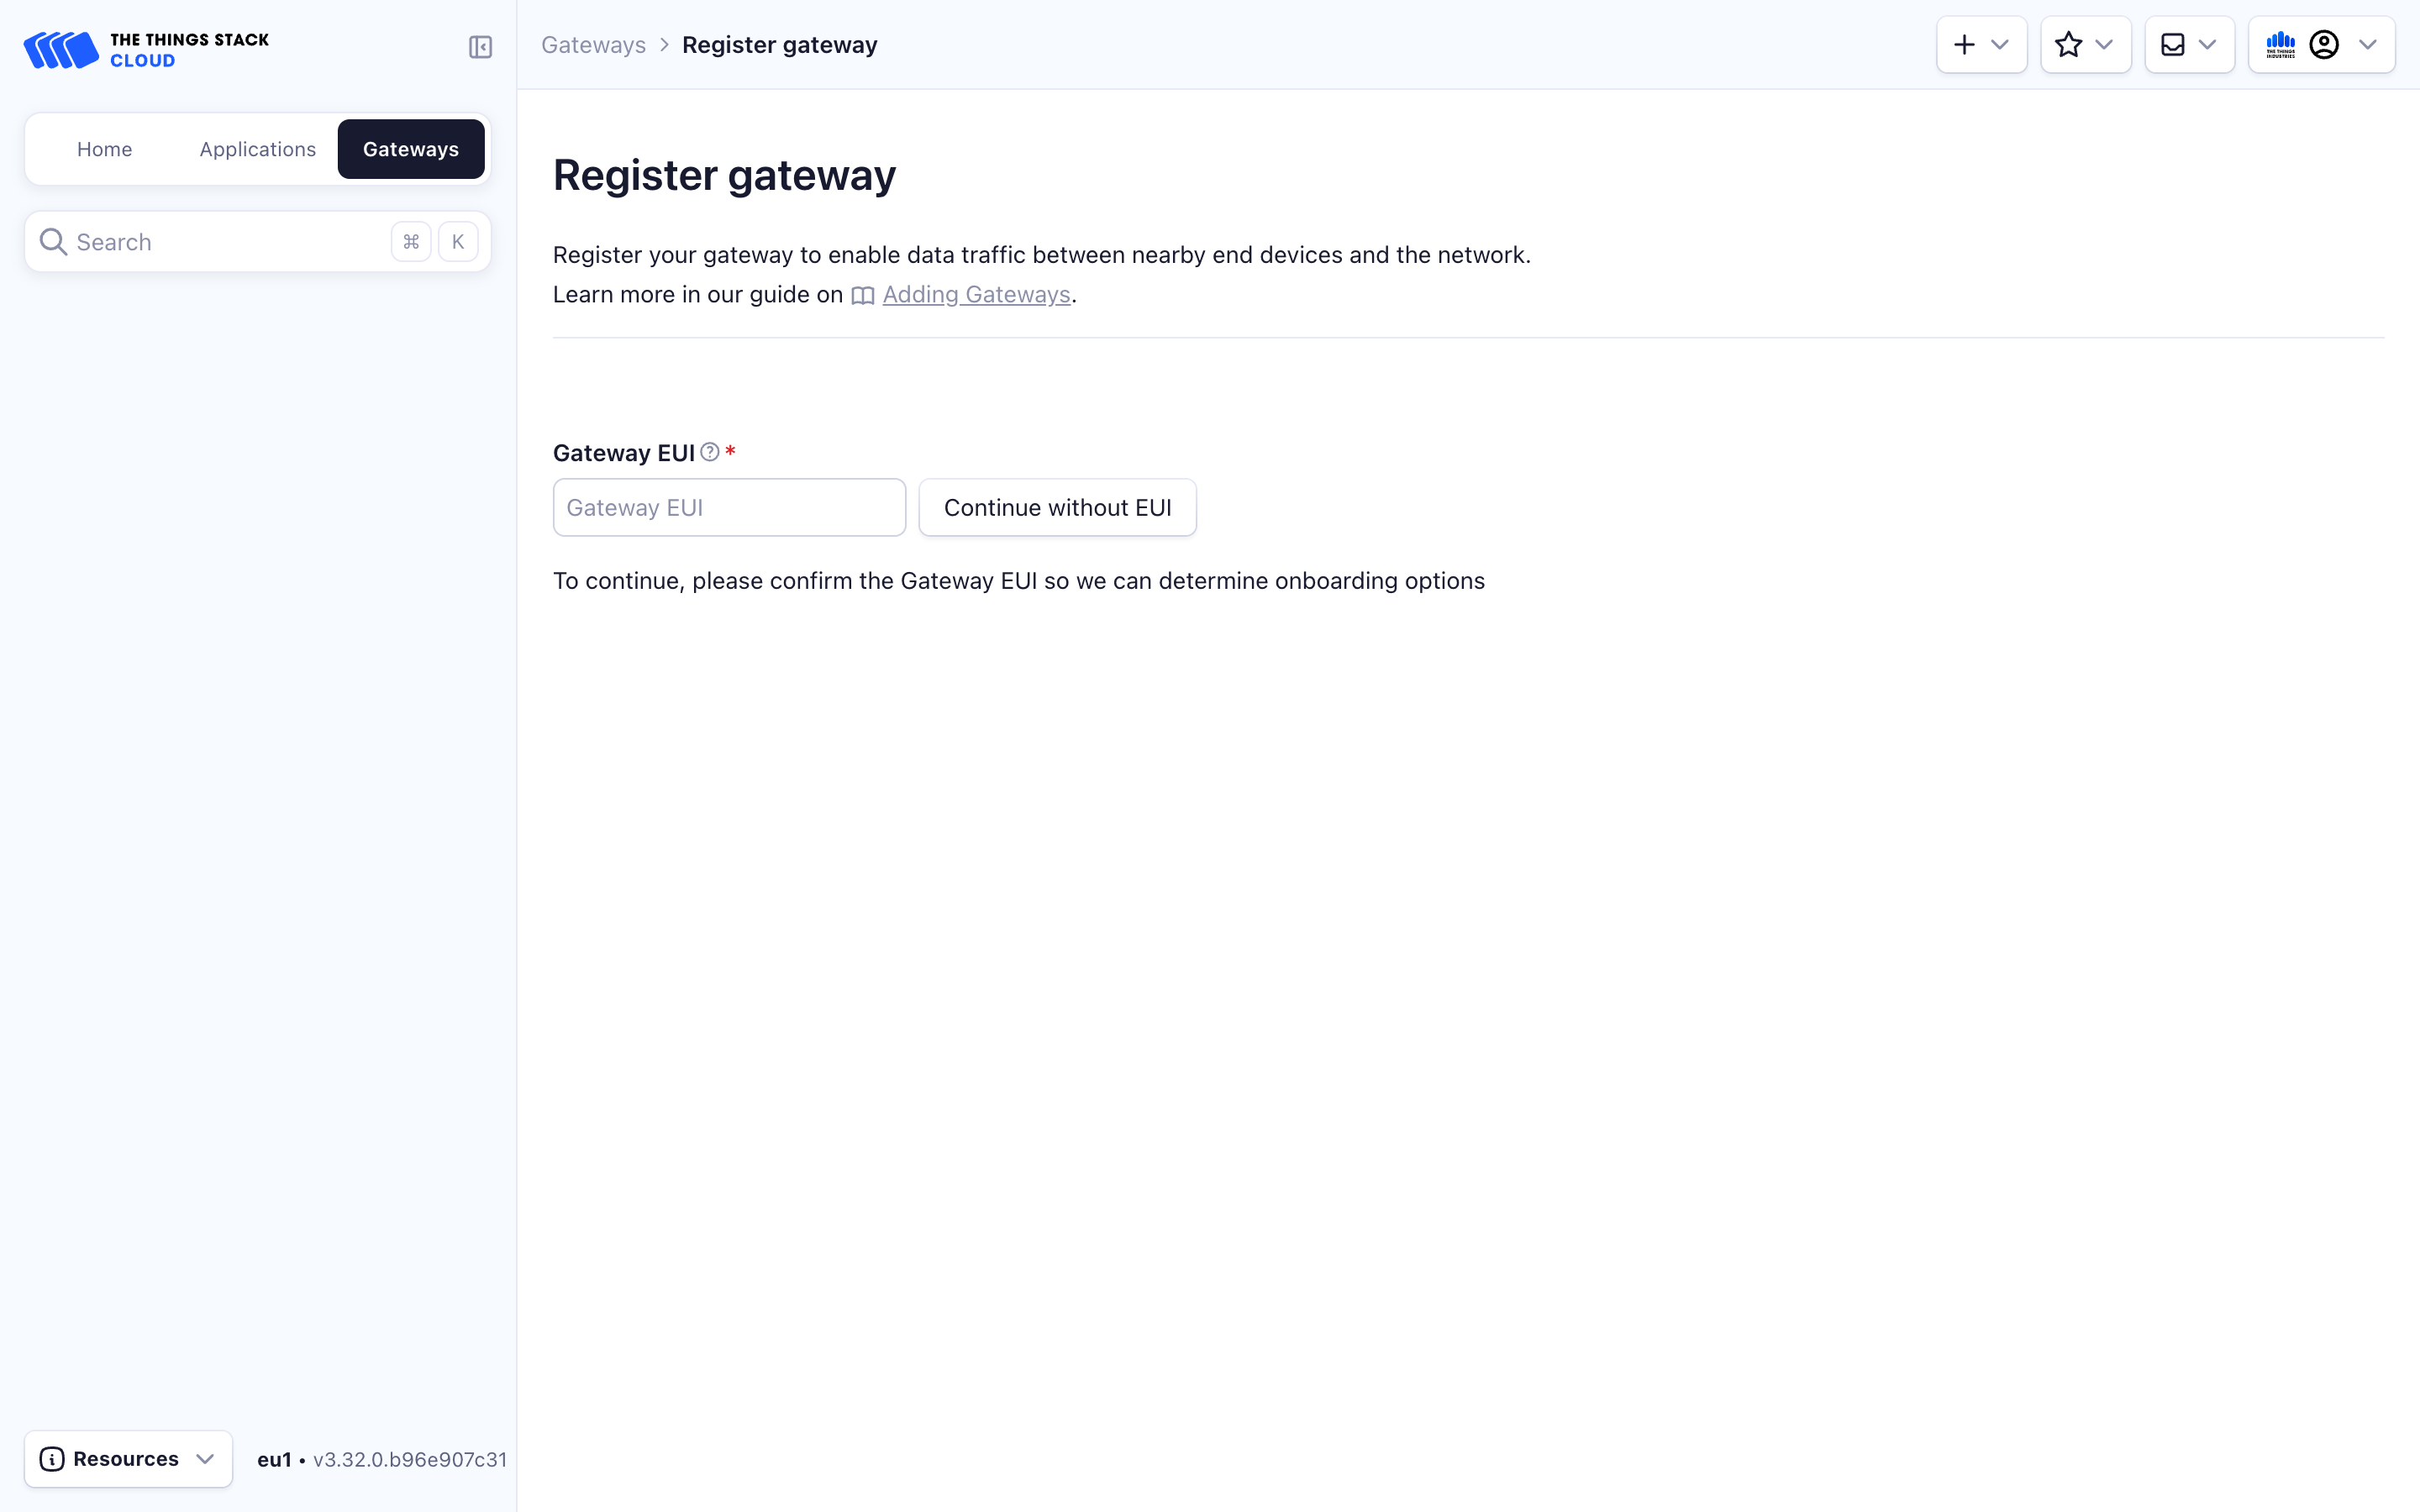
Go to Gateways in the top menu, and click + Register Gateway to reach the gateway registration page.
Fill the Gateway EUI and click Confirm. Some gateways do not use a Gateway EUI, in which case you can just click on Continue without EUI.
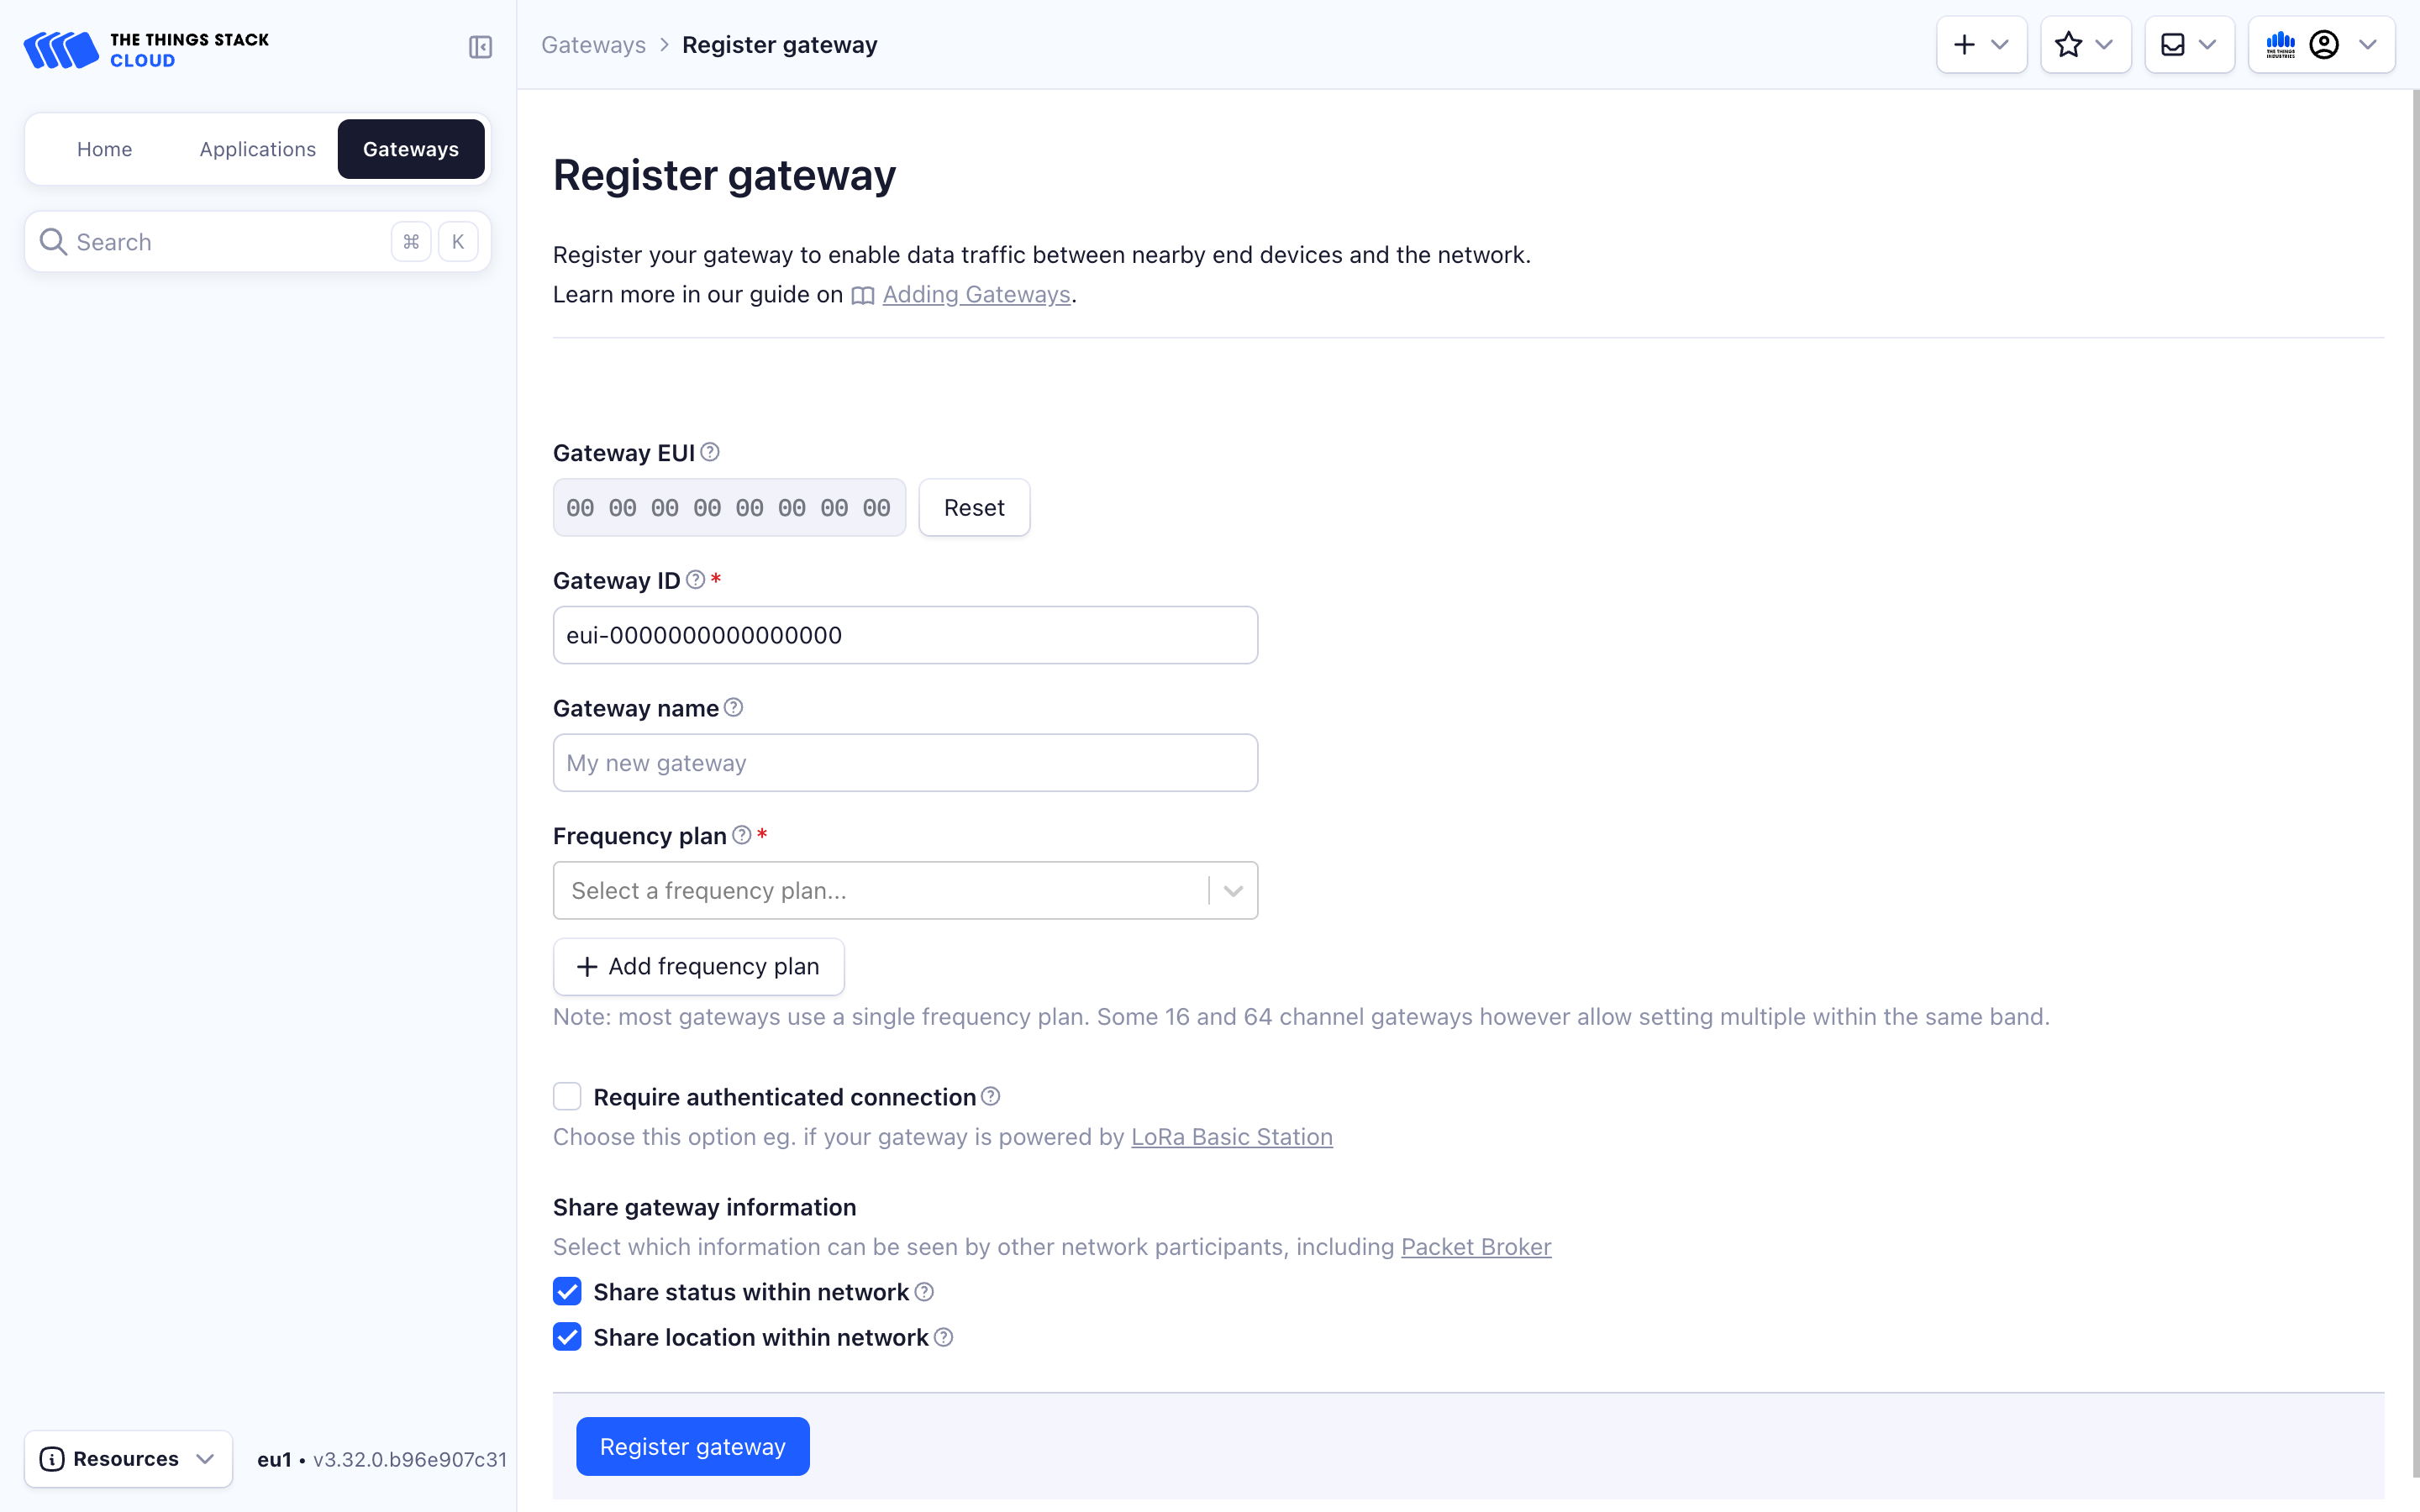
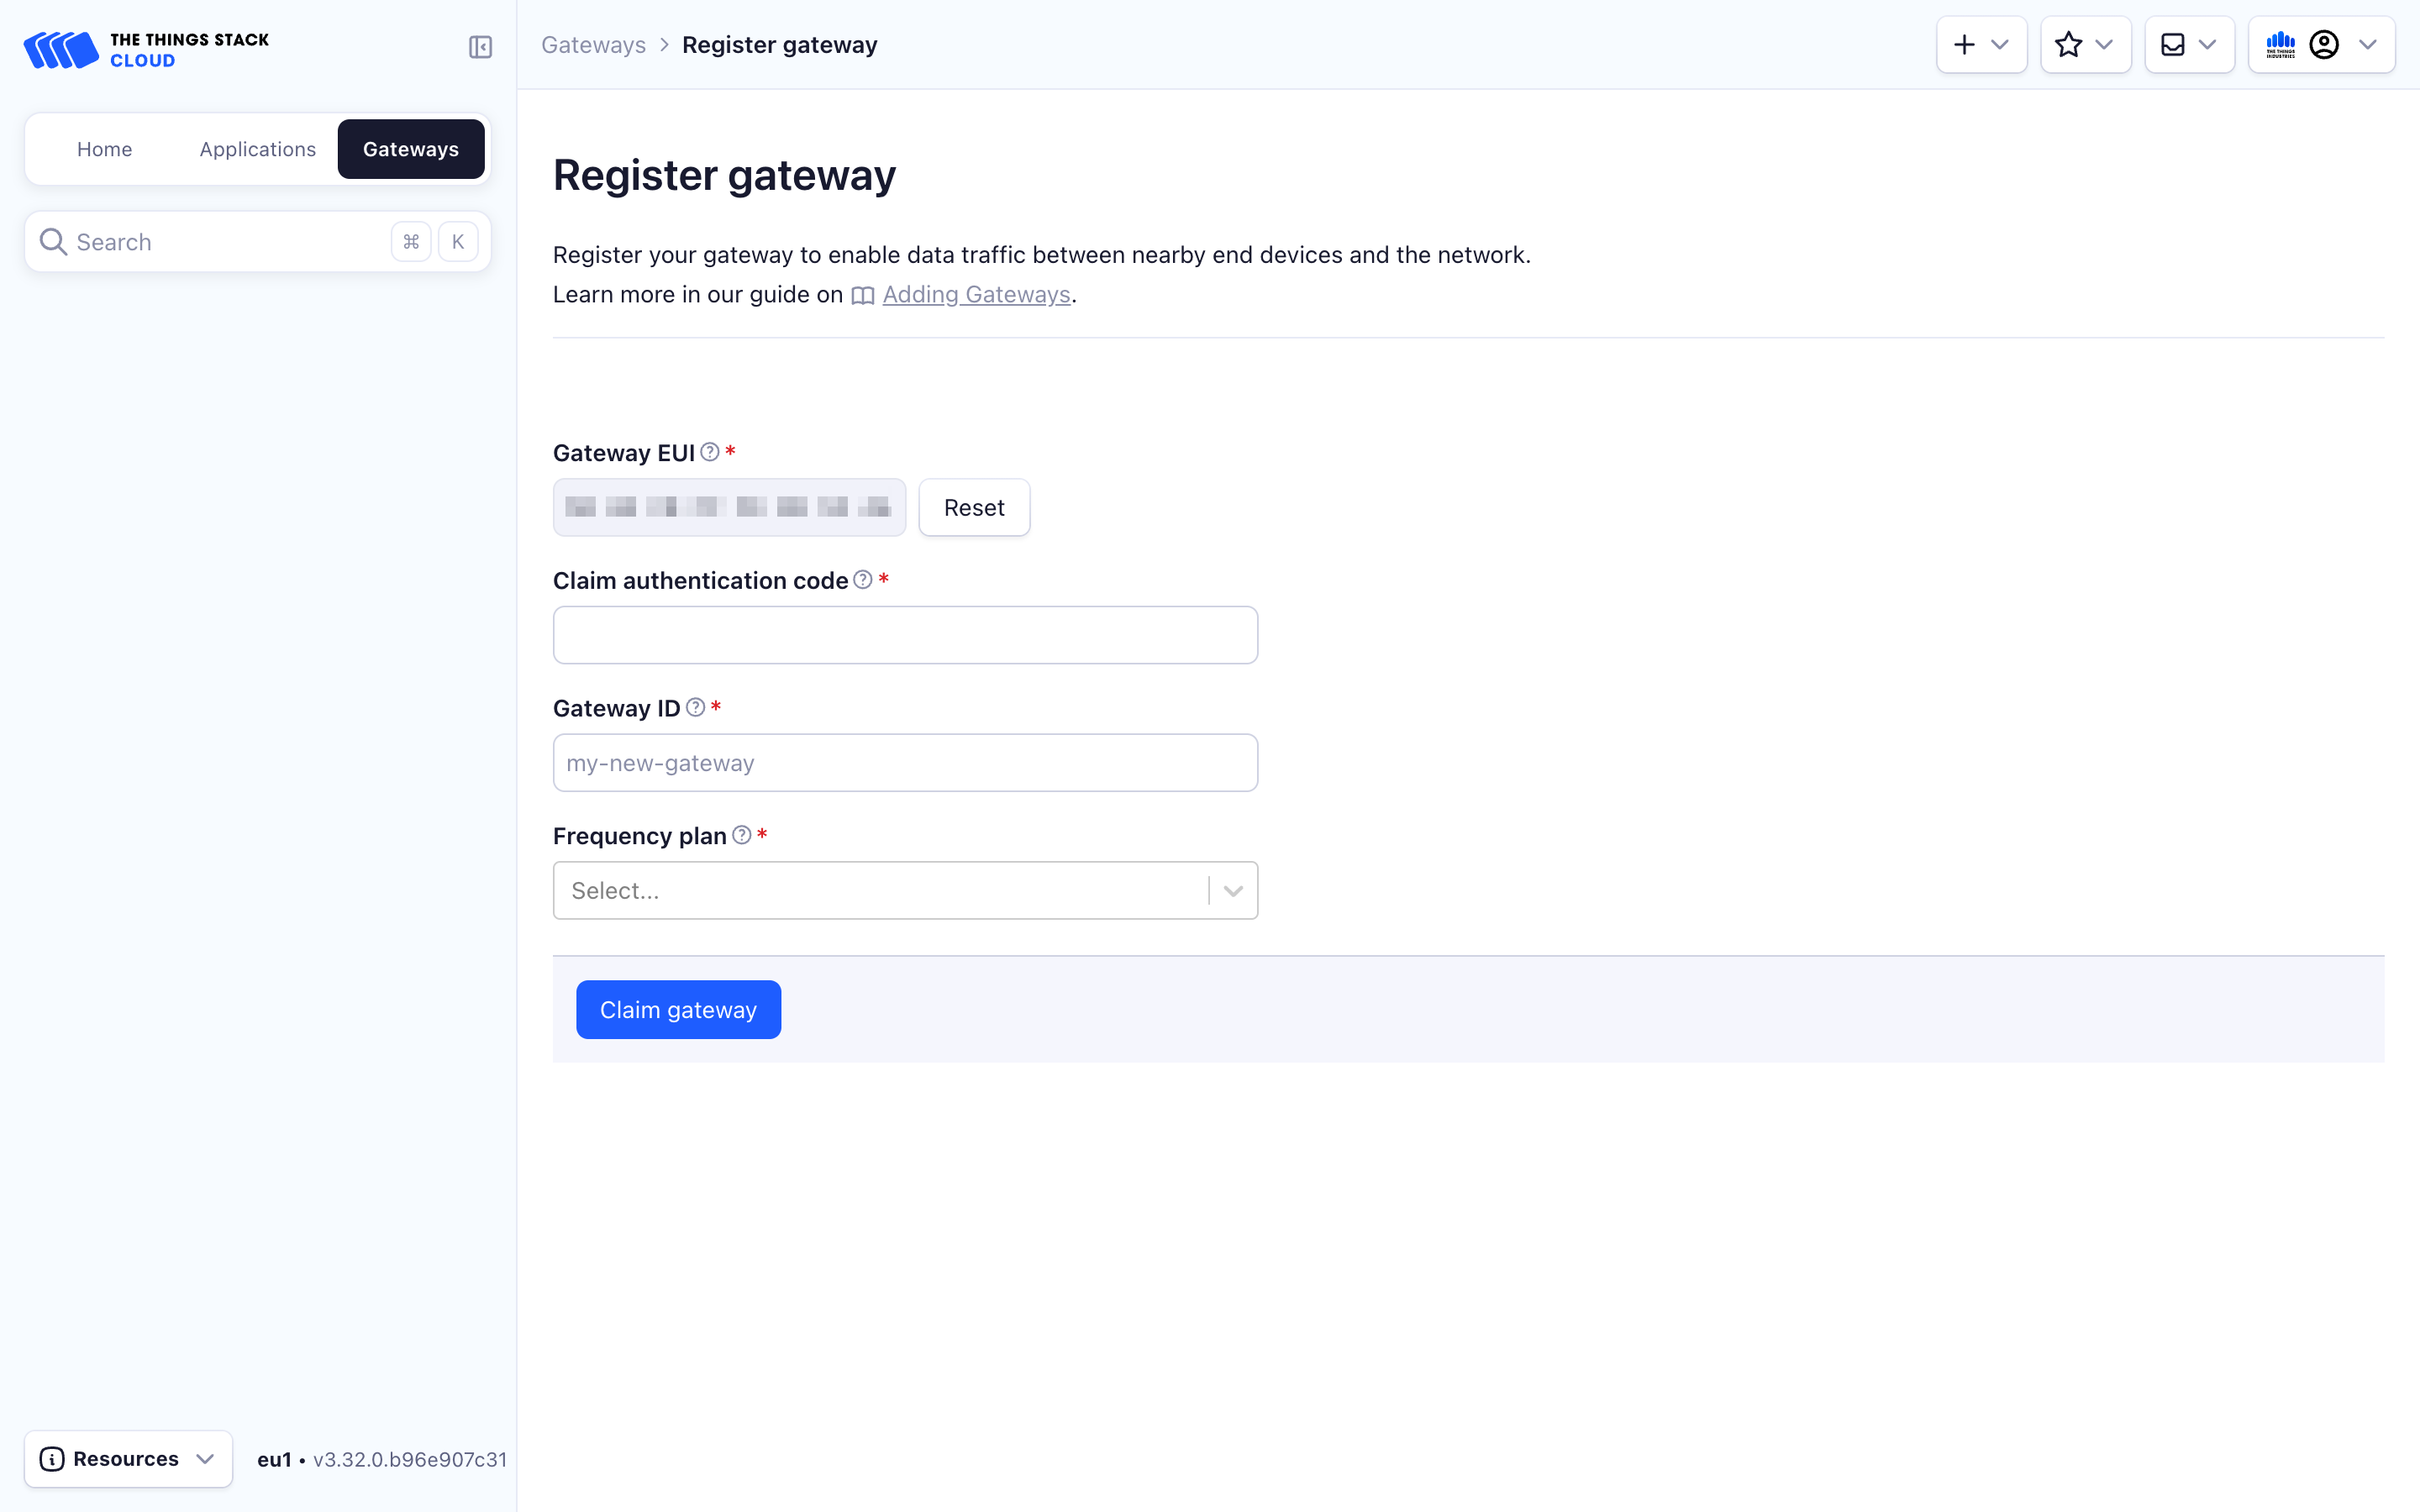
Depending on whether the Gateway EUI is claimable you will either be shown the claiming form or the manual registration form.
On the manual registration form fill in the Frequency Plan and the Gateway ID if it was not pre filled, The other fields are optional. Click Register Gateway to finish.
If your gateway is claimable (e.g. The Things Indoor Gateway Pro and The Things Indoor Gateway), you will see the claiming form. Here, fill in the Owner Token, Gateway ID and the Frequency Plan. Click Claim Gateway to finish.
Your gateway will be created and you will be redirected to the gateway overview page of your newly created gateway.
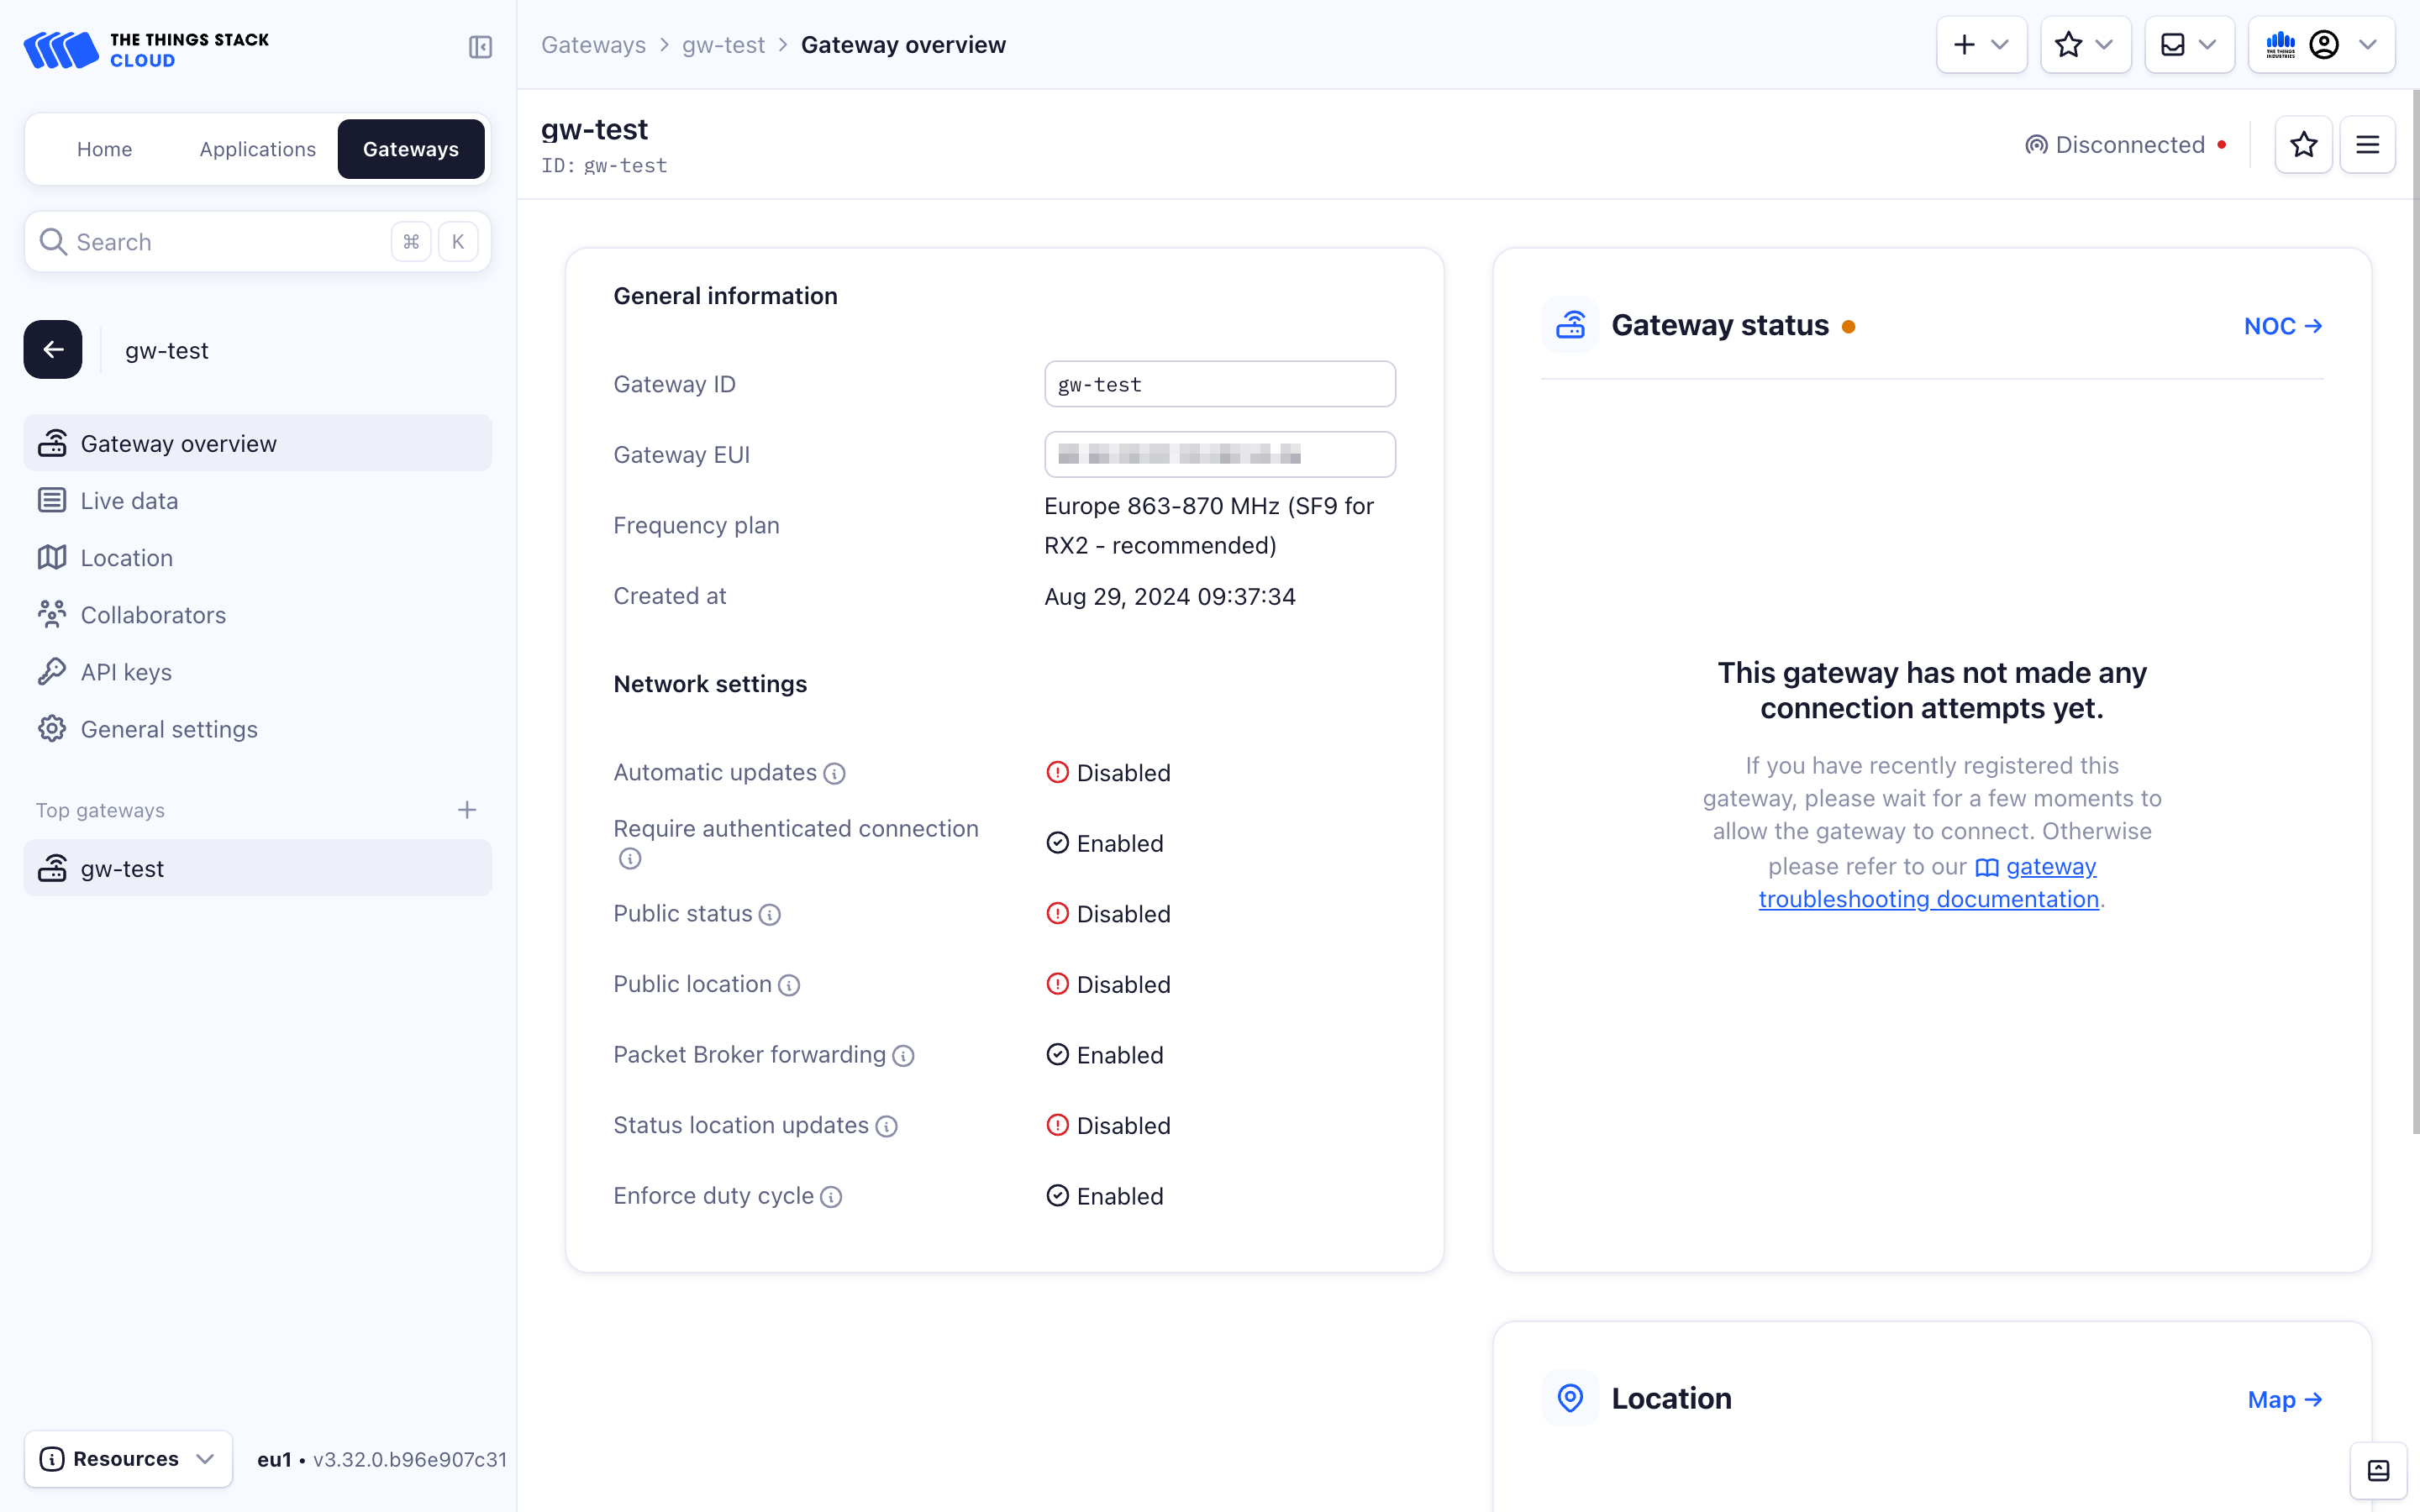
You can now connect your gateway to The Things Stack.
Adding Gateways using the CLI
We define some user parameters that will be used below:
GTW_ID="gtw1"
FREQUENCY_PLAN="EU_863_870"
GTW_EUI="00800000A00009EF"
USER_ID="admin"
Make sure to modify these according to your setup.
First, list the available frequency plans:
ttn-lw-cli gateways list-frequency-plans
Then, create the first gateway with the chosen frequency plan:
ttn-lw-cli gateways create $GTW_ID \
  --user-id $USER_ID \
  --frequency-plan-id $FREQUENCY_PLAN \
  --gateway-eui $GTW_EUI \
  --enforce-duty-cycle
This creates a gateway gtw1 with user admin as collaborator, frequency plan EU_863_870, EUI 00800000A00009EF and respecting duty-cycle limitations. You can now connect your gateway to The Things Stack.
Adding Gateways using the API
Details
| Item | Value |
|---|---|
| Endpoint | /api/v3/users/{collaborator.user_ids.user_id}/gateways |
| Request type | POST |
Example
To create a gateway for user user1 on thethings.example.com, first create a JSON file named req.json in the same folder with the following example contents.
{
  "gateway": {
    "ids": {
      "eui": "1111111111111111",
      "gateway_id": "test-gateway"
    },
    "name": "My Test Gateway",
    "frequency_plan_ids": ["EU_863_870"],
    "require_authenticated_connection": false,
    "status_public": false,
    "location_public": false,
    "gateway_server_address": "thethings.example.com",
    "enforce_duty_cycle": true
  }
}
The request using cURL is as follows.
curl -v -H "Content-Type: application/json" -H "Authorization: Bearer $API_KEY" \
-d @./req.json https://thethings.example.com/api/v3/users/testuser/gateways
{"ids":{"gateway_id":"my-test-gateway","eui":"1111111111111111"},"created_at":"2024-01-09T13:29:22.468006Z","updated_at":"2024-01-09T13:29:22.468007Z","name":"My Test Gateway","administrative_contact":{"user_ids":{"user_id":"testuser"}},"technical_contact":{"user_ids":{"user_id":"testuser"}},"version_ids":{},"gateway_server_address":"thethings.example.com","frequency_plan_ids":["EU_863_870"],"enforce_duty_cycle":true,"schedule_anytime_delay":"0s"}
Optional: Create Gateway API Key
Some gateways require an API Key with Link Gateway Rights to be able to connect to The Things Stack. In this section we explain how to create an API key with this right, but the procedure of creating an API key is identical for any other right as well.
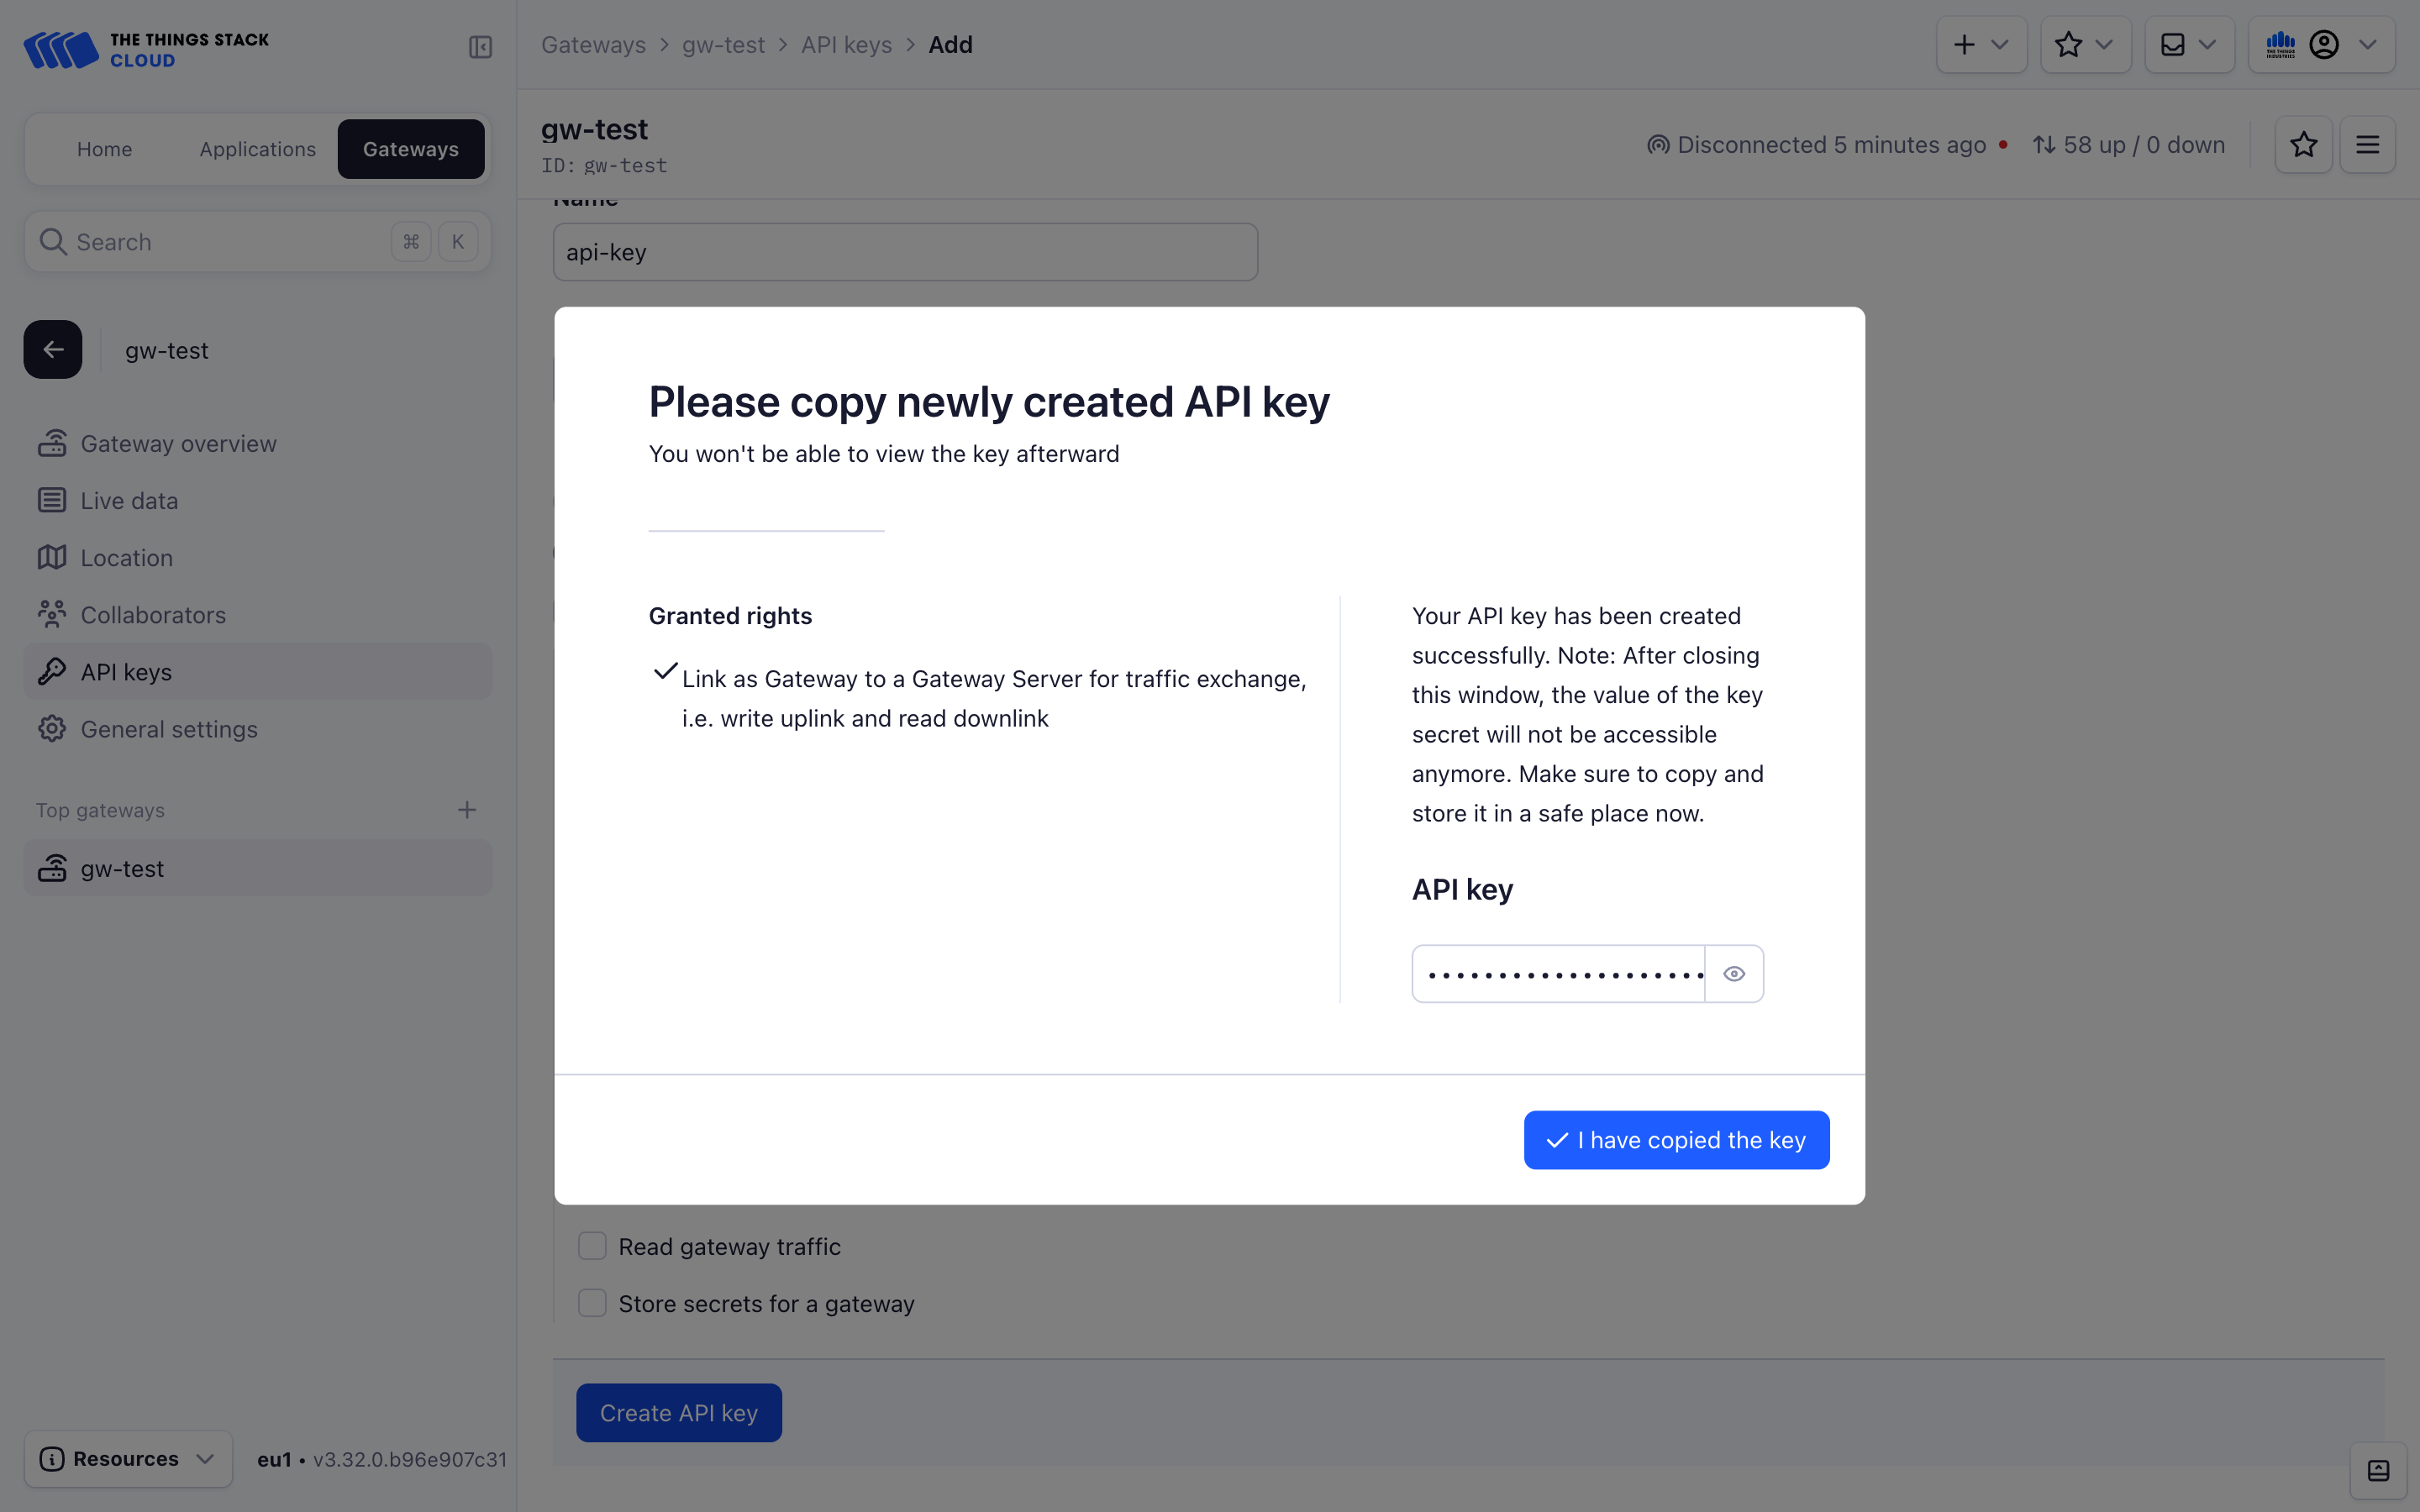
To do this, navigate to API Keys on the left hand menu of your gateway’s settings and select Add API Key.
Enter a Name for your key, set the Expiry date, select the Link as Gateway to a Gateway Server for traffic exchange, i.e. write uplink and read downlink right and then press Create API Key.

You will see a screen that shows your newly created API Key. You now can copy it in your clipboard by pressing the copy button. After saving the key in a safe place, press I have copied the key. You will not be able to see this key again in the future, and if you lose it, you can create a new one to replace it in the gateway configuration.
To create an API key for the gateway with the Link as Gateway Server for traffic exchange, i.e. write uplink and read downlink right:
API_KEY_NAME="API key for connecting my gateway"
ttn-lw-cli gateways api-keys create \
  --name $API_KEY_NAME \
  --gateway-id $GTW_ID \
  --right-gateway-link
The CLI will return an API key such as NNSXS.VEEBURF3KR77ZR.... This API key has only link rights and can therefore only be used for linking this gateway. Make sure to copy the key and save it in a safe place. You will not be able to see this key again in the future, and if you lose it, you can create a new one to replace it in the gateway configuration.
See the CLI Reference for details on managing gateway API keys using the CLI.
Details
| Item | Value |
|---|---|
| Endpoint | /api/v3/gateways/{gateway_ids.gateway_id}/api-keys |
| Request type | POST |
Example
To create an API Key for gateway my-test-gateway on thethings.example.com, first create a JSON file named req.json in the same folder with the following example contents.
{
  "expires_at": "2024-11-07T20:33:48.000Z",
  "name": "Test API Key",
  "rights": ["RIGHT_GATEWAY_LINK"]
}
The request using cURL is as follows.
curl -H "Content-Type: application/json" -H "Authorization: Bearer $API_KEY" \
-d @./req.json \
 https://thethings.example.com/api/v3/gateways/my-test-gateway/api-keys
{"id":"KS7BFCW5TUTMVA3WBN5GSQVTTYVQVR5FRH54C7A","key":"NNSXS.KS7BFCW5TUTMVA3WBN5GSQVTTYVQVR5FRH54C7A.Z3YH2OFUTBBAOUJBCJWSUGKFFQWGSDXG5JHNHMEU4DYYLO6JK7AQ","name":"Test API Key","rights":["RIGHT_GATEWAY_LINK"],"created_at":"2024-01-09T13:42:55.276762Z","updated_at":"2024-01-09T13:42:55.276763Z","expires_at":"2024-11-07T20:33:48Z"}
Set Gateway Location
Once you have added your gateway to The Things Stack, you can also set its location to be displayed on a map widget by clicking Location in the left-hand menu.
If you do not mind your gateway’s location to be publicly displayed, check the Share location within network box.
The gateway location can be manually set by entering the Latitude, Longitude and Altitude values.
You can also check the Update from status messages box if you want to update the location based on the metadata from the incoming uplink gateway status messages. The location settings you manually entered will be overwritten by the updates from the gateway status messages.
Note:
The Things Stack Console currently supports setting one antenna location per gateway.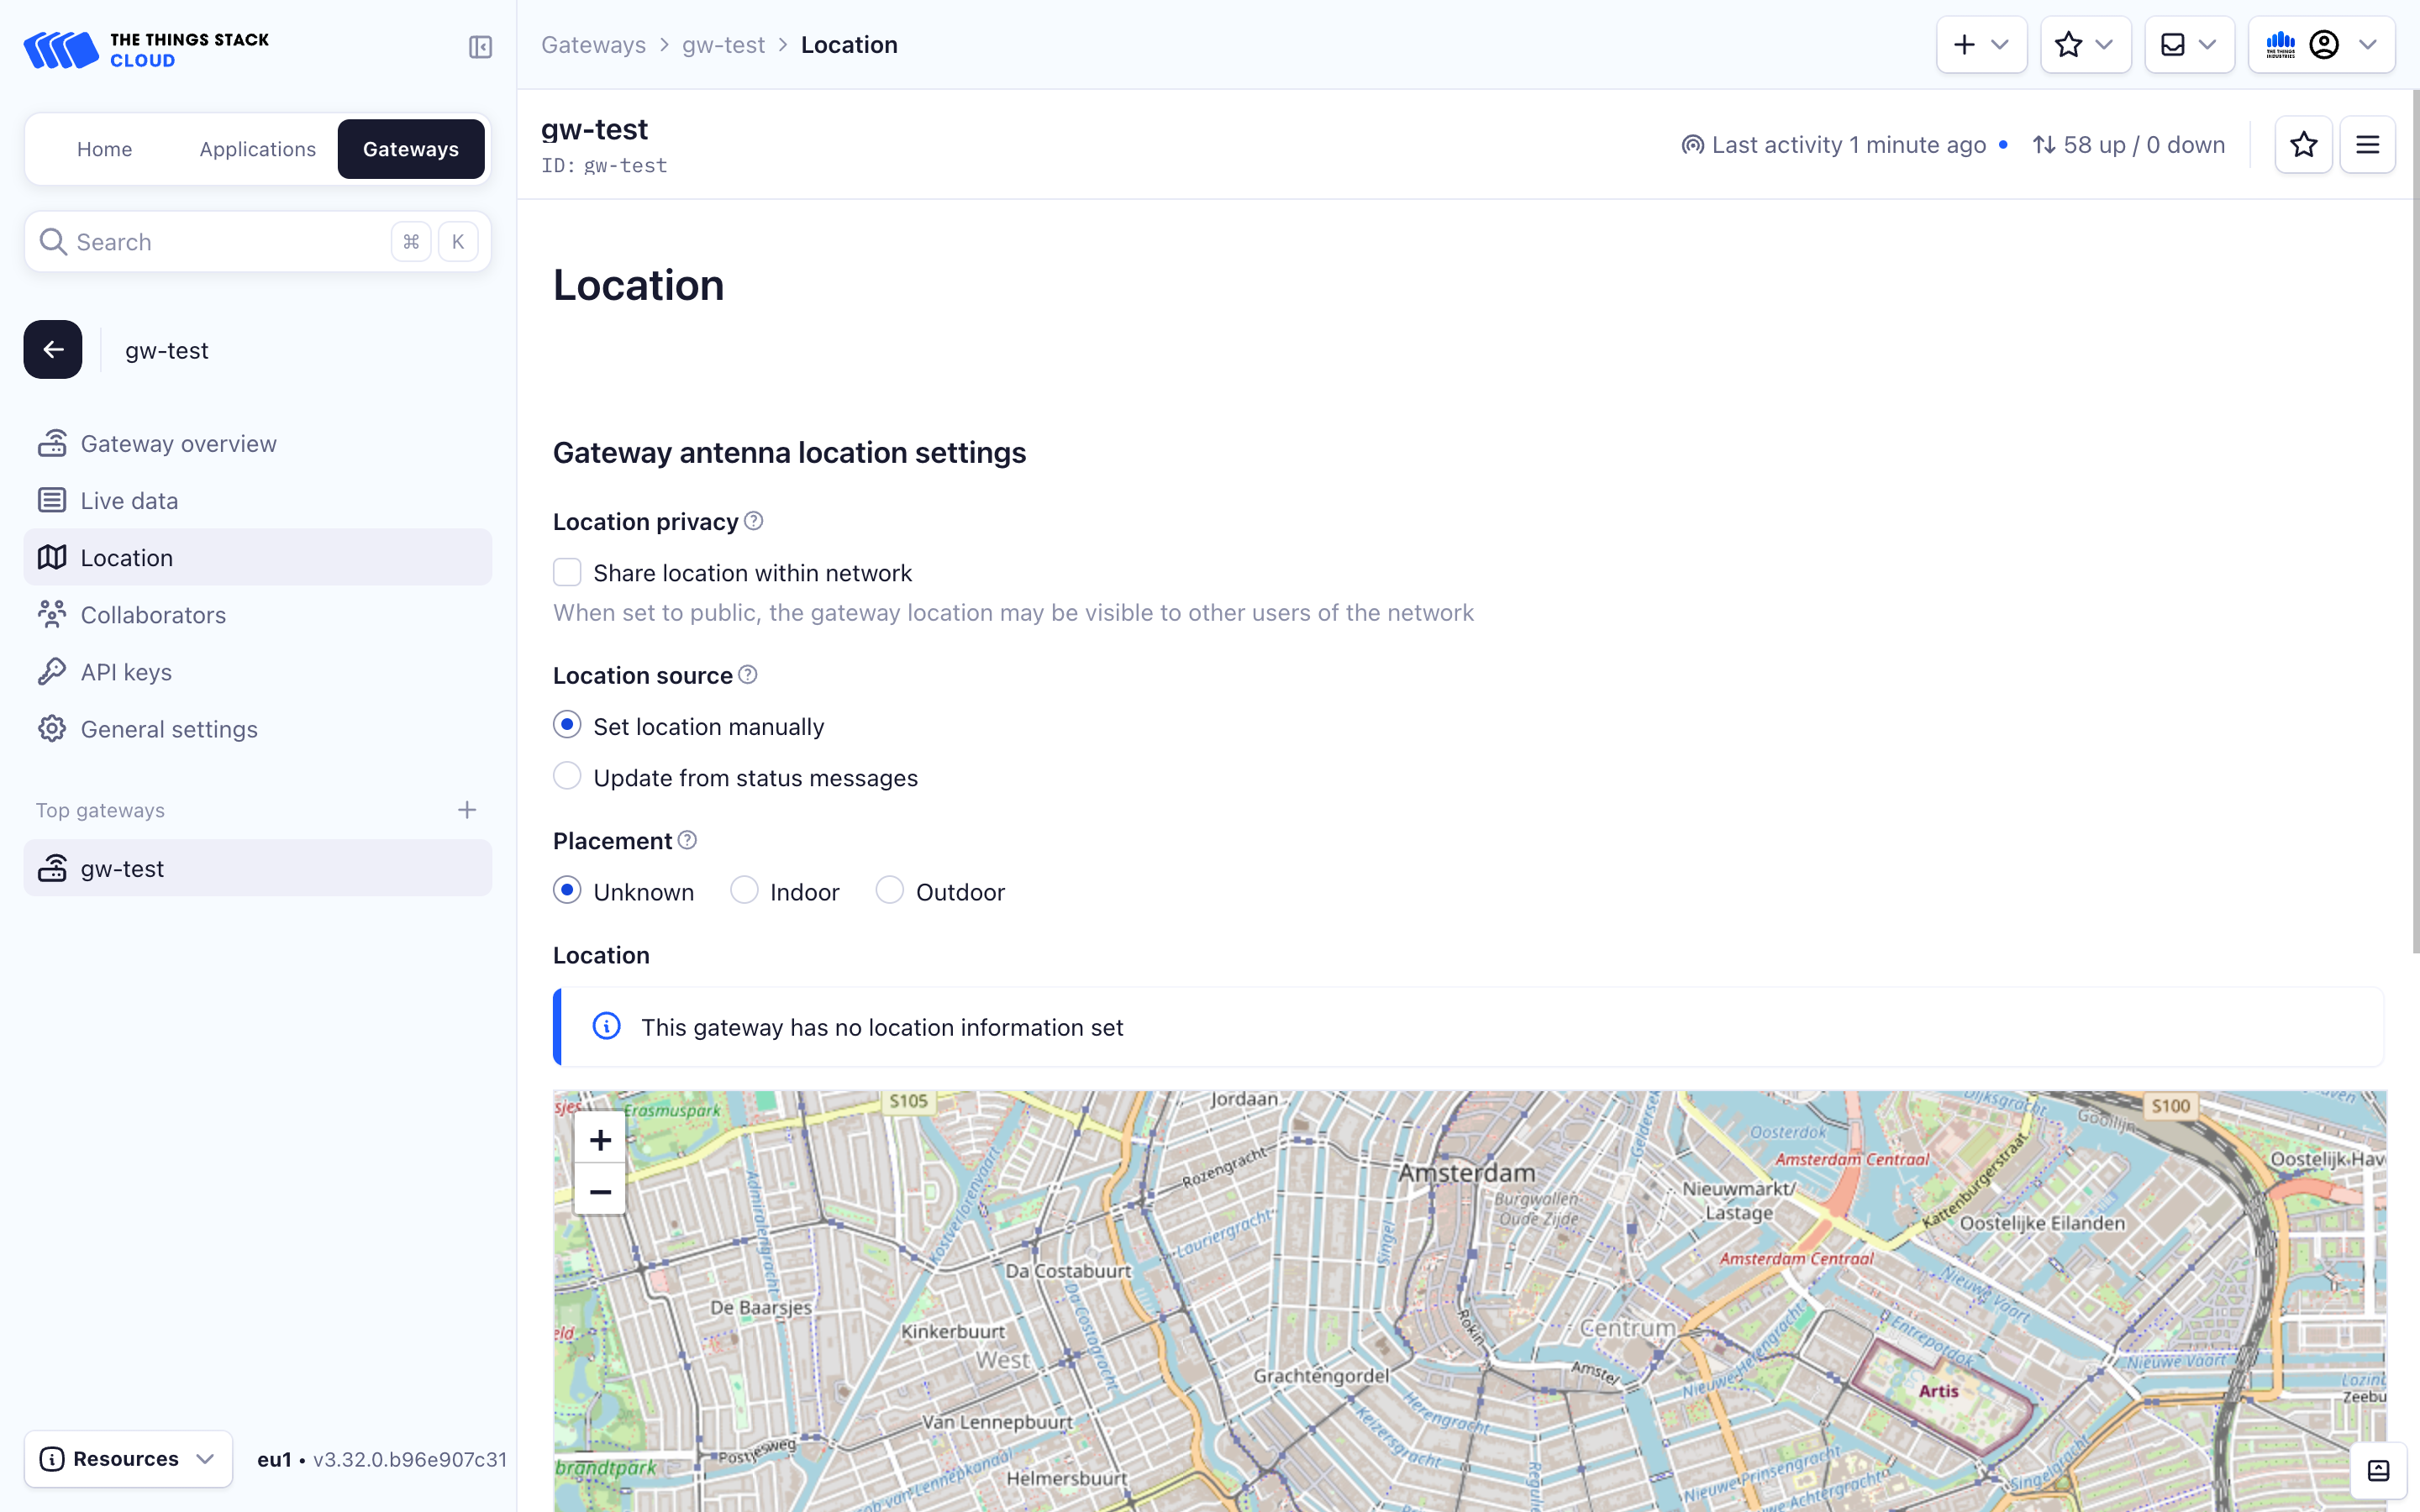
Once you have added your gateway to The Things Stack, you can also set the locations of the gateway antennas.
Add an antenna and set its location with:
LAT="43.84"
LONG="18.32"
ALT="500"
ttn-lw-cli gateways set $GTW_ID \
  --antenna.location.latitude $LAT \
  --antenna.location.longitude $LONG \
  --antenna.location.altitude $ALT \
  --antenna.add \
If you do not mind your gateway’s location to be publicly displayed, append the --location-public flag.
You can also set the gateway location to be updated from various sources with the --antenna.location.source flag. The source of the location data can be the registry, GPS data, results of the LoRa RSSI geolocation, etc.
Use ttn-lw-cli gateways set $GTW_ID --help command to see the full list of the available location sources and other relatable info. Keep in mind that if you set the alternative location source, the location settings you manually set will be overwritten by the automatic updates from that source.
The CLI will return something like:
{
  "ids": {
    "gateway_id": "gtw1"
  },
  "created_at": "2020-05-27T14:43:13.606Z",
  "version_ids": {},
  "auto_update": true,
  "antennas": [
    {
      "location": {
        "latitude": 43.84,
        "longitude": 18.32,
        "altitude": 500,
        "source": "SOURCE_REGISTRY"
      }
    }
  ],
  "location_public": true
}
Details
| Item | Value |
|---|---|
| Endpoint | /api/v3/gateways/{gateway.ids.gateway_id} |
| Request type | PUT |
Example
To set the location of a gateway with ID my-test-gateway on thethings.example.com, first create a JSON file named req.json in the same folder with the following example contents.
{
  "gateway": {
    "antennas": [
      {
        "location": {
          "placement": "PLACEMENT_UNKNOWN",
          "latitude": 48.40627905572619,
          "longitude": 24.851562500000004,
          "altitude": 0,
          "accuracy": 0,
          "source": "SOURCE_REGISTRY"
        }
      }
    ]
  },
  "field_mask": {
    "paths": ["antennas"]
  }
}
The request using cURL is as follows.
curl -X PUT -H "Content-Type: application/json" -H "Authorization: Bearer $API_KEY" \
-d @./req.json \
 https://thethings.example.com/api/v3/gateways/my-test-gateway
{"ids":{"gateway_id":"my-test-gateway","eui":"1111111111111111"},"created_at":"2024-01-09T13:29:22.468006Z","updated_at":"2024-01-09T13:57:17.484187Z","antennas":[{"location":{"latitude":48.40627905572619,"longitude":24.851562500000004,"source":"SOURCE_REGISTRY"}}]}
Keep in mind that if you change the physical location of your gateway, the location update in The Things Stack will take place only after you restart the gateway.
Set Gateway Antenna Gain
A preffered way for adjusting a downlink path gain is setting the gateway antenna gain, instead of changing the gateway Tx power.
The following command will set the gateway antenna gain to 3 dB:
GAIN="3"
ttn-lw-cli gateways set $GTW_ID --antenna.gain $GAIN
The CLI output will be similar to:
{
  "ids": {
    "gateway_id": "gtw1"
  },
  "created_at": "2020-05-27T14:43:13.606Z",
  "version_ids": {},
  "auto_update": true,
  "antennas": [
    {
      "gain": 3,
      "location": {
        "latitude": 43.84,
        "longitude": 18.32,
        "altitude": 500,
        "source": "SOURCE_REGISTRY"
      }
    }
  ],
  "location_public": true
}
Details
| Item | Value |
|---|---|
| Endpoint | /api/v3/gateways/{gateway.ids.gateway_id} |
| Request type | PUT |
Example
To adjust the antenna gain of a gateway with ID my-test-gateway on thethings.example.com, first create a JSON file named req.json in the same folder with the following example contents.
{
  "gateway": {
    "antennas": [
      {
        "gain": 3
      }
    ]
  },
  "field_mask": {
    "paths": ["antennas"]
  }
}
The request using cURL is as follows.
curl -X PUT -H "Content-Type: application/json" -H "Authorization: Bearer $API_KEY" \
-d @./req.json \
 https://thethings.example.com/api/v3/gateways/my-test-gateway
{"ids":{"gateway_id":"my-test-gateway","eui":"1111111111111111"},"created_at":"2024-01-09T13:29:22.468006Z","updated_at":"2024-01-09T14:11:10.062055Z","antennas":[{"gain":3}]}
Keep in mind that the antennas.location object will be cleared if previously set since it’s only possible to set entire antennas object. Combine this with setting the location if both values need to persist.
Once a gateway has been added, get started with Adding Devices and Integrations to process and act on data.
Forwarding Uplinks to Packet Broker
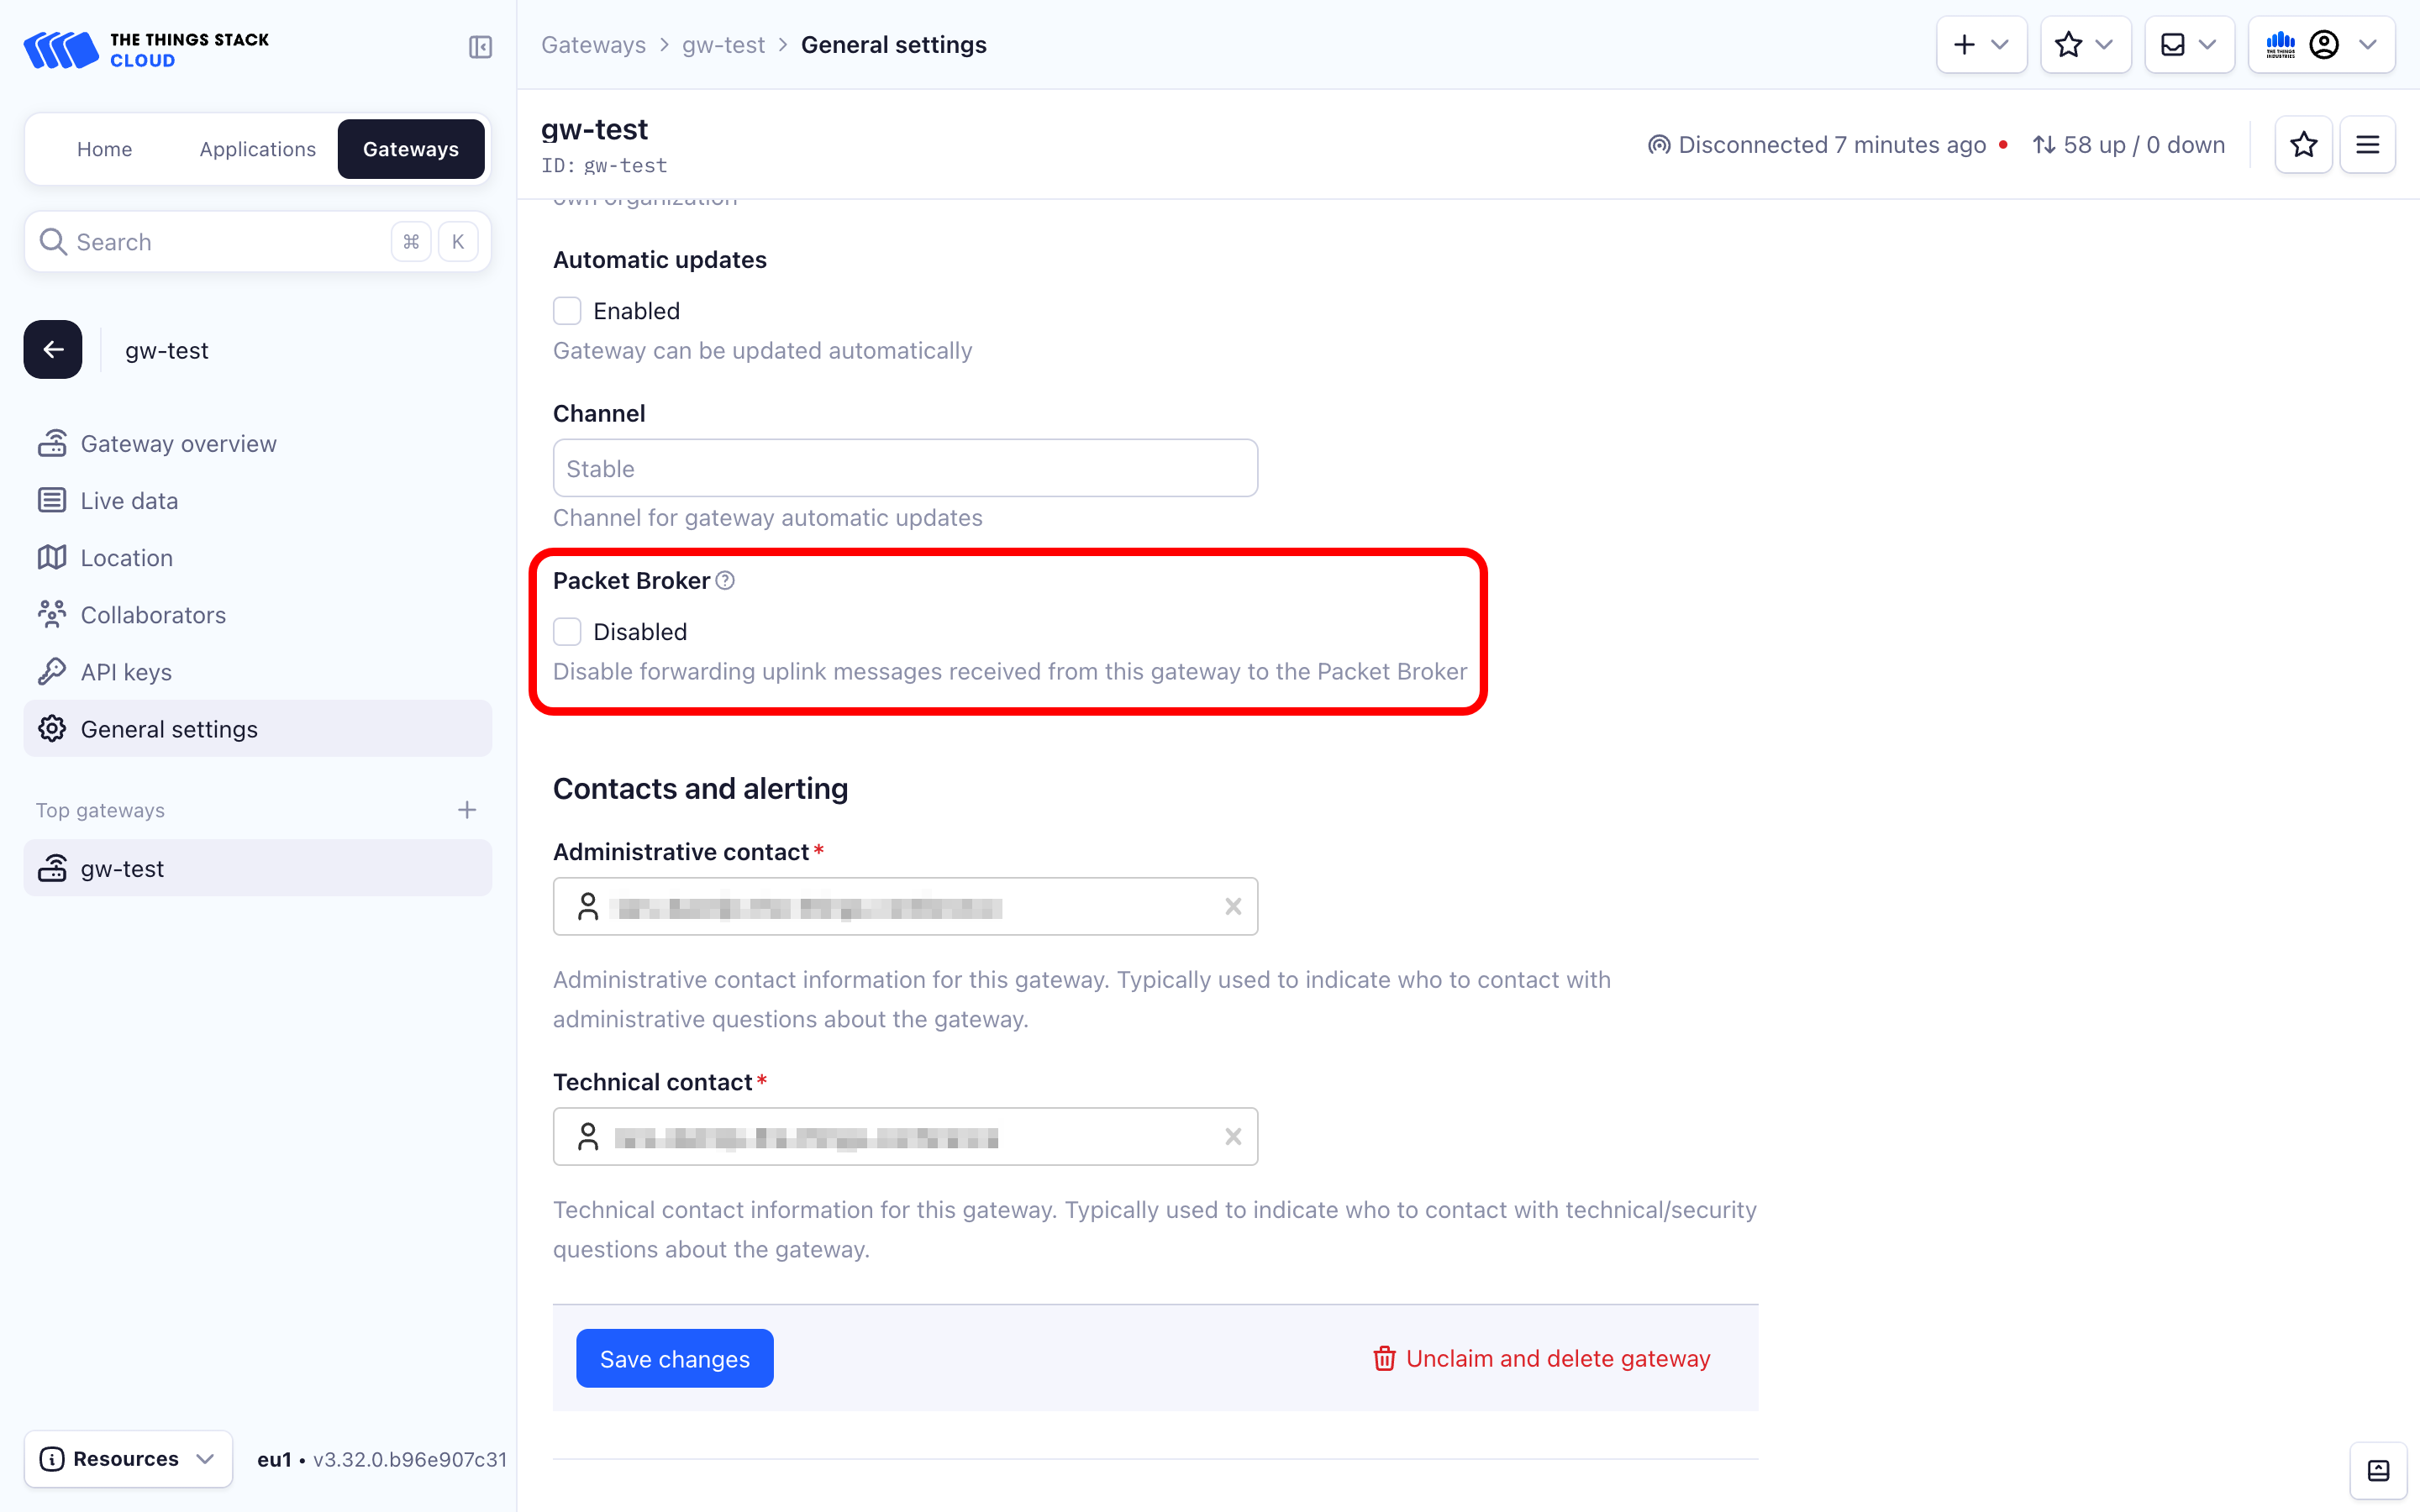
In deployments connected to Packet Broker, you can control if you want uplinks received by your gateway to be forwarded to Packet Broker or not. In these deployments, uplinks received by your gateway are being forwarded to Packet Broker by default, but you can choose to disable this behavior.
To disable forwarding uplink messages from your gateway to Packet Broker in The Things Stack Console, navigate to the General settings tab on the left hand menu in your gateway’s overview, scroll to the bottom of the Basic settings section and tick the Disabled box under Packet Broker option.
To disable forwarding uplink messages from your gateways to Packet Broker using the CLI, use the following command:
ttn-lw-cli gateways set $GTW_ID --disable-packet-broker-forwarding
Details
| Item | Value |
|---|---|
| Endpoint | /api/v3/gateways/{gateway.ids.gateway_id} |
| Request type | PUT |
Example
To disable forwarding to Packet Broker for the gateway my-test-gateway on thethings.example.com, first create a JSON file named req.json in the same folder with the following example contents.
{
  "gateway": {
    "disable_packet_broker_forwarding": true
  },
  "field_mask": {
    "paths": ["disable_packet_broker_forwarding"]
  }
}
The request using cURL is as follows.
curl -X PUT -H "Content-Type: application/json" -H "Authorization: Bearer $API_KEY" \
-d @./req.json \
 https://thethings.example.com/api/v3/gateways/my-test-gateway
{"ids":{"gateway_id":"my-test-gateway","eui":"1111111111111111"},"created_at":"2024-01-09T13:29:22.468006Z","updated_at":"2024-01-09T14:17:19.314981Z","disable_packet_broker_forwarding":true}
Keep in mind that changes will apply only after restarting the gateway.