Over-the-Air-Activation (OTAA) is the secure, scalable way to activate LoRaWAN devices. All commercially available LoRaWAN devices support OTAA, and it is selected by default. This guide explains how to add OTAA devices manually.
The example in this guide covers adding a device using OTAA (the most secure and preferred activation method) and LoRaWAN version MAC V1.0.2 (the most common LoRaWAN version, although newer versions are better and more secure) and RP001 Regional Parameters 1.0.2 revision B. Names and keys may vary slightly for other versions, but the process is the same and any differences are noted.
First, enter a JoinEUI/AppEUI if provided by your manufacturer. If it is not provided by the manufacturer and your device is programmable, you can generate a random one in accordance with the test ranges defined by the IEEE 802 standards or use all zeros, just make sure to program the same value into your device. Then click Confirm.
Enter your DevEUI. This should be provided by your manufacturer for commercial devices. If your device is programmable, you may generate an EUI using the Generate button, and program it in your device.
Note:
Note that the JoinEUI and DevEUI fields will be pre-filled if you scanned your device’s QR code as explained in Onboarding Devices using QR Codes section.If your manufacturer provides an AppKey, enter it. Otherwise, use the Generate button to create one, and program it into your device.
Give your device a unique End device ID. See ID and EUI constraints for guidelines about choosing a unique ID.
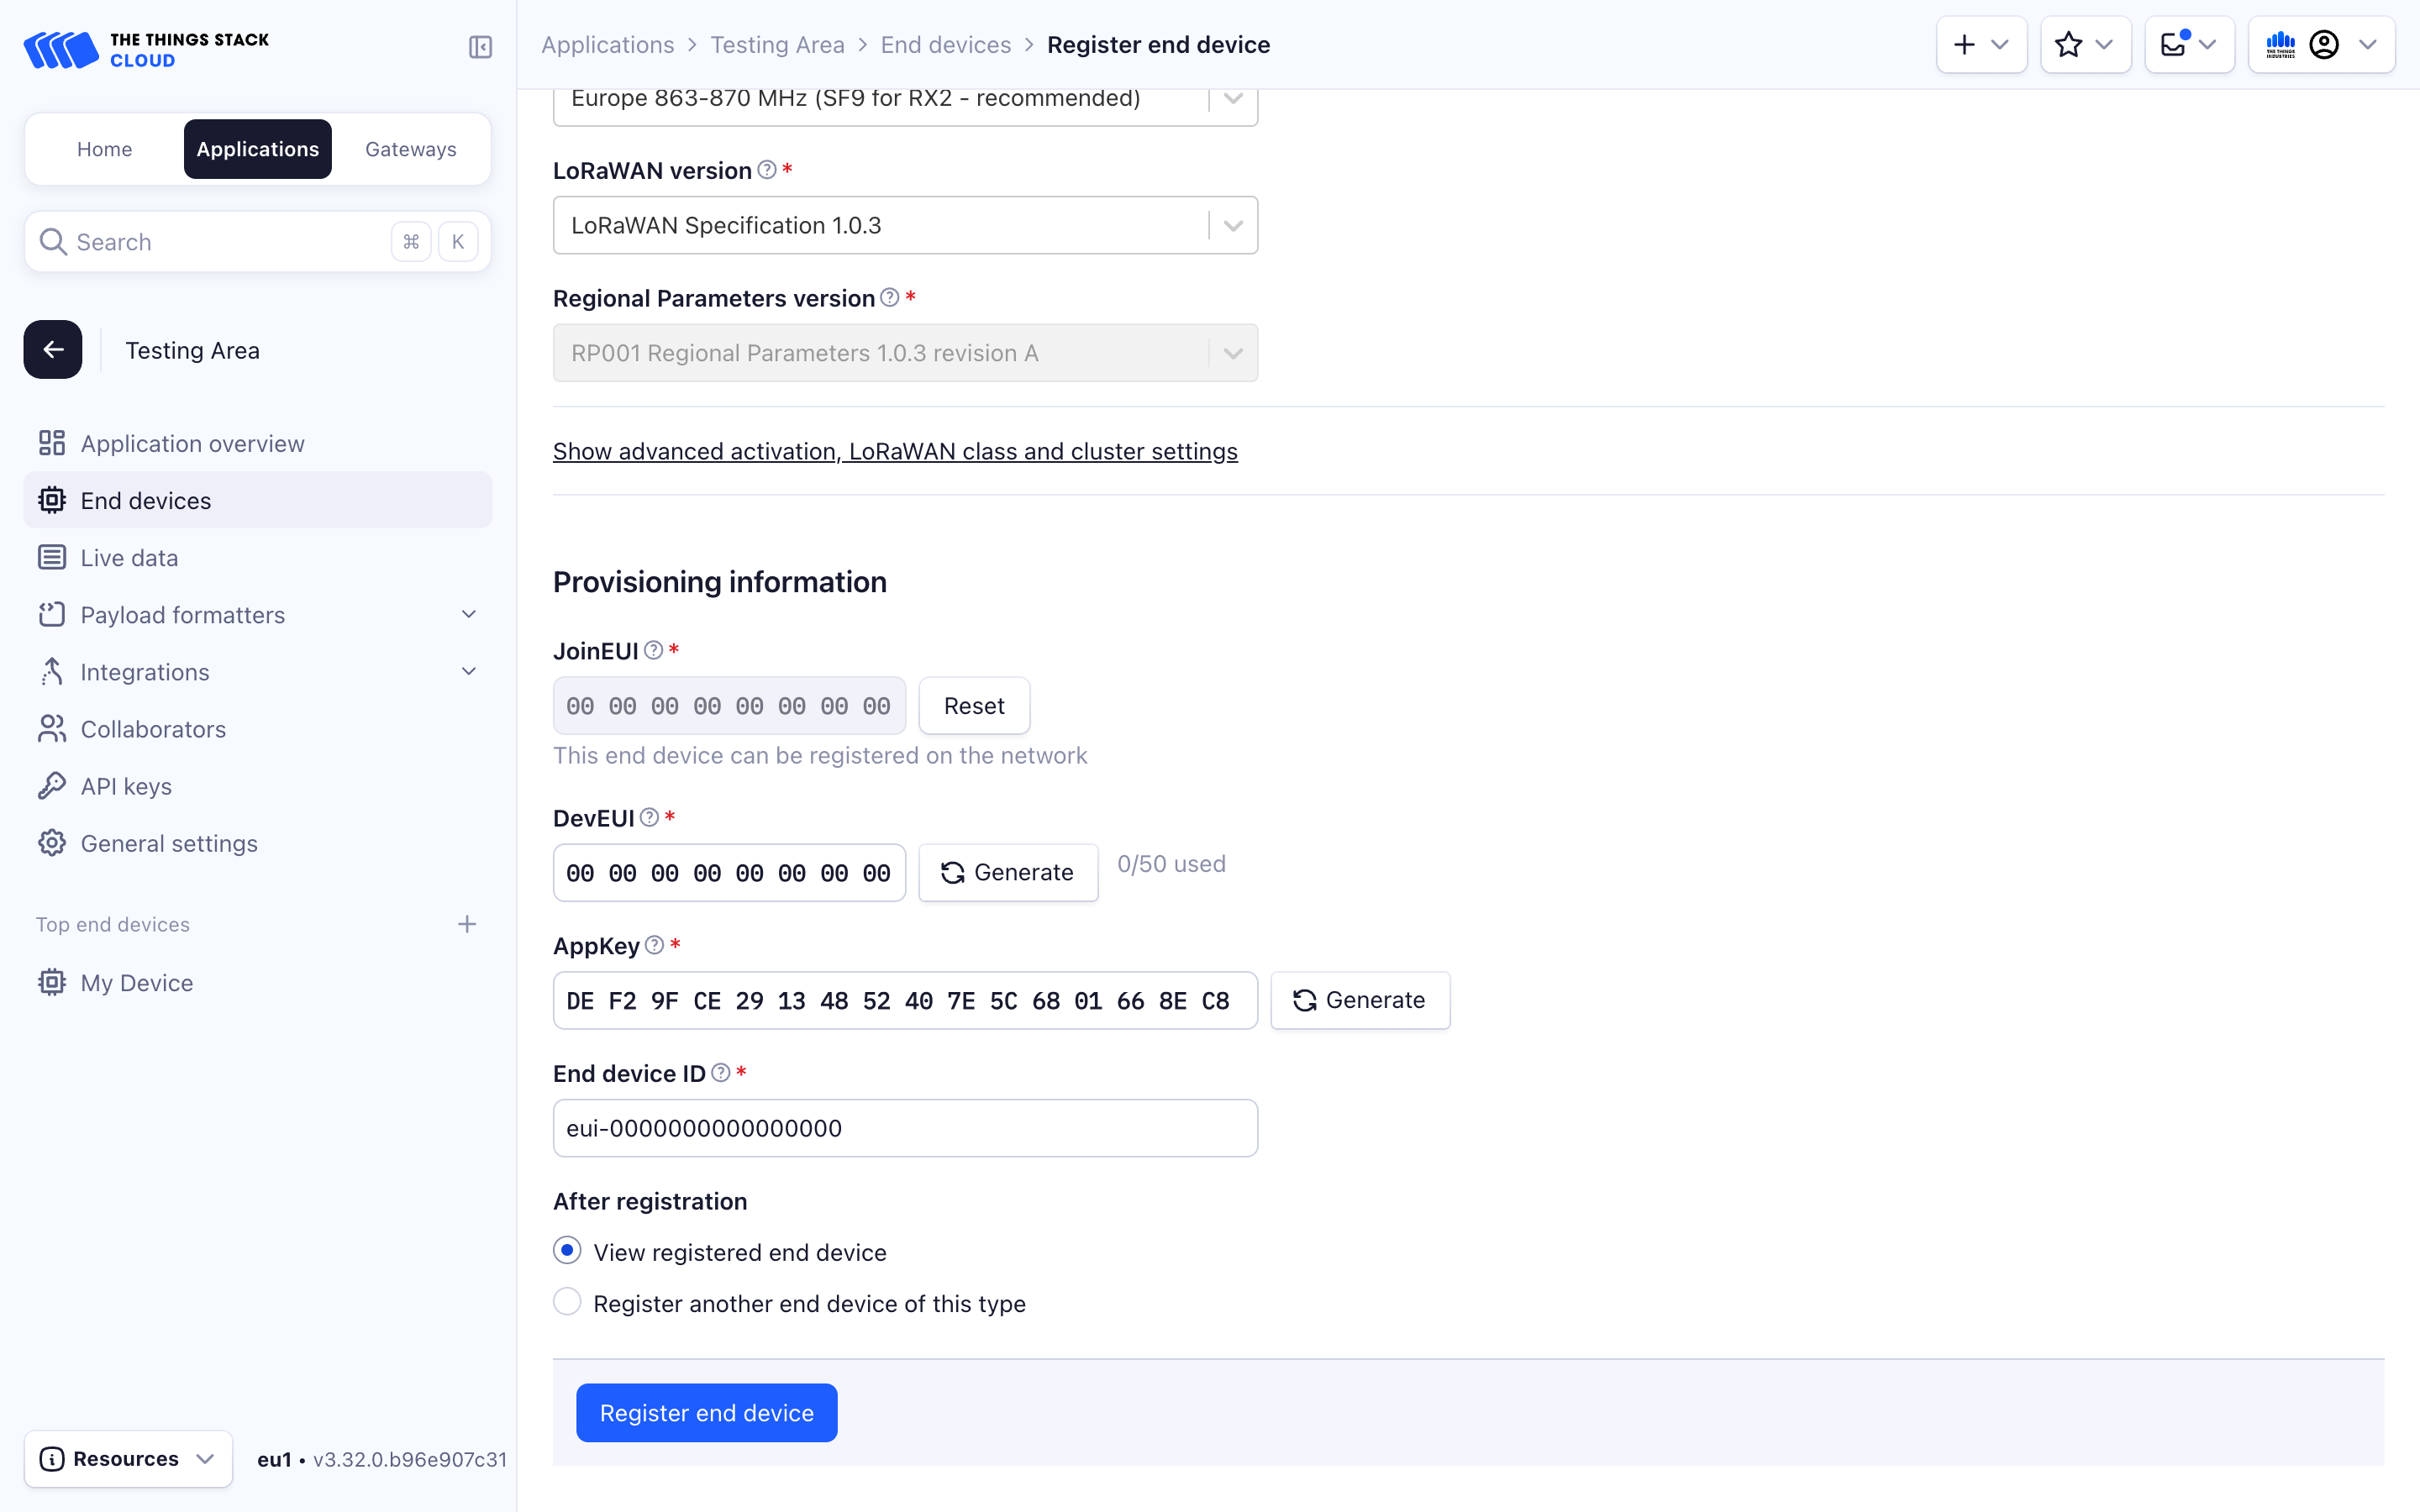
Click Register end device to create the end device.
First, list the available frequency plans and LoRaWAN versions:
ttn-lw-cli end-devices list-frequency-plans
ttn-lw-cli end-devices create --help
We define some user parameters that will be used below:
APP_ID="app1"
DEVICE_ID="dev1"
FREQUENCY_PLAN="EU_863_870"
DEV_EUI="0004A30B001C0530"
APP_EUI="800000000000000C"
APP_KEY="752BAEC23EAE7964AF27C325F4C23C9A"
Make sure to modify these according to your setup.
LoRaWAN 1.0.x:
To create an end device using over-the-air-activation (OTAA):
ttn-lw-cli end-devices create $APP_ID $DEVICE_ID \
  --dev-eui $DEV_EUI \
  --app-eui $APP_EUI \
  --frequency-plan-id $FREQUENCY_PLAN \
  --root-keys.app-key.key $APP_KEY \
  --lorawan-version 1.0.3 \
  --lorawan-phy-version 1.0.3-a
This will create an end device dev1 in application app1 with the EU_863_870 frequency plan, that uses LoRaWAN 1.0.3 MAC version and 1.0.3-a PHY versions. Make sure to replace the LoRaWAN MAC and PHY versions according to your setup.
Please note that the AppEUI is returned as join_eui (The Things Stack uses LoRaWAN 1.1 terminology).
If your device does not have a JoinEUI, you can use the default Join EUI of the Join Server. To use this, leave the --join-eui/--app-eui field empty. The CLI will contact the Join Server and get its default.
If your device does not have a DevEUI, set the --request-dev-eui flag. The CLI will contact the server and fetch a DevEUI.
Warning:
You must either use the value DevEUI/JoinEUI that’s allotted to your device or let the server define these values as described above. Do not use0000000000000000 or other randomly generated values as this is not LoRaWAN compliant and your devices will not be interoperable with other networks in the LoRaWAN ecosystem.
You can also pass --with-root-keys to have root keys generated. In this case, you do not need to specify --root-keys.app-key.key.
The end device should now be able to join the network.
LoRaWAN 1.1.x:
To create an end device using over-the-air-activation (OTAA):
NWK_KEY="01020304050607080102030405060708"
ttn-lw-cli end-devices create $APP_ID $DEVICE_ID \
  --dev-eui $DEV_EUI \
  --app-eui $APP_EUI \
  --frequency-plan-id $FREQUENCY_PLAN \
  --root-keys.app-key.key $APP_KEY \
  --root-keys.nwk-key.key $NWK_KEY \
  --lorawan-version 1.1.0 \
  --lorawan-phy-version 1.1.0-b
This will create an end device dev1 in application app1 with the EU_863_870 frequency plan, that uses LoRaWAN 1.1.0 MAC and 1.1.0-b PHY versions. Make sure you replace these versions according to your setup.
You can also pass --with-root-keys to have root keys generated. In this case, you do not need to specify --root-keys.app-key.key or root-keys.nwk-key.key.
The end device should now be able to join the private network.
The Things Stack stores end device data on the Identity Server, Application Server, Network Server and optionally the Join Server.
Note:
These examples only set a few basic fields. For the full list of customization options, check the linked references.Make sure to follow the same order in creating the devices across the servers.
First, create the device on the Identity Server. Create an is.json file in the same folder.
{
  "end_device": {
    "ids": {
      "device_id": "test-device",
      "dev_eui": "0000000000000011",
      "join_eui": "1111111111111111"
    },
    "join_server_address": "thethings.example.com",
    "network_server_address": "thethings.example.com",
    "application_server_address": "thethings.example.com"
  },
  "field_mask": {
    "paths": [
      "join_server_address",
      "network_server_address",
      "application_server_address",
      "ids.dev_eui",
      "ids.join_eui"
    ]
  }
}
Then make a POST request to the /api/v3/applications/{end_device.ids.application_ids.application_id}/devices end point.
curl -X POST -H "Content-Type: application/json" -H "Authorization: Bearer $API_KEY" \
-d @./is.json \
 https://thethings.example.com/api/v3/applications/my-test-app/devices
{"ids":{"device_id":"test-device","application_ids":{"application_id":"my-test-app"},"dev_eui":"0000000000000011","join_eui":"1111111111111111"},"created_at":"2024-01-10T14:26:18.084008Z","updated_at":"2024-01-10T14:26:18.084009Z","version_ids":{},"network_server_address":"thethings.example.com","application_server_address":"thethings.example.com","join_server_address":"thethings.example.com","lora_alliance_profile_ids":{}}%
Next create the device on the Join Server. Create a js.json file with the following example contents. Note that this is the only server where you should set the device root keys on.
{
  "end_device": {
    "ids": {
      "device_id": "test-device",
      "dev_eui": "0000000000000011",
      "join_eui": "1111111111111111"
    },
    "network_server_address": "thethings.example.com",
    "application_server_address": "thethings.example.com",
    "root_keys": {
      "app_key": {
        "key": "11223344556677881122334455667788"
      }
    }
  },
  "field_mask": {
    "paths": [
      "network_server_address",
      "application_server_address",
      "ids.device_id",
      "ids.dev_eui",
      "ids.join_eui",
      "root_keys.app_key.key"
    ]
  }
}
Make a PUT request to the /api/v3/js/applications/{end_device.ids.application_ids.application_id}/devices/{end_device.ids.device_id} end point.
curl -X PUT -H "Content-Type: application/json" -H "Authorization: Bearer $API_KEY" \
-d @./js.json \
 https://thethings.example.com/api/v3/js/applications/my-test-app/devices/test-device
{"ids":{"device_id":"test-device","application_ids":{"application_id":"my-test-app"},"dev_eui":"0000000000000011","join_eui":"1111111111111111"},"created_at":"2024-01-10T14:30:01.564243Z","updated_at":"2024-01-10T14:30:01.564243Z","network_server_address":"thethings.example.com","application_server_address":"thethings.example.com","root_keys":{"app_key":{"key":"11223344556677881122334455667788"}}}
Now create the device on the Network Server. Create an ns.json file with the following example contents. Note that you need to set the correct LoRaWAN settings for the device on the Network Server.
{
  "end_device": {
    "supports_join": true,
    "lorawan_version": "1.0.2",
    "ids": {
      "device_id": "test-device",
      "dev_eui": "0000000000000011",
      "join_eui": "1111111111111111"
    },
    "lorawan_phy_version": "1.0.2-b",
    "frequency_plan_id": "EU_863_870_TTN"
  },
  "field_mask": {
    "paths": [
      "supports_join",
      "lorawan_version",
      "ids.device_id",
      "ids.dev_eui",
      "ids.join_eui",
      "lorawan_phy_version",
      "frequency_plan_id"
    ]
  }
}
Make a PUT request to the /api/v3/ns/applications/{end_device.ids.application_ids.application_id}/devices/{end_device.ids.device_id} end point.
curl -X PUT -H "Content-Type: application/json" -H "Authorization: Bearer $API_KEY" \
-d @./ns.json \
 https://thethings.example.com/api/v3/ns/applications/my-test-app/devices/test-device
{"ids":{"device_id":"test-device","application_ids":{"application_id":"my-test-app"},"dev_eui":"0000000000000011","join_eui":"1111111111111111"},"created_at":"2024-01-10T14:34:54.493279Z","updated_at":"2024-01-10T14:34:54.493279Z","lorawan_version":"MAC_V1_0_2","lorawan_phy_version":"PHY_V1_0_2_REV_B","frequency_plan_id":"EU_863_870_TTN","supports_join":true}
Now create the device on the Application Server. Create an as.json file with the following example contents.
{
  "end_device": {
    "ids": {
      "device_id": "test-device",
      "dev_eui": "0000000000000011",
      "join_eui": "1111111111111111"
    }
  },
  "field_mask": {
    "paths": ["ids.device_id", "ids.dev_eui", "ids.join_eui"]
  }
}
Make a PUT request to the /api/v3/as/applications/{end_device.ids.application_ids.application_id}/devices/{end_device.ids.device_id} end point.
curl -X PUT -H "Content-Type: application/json" -H "Authorization: Bearer $API_KEY" \
-d @./as.json \
 https://thethings.example.com/api/v3/as/applications/my-test-app/devices/test-device
{"ids":{"device_id":"test-device","application_ids":{"application_id":"my-test-app"},"dev_eui":"0000000000000011","join_eui":"1111111111111111"},"created_at":"2024-01-10T14:37:56.826742Z","updated_at":"2024-01-10T14:37:56.826742Z"}%